隨著生命的不同階段
需要做的事情都不相同
以上是廢話
不過
這道理在程式的世界也是一樣
Component 也有它的生命週期
這篇的目標就是要
了解組件的生命週期以及每個階段可以做的事情
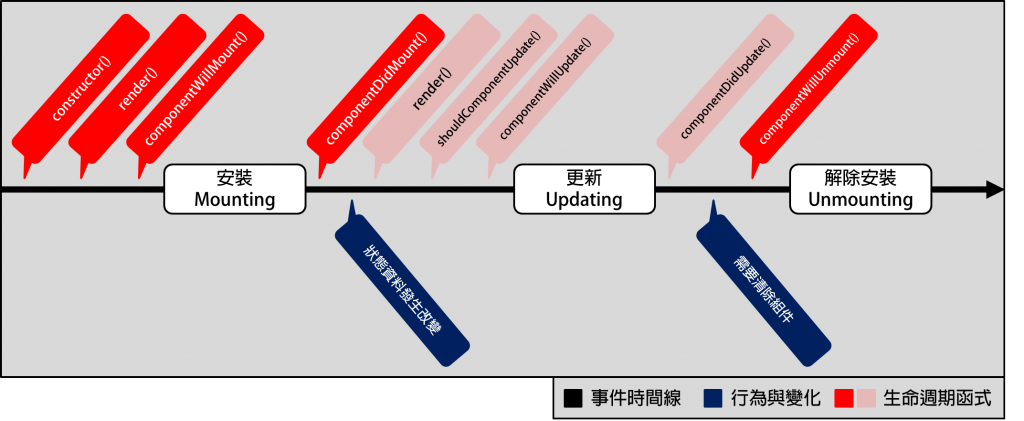
組件的生命週期可以由幾個事件來做區分
在這些事件中分別都有一些函式(lifecycle methods)
可以透過覆寫(Override)讓組件在程序(Process)過程中執行一些程式
這些生命週期的函式有一個共同的命名規則
在函式名稱裡有 will 就表示在事件之前會執行
did 則表示是在事件發生之後
下面來逐個說明:
從組件的建構到渲染出物件的過程就稱作 安裝
在這段過程共有 4個 函式會被呼叫
依序是:
constructor()
render()
componentWillMount()
componentDidMount()
constructor 是組件安裝前第一個執行的函式
當他實作(implement)React.Component的子類別(subclass)時
再設定與使用任何狀態之前
必須先呼叫super(props)
否則會導致this.props未定義(undefined)的錯誤產生
componentWillMount
按照命名規則可以知道他是在 安裝前 會執行的函式
在安裝的事件發生時會立刻執行這個函式
如果在這裡面更改狀態值
將 不會 額外再多渲染一次這個組件
render是 React 必須寫出來的函式
他可以有五種不同的回傳(return)值 分別是:
ReactDOM.createPortal()創建,可以在既有節點下新增子節點且不受父組件屬性限制。componentDidMount會在組件安裝完成後被執行
這個時候組件DOM節點已經被產生出來
所以在這裡對DOM提出需求(require)或訂閱(subscription)
就可以確實找到熱騰騰剛剛安裝出來的新組件!
在組件的 state 或 props 資料發生改變的時候
會觸發 **更新 ** 事件
在組件更新的過程有 5個 函式會被呼叫
依序是:
render()
componentWillReceiveProps()
shouldComponentUpdate()
componentWillUpdate()
componentDidUpdate()
componentWillReceiveProps是在一個已經產生的組件收到新的props的時候被呼叫
如果需要透過更新狀態來改變props
就可以覆寫這個函式並且呼叫this.setState()來達成
儘管props沒有改變componentWillReceiveProps也可能會因為上層組件(parent component)而被呼叫導致額外的重新渲染
所以需要特別注意
shouldComponentUpdate是用來告訴 React 這個組件需不需要被重新渲染(rerender)
預設是只要有變動就會自動重新渲染
但是可以透過回傳布林值(bool)來進行設定
若讓他回傳 false 組件就不會重新渲染
但是在第一次渲染以及呼叫forceUpdate()的時候不會被呼叫
componentWillUpdate()是在重新渲染前會執行的函式
在這裡可以對即將執行的程序做準備
但在第一次渲染組件時不會被呼叫
如果shouldComponentUpdate回傳了 false
那麼componentWillUpdate將不會被呼叫
在這個函式裡面也不能夠更改狀態(state)
如果需要應該改為在componentWillReceiveProps中執行
componentDidUpdate()在重新渲染後執行
第一次渲染完成不會被呼叫
這個函式被呼叫時表示DOM已經更新完成
若shouldComponentUpdate回傳了 false
那麼componentDidUpdate也不會被呼叫
組件要解除安裝前componentWillUnmount()會被呼叫
所有與組件相關必須被清除的資料
要在這個函式中執行
避免組件解除安裝後導致錯誤發生
componentDidCatch()主要功能是當錯誤發生時
顯示錯誤發生前的 UI 並且記錄這些錯誤取代 DOM 架構崩潰
透過錯誤處理可以防止未知的例外狀況發生導致崩潰componentDidCatch只能處理 DOM 架構該節點以下的組件
若發生狀況的組件不在這個架構底下將無法被偵測及處理
需要特別注意
理解了他們之後
接下來要說明怎麼使用
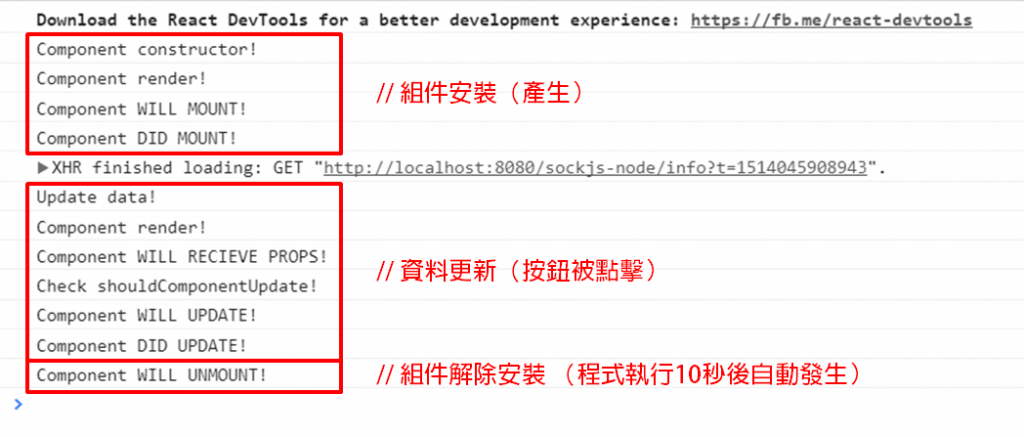
這份程式碼會安裝、更新並解除安裝一個組件
透過每個函式內紀錄資訊來了解這些生命週期函式的運作
import React from 'react';

class App extends React.Component {
   constructor(props) {
      console.log('Component constructor!');
      super(props);

      this.state = {
         data: 0
      }
      this.setNewNumber = this.setNewNumber.bind(this)
   };
   setNewNumber() {
      console.log('Update data!');
      this.setState({data: this.state.data + 1})
   }
   render() {
      console.log('Component render!');
      return (
         <div>
            <button onClick = {this.setNewNumber}>INCREMENT</button>
            <Content myNumber = {this.state.data}></Content>
         </div>
      );
   }
}
class Content extends React.Component {
   componentWillMount() {
      console.log('Component WILL MOUNT!')
   }
   componentDidMount() {
      console.log('Component DID MOUNT!')
   }
   componentWillReceiveProps(newProps) {
      console.log('Component WILL RECIEVE PROPS!')
   }
   shouldComponentUpdate(newProps, newState) {
      console.log('Check shouldComponentUpdate!');
      return true;
   }
   componentWillUpdate(nextProps, nextState) {
      console.log('Component WILL UPDATE!');
   }
   componentDidUpdate(prevProps, prevState) {
      console.log('Component DID UPDATE!')
   }
   componentWillUnmount() {
      console.log('Component WILL UNMOUNT!')
   }
   render() {
      return (
         <div>
            <h3>{this.props.myNumber}</h3>
         </div>
      );
   }
}
export default App;
import React from 'react';
import ReactDOM from 'react-dom';
import App from './App.jsx';

ReactDOM.render(<App/>, document.getElementById('app'));

// 設定10秒(10000 milliseconds)後解除安裝組件
// setTimeout() 為 javascript 函式,用於設定特定時間後觸發特定行為。
setTimeout(() => {
   ReactDOM.unmountComponentAtNode(document.getElementById('app'));}, 10000);
執行結果:
好的
以上是組件的生命週期的相關介紹
最後用一張圖片總結今天的學習筆記:
- Eva Vue.js 30天隨身包
- Ben那些年,我們一起錯過的Javascript
- Ray激戰ReactJS 30天
Day9 end
by 瑞Ray (゚∀゚)
