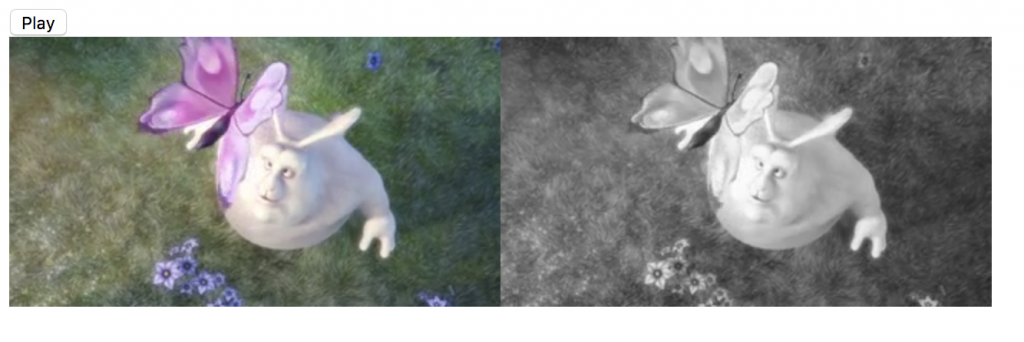
動畫其實就是把一張張靜態圖片連續播放,讓人看到感覺像是動畫
我們可以每次繪圖時改變內容大小,形狀顏色等等來達成動畫效果
甚至可以使用video元素作為來源,持續性地把畫面繪至canvas
然後通過修改canvas來製作些影片特料,例如濾鏡
至於重繪這個動作該如何實現我們有兩個方法
全域的setInterval以及requestanimationframe方法
動畫、繪圖、影片等requestanimationframe比setInterval好得多,在此僅建議使用requestanimationframe
原因是其方法requestanimationframe針對播放時間點或是對裝置處理的廖律上都優於setInterval,且setInterval其實是每隔
一個時間將callback function丟進event queue,而不是真正在一定的頻率上執行該函式。

這個範例比較長一些
可以clone這個範例的GitHub Demo
或是手動建立以下3個檔案,並放於同一目錄
controls的部分最右邊有下載可以點擊。<!DOCTYPE html>
<html lang="en">
<head>
<meta charset="UTF-8">
<meta name="viewport" content="width=device-width, initial-scale=1.0">
<meta http-equiv="X-UA-Compatible" content="ie=edge">
<title>Canvas Animation</title>
<style>
/*
* 這裡故意將video的display設為none
* 從此可知即便video是被隱藏的情況下
* js一樣可以抓到video play 當下的影像。
*/
video {
display: none;
}
</style>
</head>
<body>
<div>
<button>Play</button>
</div>
<video id="demoVideo" src="/mov_bbb.mp4"></video>
<script src="/app.js"></script>
</body>
</html>
// 我們將使用requestAnimationFrame方法來連續繪製video影像到canvas上
// 這裡先建立全域方法reqAnimation, 並指向當前裝置的requestAnimationFrame方法
window.reqAnimation = window.mozRequestAnimationFrame
    || window.webkitRequestAnimationFrame
    || window.msRequestAnimationFrame
    || window.requestAnimationFrame

// Canvas 工廠函式
function Canvas(width, height) {
    const canvas = document.createElement('canvas')
    const ctx = canvas.getContext('2d')
    canvas.width = width
    canvas.height = height
    return [canvas, ctx]
}

// 取得video元素
const video = document.getElementById('demoVideo')
video.addEventListener('play', e => play())

// 取得控制video的button
document.querySelector('button')
    .addEventListener('click', event => {
        canvas1.width = canvas2.width = video.videoWidth
        canvas1.height = canvas2.height = video.videoHeight
        video.paused == false ? video.pause() : video.play()
    })

// 建立 canvas1, canvas2 並插入body
const [canvas1, ctx1] = Canvas(video.width, video.height)
document.body.appendChild(canvas1)

const [canvas2, ctx2] = Canvas(video.width, video.height)
document.body.appendChild(canvas2)

// 當video元素觸發play事件時開始執行
function play() {
    // 繪圖
    computeFrame(video, ctx1, ctx2)
    // 如果 video暫停, 或是已經播放完畢則停止繪圖
    if (video.paused || video.ended) return
    reqAnimation(play)
}

// 圖像繪製
function computeFrame(video, ctx, ctx2 = null) {
    const width = video.videoWidth
    const height = video.videoHeight

    // 這裡使用 vicdeo為來源,將影像化在ctx上
    ctx.drawImage(video, 0, 0, width, height)

    // 如果沒定義ctx2 在繪製完ctx後直接回傳。
    if (!ctx2) return

    // 如果有指定ctx2, 代表要畫另一個
    // 在這邊以灰階做範例

    // 取得ctx 當前像素
    const imageData = ctx.getImageData(0, 0, width, height)
    const ctxBuffer = imageData.data

    // 取灰階值buff
    let buf, r, g, b, avg
    for (let i = 0; i < ctxBuffer.length; i += 4) {
        buf = ctxBuffer
        r = buf[i]
        g = buf[i + 1]
        b = buf[i + 2]
        avg = (r + g + b) / 3
        buf[i] = buf[i + 1] = buf[i + 2] = avg
    }

    // 更新到ctx2上
    ctx2.putImageData(imageData, 0, 0)
}
這個範例展示了如何將video影像繪至canvas1
另外我們同時可以再把這個canvas1當成影像處理來源
在繪製canvas2呈現出我們想要效果
W3School HTML5 Video
MDN Manipulating video using canvas
