每日一句來源:Daily English
A great secret of success is to go through life as a man who never gets used up. -- 成功的祕訣是:經歷人生,就像一個永遠不會疲憊的人。
透過Authentication Triggers,我們可以當使用者建立時執行我們想做的事情。
Authentication Triggers觸發的時機只有有兩個
| 方法 | 功能 |
|---|---|
onCreate() |
當建立時觸發 |
onDelete() |
當刪除時觸發 |
我們依序實做看看~
建立時觸發
import * as functions from 'firebase-functions';
import * as admin from 'firebase-admin';

export const userCreated = functions.auth.user()
    .onCreate((event) => {
        console.log('新增使用者');

        const user = event.data;

        return user;
    });
其中event.data的屬性如下
interface UserRecord {
  uid: string;
  email: string;
  displayName: string;
  emailVerified: boolean;
  phoneNumber: string;
  photoURL: string;
  disabled: boolean;
  metadata: admin.auth.UserMetadata; //
  providerData: admin.auth.UserInfo[];
  passwordHash?: string;
  passwordSalt?: string;
  customClaims?: Object;

  toJSON(): Object;
}
實際得到的資料如下
{
  "displayName": "名稱",
  "email": "信箱",
  "metadata": {
    "creationTime": "2018-01-09T06:55:09Z",
    "lastSignInTime": "2018-01-09T06:55:09Z"
  },
  "photoURL": "照片",
  "providerData": [
    {
      "displayName": "名稱",
      "email": "信箱",
      "photoURL": "照片",
      "providerId": "facebook.com",
      "uid": "1698238796864997"
    }
  ],
  "uid": "W4baQzIVRKZ6Nu5QGPDnFwZKrqq1"
}
注意providerData是一個陣列,裡面的providerId給的正是使用者認證的單位
筆者測試過後回傳結果如下:
| 單位 | 回傳結果 |
|---|---|
| facebook.com | |
| google.com | |
要注意若是來自email,會回傳一個undefined,因此我們在使用前要加上判斷 |
實做如下
import * as functions from 'firebase-functions';
import * as admin from 'firebase-admin';

export const userCreated = functions.auth.user()
  .onCreate((event) => {
      console.log('新增使用者');
      const user = event.data;

      const type = user.providerData ? user.providerData[0].providerId : 'email';

      const usersRef = admin.firestore().collection('users');

      return usersRef.doc(user.uid).set({
          uid: user.uid,
          email: user.email,
          displayName: user.displayName || null,
          photoURL: user.photoURL || null,
          lastSignInTime: user.metadata.lastSignInTime || null,
          creationTime: user.metadata.creationTime || null,
          type: type
      });
  });
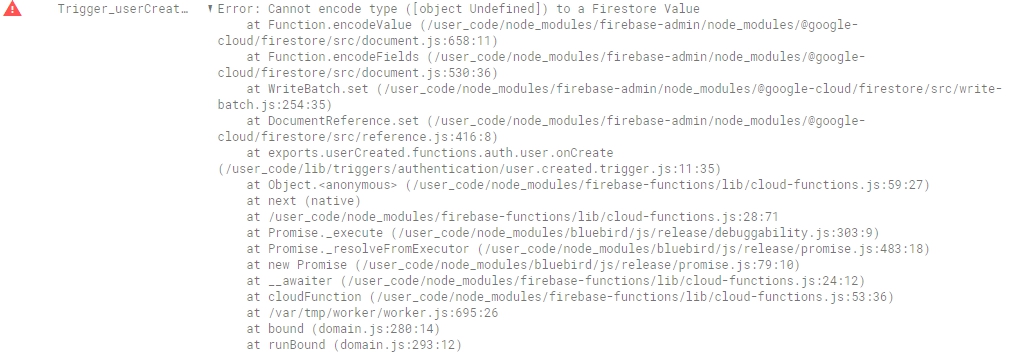
注意,在admin.firestore()裡面,我們不能存入undefined的數值,若數值是undefined寫入是會失敗的,你會看到類似以下的錯誤,因此我們要給預設值為null或是在前面先做判斷。
刪除時觸發
import * as functions from 'firebase-functions';
import * as admin from 'firebase-admin';

export const userDeleted = functions.auth.user()
    .onDelete((event) => {
        console.log('刪除使用者');
        const uid = event.data.uid;
        const usersRef = admin.firestore().collection('users');

        return usersRef.doc(uid).update({
            isDeleted: true
        }).catch(err => {
            console.error('user not exist!', uid)
            return false;
        });
    });
回到index.ts加上這兩個Trigger
// authentication
export const Trigger_userCreated = userCreated;
export const Trigger_userDeleted = userDeleted;
npm run deply
接著來到管理介面直接新增一個使用者看看,記得要輸入正確的信箱格式,你會發現我們的資料確實被寫入了!
接著回到Angular專案中,把signInUpBySocialMedia的後續寫入資料庫的行為註解,以及上面登入後的訂閱也註解掉來測試登入。
    // this._afAuth.authState
    //   // .do(() => this._block.block('登入中'))
    //   .switchMap(user => {
    //     return this.updateUser(user);
    //   })
    //   .switchMap(key => this.userHandler.document<UserModel>(key).get())
    //   .subscribe(user => {
    //     // user.ref.collection('rooms').get().then((x) => console.dir(x));
    //     // console.log(user);
    //     this._block.unblock();
    //     this.returnUrl(user);
    //     this.user = user;
    //     this.currentUser$.next(user);
    //   });

  private signInUpBySocialMedia(provider, type, isSignUp = false) {
    this.storeUrl();

    return Observable.fromPromise(this._afAuth.auth.signInWithPopup(provider))
      // .switchMap(result => {
      //   const user = result.user;
      //   return this.addUser(user, type);
      // })
      .catch(err => this.ErrorHandler(err, isSignUp ? '註冊失敗' : '登入失敗'));
  }
到store介面,我們可以確定我們的資料有寫入了,這代表我們的這段trigger確實有正常運作了。
在管理介面刪除使用者,我們也會發現delete也有正常執行了。
注意,筆者本來用一個檔案放了兩個方法時,結果第一個方法會不正常執行,我想可能是firebase搭配Typescript編譯後的問題,所以目前筆者建議每個方法都要獨立檔案存在才行,一來解決問題,二來我們的程式碼可以分離開來,易於維護!
接著我們實作註冊寄信的功能,在使用者註冊後,會發送驗證信件給使用者。
接著我們寄信,這裡使用簡單的gmail做寄信的功能,在使用gmail寄信前,我們要去帳號管理中心降低我們帳號的安全性,注意開通之後要等待大概幾分鐘在測試
import { KEYs } from '../../keys/keys';

export const userCreated = functions.auth.user()
  .onCreate((event) => {
    ...

    return usersRef.doc(user.uid).set({
      uid: user.uid,
      email: user.email,
      displayName: user.displayName || null,
      photoURL: user.photoURL || null,
      lastSignInTime: user.metadata.lastSignInTime || null,
      creationTime: user.metadata.creationTime || null,
      type: type
    }).then(u => {

      const options: nodemailer.SendMailOptions = {
        from: '"OnFireChat" <onfirechat@gmail.com>',
        to: user.email,
        subject: '歡迎來到 OnFireChat ! 這是一封確認信',
        text: '歡迎來到OnFireChat這是一封確認信!'
      };

      return nodemailer.createTransport({
        service: 'Gmail',
        auth: {
          user: KEYs.user, // 你的帳號
          pass: KEYs.pass // 你的密碼
        }
      }).sendMail(options);
    }).catch(err => {
      console.log('send fail', err);
      return false;
    });
  });
寄信基本方法如上,詳細我們可以參考nodemailer 的API
最後我們測試看看寄信功能,你應該會看到以下的錯誤: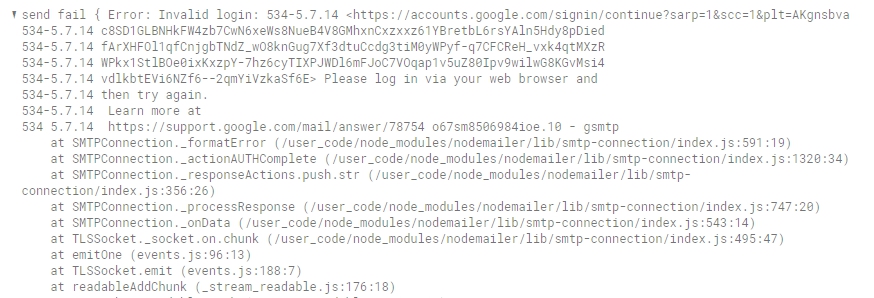
這是代表這個裝置並不被允許,我們要到Google帳號中心做調整
https://myaccount.google.com/device-activity
允許那台不明的裝置(你要確定時間是正確的,不是真的被盜了-0-)
接著我們把使用者刪除,在測試一次登入!我們會發現信有寄出去了
我們也能透過其他發信的機構來做發信,像是比較知名的:
https://www.mailjet.com
https://www.mailgun.com/
https://sendgrid.com
有興趣的朋友可以自己實做看看~
另外這裡分享另一個設定functions的環境參數的方法,就像我們在node的環境中的env很類似
我們可以在專案底下輸入以下
firebase functions:config:set gmail.email="myusername@gmail.com" gmail.password="secretpassword"
接著我們會看到以下
Please deploy your functions for the change to take effect by running firebase deploy --only functions
這代表當我們真正deploy上去後才會真的修改雲端的參數,我們先不deploy
修改剛剛的寄信的區塊,透過config來取得參數
const gmailEmail = functions.config().gmail.email;
const gmailPassword = functions.config().gmail.password;
return nodemailer.createTransport({
  service: 'Gmail',
  auth: {
    user: gmailEmail,
    pass: gmailPassword
  }
}).sendMail(options);
這樣就能正確的取得號密碼了,且我們的帳號密碼不會保留在任何檔案裡面。
想要查看config的話可以輸入以下
firebase functions:config:get
可以查看當前的config為何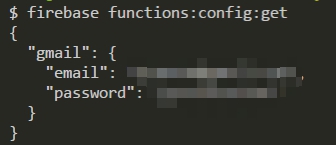
最後我們在deploy上去再來觀看trigger是否運作正常~
今天我們再次瞭解到cloud function power的地方,透過trigger自動去發信給註冊人,讓我們的邏輯能統一在cloud之中,並且透過nodemailer搭配gmail來發信,可說是相當便利,但是不建議使用gmail來當作方信單位,建議只有在測試的時候使用。如此一來不管任何使用者透過任何方法註冊,我們都能使用統一的邏輯,讓使用者能順利進入到系統中,進一步降低了我們App的處理,讓處理都擺在cloud,並且我們知道了怎麼使用config來設定相關的系統參數,讓我們的安全性又更安全了一些。
我筆者來說,基本上就是把我functions當作多個可以執行的nodejs的命令視窗在操作!
| 名稱 | 網址 |
|---|---|
| functions | https://github.com/ZouYouShun/Angular-firebase-ironman-functions/tree/day20_functions_authentication |
https://github.com/firebase/functions-samples/blob/master/email-confirmation/README.md
https://www.youtube.com/watch?v=pADTJA3BoxE&list=PLl-K7zZEsYLkPZHe41m4jfAxUi0JjLgSM&index=6
https://www.youtube.com/watch?v=wCtNjP9gcqk
https://www.youtube.com/watch?v=CbE2PzvAMxA&index=7&list=PLl-K7zZEsYLkPZHe41m4jfAxUi0JjLgSM
https://firebase.google.com/docs/functions/config-env