在第20天的課題當中,我們透過 Web API 中的 SpeechRecognition 介面,將輸入的聲音轉成字串。而今天我們要透過另一個 SpeechSynthesis,將輸入的文字轉為聲音,做出我們自己的 google 小姐。
實作連結
SpeechSynthesisUtterance 為 Web Speech API 中代表一發音的需求,此物件中包含可讓語音合成伺服器辨識的資訊,例如語言、音調、聲音、速率等。[2]
SpeechSynthesisUtterance.lang:設定或取得發音的語言。
SpeechSynthesisUtterance.pitch:設定或取得發音的音調。
SpeechSynthesisUtterance.rate:設定或取得發音的速度。
SpeechSynthesisUtterance.text:設定或取得發音的文字內容。
SpeechSynthesisUtterance.voice:設定或取得發音的聲音。
SpeechSynthesisUtterance.volume:設定或取得發音的音量。
SpeechSynthesisUtterance.onboundary:當發音到單字間或片語間的停頓時會出發此事件。
SpeechSynthesisUtterance.onend:完成語句的發音之後會觸發此事件。
SpeechSynthesisUtterance.onpause:發音被暫停時會觸發此事件。
SpeechSynthesisUtterance.onresume:發音被繼續播放時會觸發此事件。
SpeechSynthesisUtterance.onstart:開始發音時會觸發此事件。
SpeechSynthesis 介面,為語音合成伺服器的控制器,可透過其來取得可使用的語音合成資訊,並播放或暫停發音等相關功能。[3]
SpeechSynthesis.paused:回傳目前 SpeechSynthesis object 物件是否為暫停的狀態。SpeechSynthesis.pending:回傳語言庫中是否還有沒被發音出來的語句。SpeechSynthesis.speaking:回傳目前是否有語句正在被發音出來。SpeechSynthesis.cancel():移除所有的發音資訊。
SpeechSynthesis.getVoices():取得一陣列,其中包含目前所有的 SpeechSynthesisVoice 物件,其裡頭的屬性為所有發音資訊。
SpeechSynthesis.pause():將 SpeechSynthesis 物件改為暫停的狀態。
SpeechSynthesis.resume():取消 SpeechSynthesis 物件的暫停狀態。
SpeechSynthesis.speak():將一段發音加入發音庫,當前面的發音皆播放完成後,就會播放此發音。
首先我們先將 speechSynthesis 物件加上其唯一的監聽事件 onvoiceschanged,函示。當speechSynthesis 物件中的 SpeechSynthesisVoice 清單改變時,就會觸發該事件。而在觸發的函式中,可以利用 SpeechSynthesis.getVoices()方法,取得包含所有SpeechSynthesisVoice 物件的陣列,並將這些資料加到上方的可選取欄位中:
speechSynthesis.addEventListener('voiceschanged', populateVoices);
function populateVoices(event) {
    //取得 speechSynthesis 中包含的所有語言資料物件的陣列
    voices = event.target.getVoices();
    //將這些資料轉入我們的 dropdown 表單中
    let optionList = voices.map(function(voice){
        return `<option value="${voice.name}">${voice.name} (${voice.lang})</option>`;
        });
    voicesDropdown.innerHTML = optionList.join('');
};
下一步我們讓語音格式與選取表單中的資料連動,因此我們要將該 select 元素加上監聽事件 onchange 以及觸發函示。在該函式當中,我們要透過前面陣列方法提過的 Array.find() 方法,從陣列中找出與我們相符的物件,並透過 SpeechSynthesisUtterance.voice,將我們選擇的聲音資料指定給 SpeechSynthesisUtterance,並先停止之前的發音,在執行這次的發音:
voicesDropdown.addEventListener('change', setVoice);
function setVoice(event) {
    msg.voice = voices.find(function(voice){
    return voice.name === this.value
    });
    speechSynthesis.cancel();
    speechSynthesis.speak(msg);
};
可以發現我們先執行了 speechSynthesis.cancel(),之後才執行 speechSynthesis.speak(msg)。這是因為如同前面 SpeechSynthesis Method 中所提到的,如果我們只單純執行 .speak() 的話,需要等到前面的發音都播放完畢才會播放當次的發音,所以需要加一個 .cancel() 在前面,才能馬上播放當下的發音。
再來要將調整器的功能加上。透過加上監聽事件 onchange 與指定 input 元素的值給 SpeechSynthesisUtterance.rate 以及 SpeechSynthesisUtterance.volume 屬性,我們就能隨心所欲的調整發音速度與音調:
options.forEach(function(option){
    option.addEventListener('change', setOption);
});

function setOption() {
    msg[this.name] = this.value;
    speechSynthesis.cancel();
    speechSynthesis.speak(msg);
};
最後只要將我們的播放按鈕與停止按鈕加上功能,即可完成今天的課題:
speakButton.addEventListener('click', speak);
stopButton.addEventListener('click', pause);
function speak () {
    speechSynthesis.speak(msg);
};
function pause () {
    speechSynthesis.cancel();
};
今天我們學到以下的技能:
今天透過使用以上的 Web Speech API 介面,我們成功將輸入的字串轉為聲音輸出,將介面變成屬於自己的 google 小姐,並額外加上音調與速度的功能,讓我們的 google 小姐變得更潮!

你好,我發現一個問題~在這個步驟
voicesDropdown.addEventListener('change', setVoice);
function setVoice(event) {
    msg.voice = voices.find(function(voice){
    return voice.name === this.value
    });
    speechSynthesis.cancel();
    speechSynthesis.speak(msg);
};
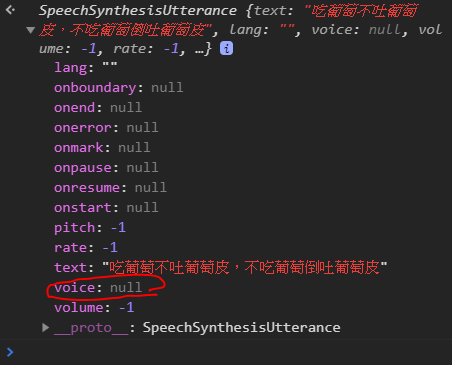
似乎沒有正確將voice資料指定給msg
console.log(msg)如下
我按照作者原始範例
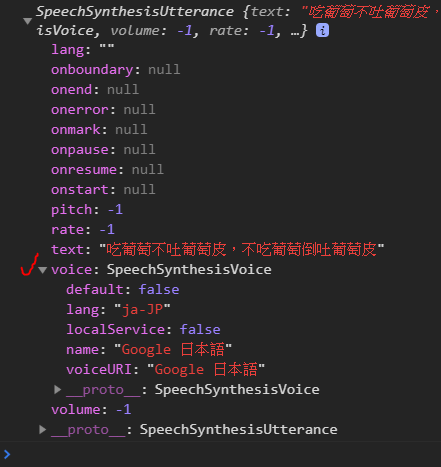
使用arrow function
msg.voice = voices.find(voice => voice.name === this.value);
就有正確抓到voice資料:
不知道傳統function在這邊為何抓不到(還是根本不是這個問題XD)
我試了一下,function的this似乎會發生變化
我事件聆聽的function是用匿名函式,參數加了「e」
然後voices的.find的function的「this」改為「e.target」就抓到囉
voicesDropdown.addEventListener('change',function(e){
    msg.voice = voices.find(function(item){return item.name===e.target.value})
})