
在android程式碼,主要是可以先選取手機上的相片圖檔,顯示到ImageView後,再上傳到伺服器。不過,不建議在模擬器上執行。因為在選取相片的圖檔,就一直無法找到模擬的SD卡上的檔案。後來,才找到,原來是檔案權限不足,要用Linux的指令,才有可以寫入到模擬的SD卡。此部份,因為對Linux不熟,所以,無法執行成功。

最後,才申請了固定的IP,有了對外的PHP的網頁。再將程式,直接安裝到實體手機,才能選到檔案,上傳到伺服器。下述為完整的android程式碼,可以請看註解的部份,來說明每個部份的功能。
public class MainActivity extends AppCompatActivity implements View.OnClickListener{

    //宣告物件
    private TextView messageText;
    private Button uploadButton, btnselectpic;
    private ImageView imageview;

    private int serverResponseCode = 0;
    private ProgressDialog dialog = null;

    private String upLoadServerUri = null;
    private String imagepath=null;

    @Override
    protected void onCreate(Bundle savedInstanceState) {
        super.onCreate(savedInstanceState);
        setContentView(R.layout.activity_main);

        //宣告的物件,跟View上的元件來連結。
        uploadButton = (Button)findViewById(R.id.uploadButton);
        messageText  = (TextView)findViewById(R.id.lblmessage);
        btnselectpic = (Button)findViewById(R.id.button_selectpic);
        imageview = (ImageView)findViewById(R.id.imageView_pic);

        //設定Button的監聽事件。
        btnselectpic.setOnClickListener(this);
        uploadButton.setOnClickListener(this);

        //設定連結到PHP的網址。(建議用手機來測試,再連到固定IP的網址。)
        upLoadServerUri = "http://192.168.7.7/upload.php";
    }

    @Override
    public void onClick(View v) {

        //Button的監聽事件要做什麼事。
        if(v==btnselectpic)
        {
            //觸發開啟手機上的相片(類似想檔案總管),來選要上傳的照片。
            Intent intent = new Intent();
            intent.setType("image/*");
            intent.setAction(Intent.ACTION_GET_CONTENT);

            //回傳時,要如何處理。請重新Override onActivityResult函式。
            startActivityForResult(Intent.createChooser(intent, "Complete action using"), 1);
        }
        else if (v==uploadButton) {

            //按上傳檔案的按鈕,要處理時,會用Thread 來處理 Http Post的動作。
            dialog = ProgressDialog.show(MainActivity.this, "", "Uploading file...", true);
            messageText.setText("uploading started.....");
            new Thread(new Runnable() {
                public void run() {
                    uploadFile(imagepath);
                }
            }).start();
        }
    }

    @Override
    protected void onActivityResult(int requestCode, int resultCode, Intent data) {
        super.onActivityResult(requestCode, resultCode, data);

        Uri selectedImageUri = data.getData();

        imagepath = getPath(selectedImageUri);

        //依相片的路徑,轉成Bitmap的型態,在ImageView,顯示出選取的相片。
        Bitmap bitmap= BitmapFactory.decodeFile(imagepath);
        imageview.setImageBitmap(bitmap);
        messageText.setText("Uploading file path:" +imagepath);
    }

    //取得選取相片的檔案路徑。
    public String getPath(Uri uri) {
        String[] projection = { MediaStore.Images.Media.DATA };
        Cursor cursor = managedQuery(uri, projection, null, null, null);
        int column_index = cursor.getColumnIndexOrThrow(MediaStore.Images.Media.DATA);
        cursor.moveToFirst();
        return cursor.getString(column_index);
    }

    //進行檔案上傳的動作。
    public int uploadFile(String sourceFileUri) {

        String fileName = sourceFileUri;

        HttpURLConnection conn = null;
        DataOutputStream dos = null;
        String lineEnd = "\r\n";
        String twoHyphens = "--";
        String boundary = "*****";
        int bytesRead, bytesAvailable, bufferSize;
        byte[] buffer;
        int maxBufferSize = 1 * 1024 * 1024;
        File sourceFile = new File(sourceFileUri);

        if (!sourceFile.isFile()) {
            dialog.dismiss();
            Log.e("uploadFile", "Source File not exist :"+imagepath);

            runOnUiThread(new Runnable() {
                public void run() {
                    messageText.setText("Source File not exist :"+ imagepath);
                }
            });

            return 0;
        }
        else
        {
            try {

                //使用HttpURLConnection,連到Server瑞的網頁
                FileInputStream fileInputStream = new FileInputStream(sourceFile);
                URL url = new URL(upLoadServerUri);

                //打開 HTTP 連到 URL物件上的網頁,再設定要以多媒體的方式,POST資料到Server端。
                conn = (HttpURLConnection) url.openConnection();
                conn.setDoInput(true); // Allow Inputs
                conn.setDoOutput(true); // Allow Outputs
                conn.setUseCaches(false); // Don't use a Cached Copy
                conn.setRequestMethod("POST");
                conn.setRequestProperty("Connection", "Keep-Alive");
                conn.setRequestProperty("ENCTYPE", "multipart/form-data");
                conn.setRequestProperty("Content-Type", "multipart/form-data;boundary=" + boundary);
                conn.setRequestProperty("uploaded_file", fileName);

                dos = new DataOutputStream(conn.getOutputStream());

                dos.writeBytes(twoHyphens + boundary + lineEnd);
                dos.writeBytes("Content-Disposition: form-data; name=\"uploaded_file\";filename=\""
                        + fileName + "\"" + lineEnd);

                dos.writeBytes(lineEnd);

                //上傳檔案,不是一次就可以傳送上去。要一部份一部份的上傳。
                //所以,要先設定一個buffer,將檔案的內容分次上傳。
                bytesAvailable = fileInputStream.available();

                bufferSize = Math.min(bytesAvailable, maxBufferSize);
                buffer = new byte[bufferSize];

                bytesRead = fileInputStream.read(buffer, 0, bufferSize);

                while (bytesRead > 0) {

                    dos.write(buffer, 0, bufferSize);
                    bytesAvailable = fileInputStream.available();
                    bufferSize = Math.min(bytesAvailable, maxBufferSize);
                    bytesRead = fileInputStream.read(buffer, 0, bufferSize);

                }

                //傳送多媒體的form資料。
                dos.writeBytes(lineEnd);
                dos.writeBytes(twoHyphens + boundary + twoHyphens + lineEnd);

                //接收Server端的回傳訊息及代碼
                serverResponseCode = conn.getResponseCode();
                String serverResponseMessage = conn.getResponseMessage();

                Log.i("uploadFile", "HTTP Response is : "
                        + serverResponseMessage + ": " + serverResponseCode);

                if(serverResponseCode == 200){

                    runOnUiThread(new Runnable() {
                        public void run() {
                            String msg = "File Upload Completed.\n\n See uploaded file your server. \n\n";
                            messageText.setText(msg);
                            Toast.makeText(MainActivity.this, "File Upload Complete.", Toast.LENGTH_SHORT).show();
                        }
                    });
                }

                fileInputStream.close();
                dos.flush();
                dos.close();

            } catch (MalformedURLException ex) {

                dialog.dismiss();
                ex.printStackTrace();

                runOnUiThread(new Runnable() {
                    public void run() {
                        messageText.setText("MalformedURLException Exception : check script url.");
                        Toast.makeText(MainActivity.this, "MalformedURLException", Toast.LENGTH_SHORT).show();
                    }
                });

                Log.e("Upload file to server", "error: " + ex.getMessage(), ex);
            } catch (Exception e) {

                dialog.dismiss();
                e.printStackTrace();

                runOnUiThread(new Runnable() {
                    public void run() {
                        messageText.setText("Got Exception : see logcat ");
                        Toast.makeText(MainActivity.this, "Got Exception : see logcat ", Toast.LENGTH_SHORT).show();
                    }
                });
            }

            dialog.dismiss();
            return serverResponseCode;
        }
    }
}
最後,來看看在模擬器的畫面,不過,就是選不到檔案。如下圖所示: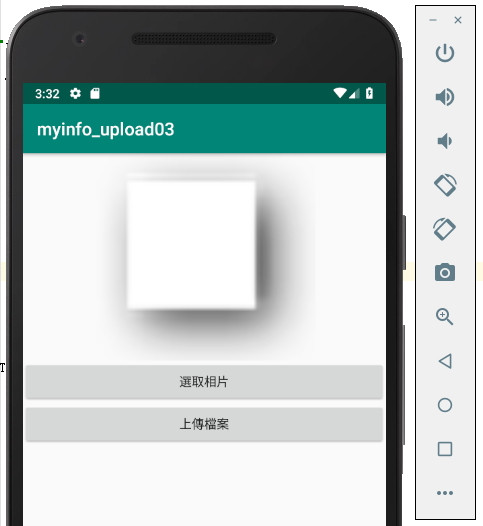
後續,會再說明重點的部份及安裝在實體上的部份。
大大您好,小弟目前接觸Android Studio不久,這裡想請教您,目前我將一台主機當作伺服器(Ubuntu->Linux)做使用,並將它部署到Jupyter Notebook的網頁上方便做管理,而目前希望設計一個App能夠拍照並上傳圖片到這個伺服器中(主機伺服器本身有使用者名稱和密碼的驗證),如果參考您的設計方法,"選取相片"功能是沒問題的,但是"上傳檔案"功能會因為是使用PHP的方式進行接收,所以沒辦法符合Jupyter Notebook或是主機伺服器的傳輸規則,不知道大大能不能提供將圖片直接上傳到Jupyter Notebook或是主機伺服器的方法? 謝謝您。
