作業系統 : Ubuntu 18.04 64bit
使用客戶端 :geth(go-ethereum)
(1)以太坊網路類型
-Main(主要網路)
在主要網路產生的操作,能夠產生現實中的價值,networkid : 1 。
-Morden
(測試網路,停用),共識機制為PoW,networkid : 2。
-Ropsten
(測試網路),共識機制為PoW,newworkid : 3。
-Rinkeby(測試網路)
共識機制為PoA,networkid : 4。
-Private(私有網路)
共識機制為PoA,networkid : 自訂。
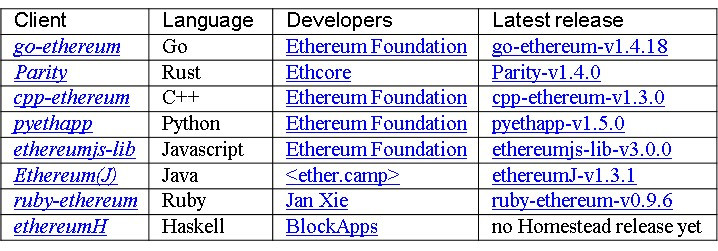
(2)客戶端介紹
客戶端用於連接以太坊網路,有數種語言實做的客戶端,在此系列文章中,使
用的是Go語言實做的指令型客戶端,go-ethereum(Geth)。
go-ethereum官方網站 : https://geth.ethereum.org/
規格書中的客戶端說明:
(3)安裝geth(go-ethereum) - 在Terminal
1.添加資料庫 :sudo add-apt-repository -y ppa: ethereum/erhereum
2.安裝指令 : sudo apt-get updatesudo apt-get install ethereum
或是sudo apt-get updatesudo apt-get install ethereum-unstable
(4)Genesis of BlockChain(第一個區塊)
要搭建一個私有鏈¸必須先定義第一個區塊的內容。
網站:https://github.com/ethereum/go-ethereum/wiki/Private-network
genesis.json範例:
{
“config”: {
“chainId”:15,
“homesteadBlock”:0,
“eip155Block”:0,
“eip158Block”:0
},
“alloc” :{
“0xa3754f5b8277b6733ce633f52b5ff229bec012de”:{“balance”:”10000000000000000000000”}
},
“coinbase” :”0x00000000000000000000000000000000000000”,
“diffculty” :”0x01”,
“extradata” :”0x123456789”,
“gasLimit” :”0xffffffff”,
“parentHash”:”0x00”,
“timestamp” :”0x00”
}
genesis.json 參數說明:
chainId:區塊鏈網路ID,不能與公有鏈衝突。
homesteadBlock:以太坊版本,值為0代表正在使用。
eip155Block:區塊鏈的分叉提議,不會干涉私有鏈,設值為0。
eip158Block:區塊鏈的分叉提議,不會干涉私有鏈,設值為0。
alloc:配置給帳戶預設的Ether(以太幣)。
coinbase:初始礦工的帳戶(挖礦得到Ether的帳戶)。
diffculty:挖礦難度。
extraData:自定義的資料,可以寫入32Bytes。
gaslimit:區塊中Gas的消耗限制。
parentHash:上一個區塊的雜湊值,因為是第一個區塊所以設值為0。
timestamp:創立區塊的時間。
