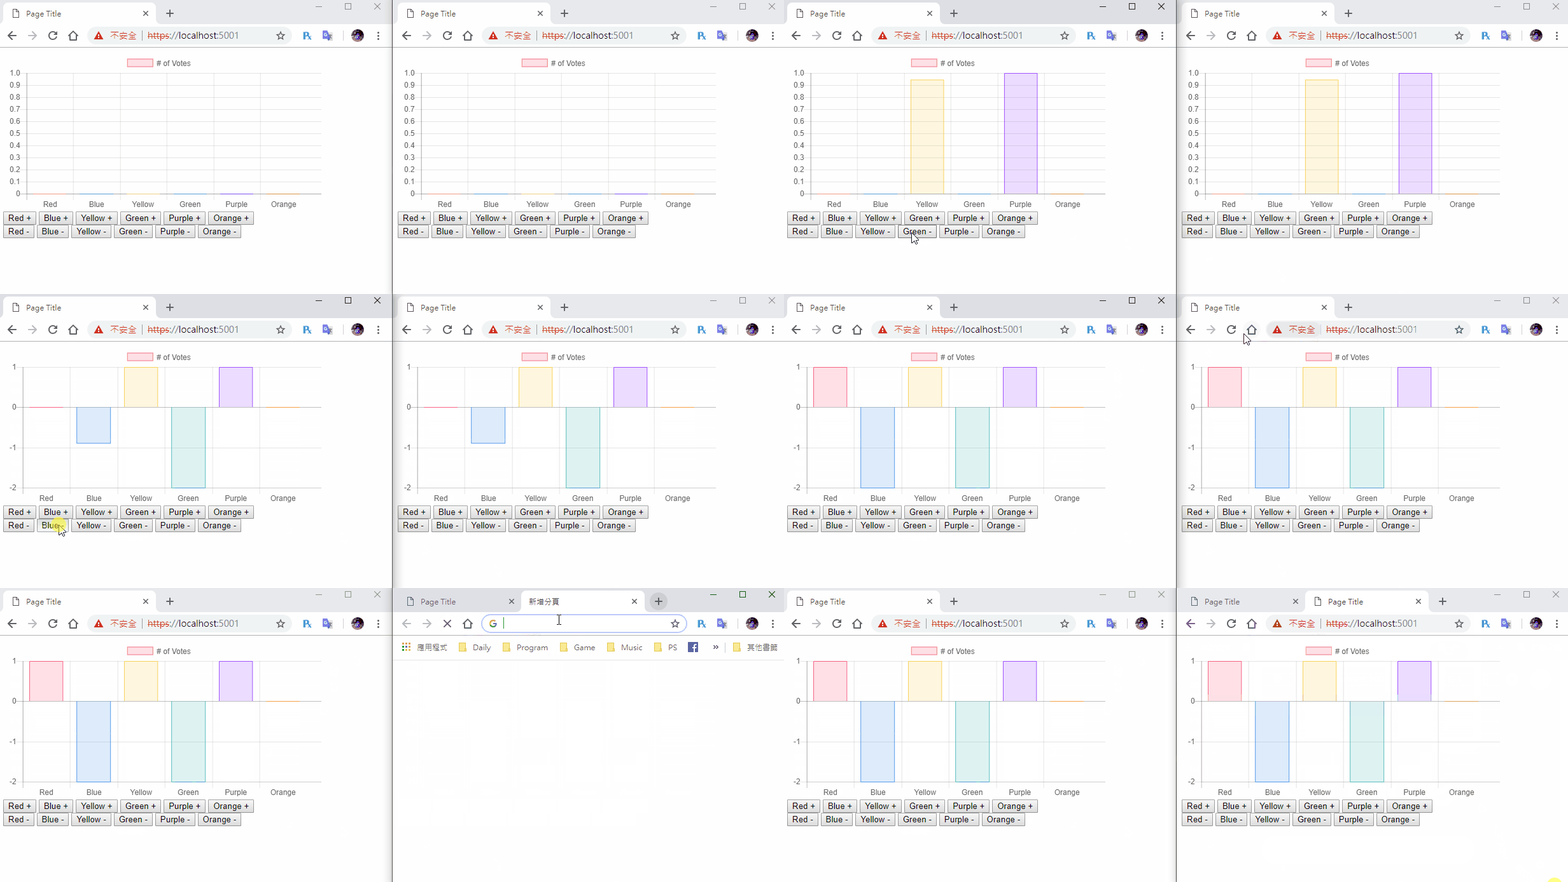
今天要來把即時投票系統跟SignalR連線囉!
基本上跟塗鴉板也是差不多,但是投票系統應該需要自訂投票的選項和建立投票的種類,這個部份我們需要去設計物件來達成,難度會高一些,但今天還不會講就是,先把連線的處理準備好,
明天再講這個部分。
後端我們需要建立3個東西VoteHub、VoteService、VoteModel
VotwModel用來當作一場投票的容器,大概需要投票編號、投票名稱、建立者、投票選項、投票數、開始時間、結束時間,大概這些,比較要注意的是投票選項和投票數
,這2個是我們一開始無法確認數量為多少,名稱也不清楚,我想了想使用C# 的 Dictory來處理這部分最適合,因為本身是一個key值對應一個value,不會有重複選項建立的問題,要注意的
大概就是這個,以下設計出來後大概的樣子。
using System;
using System.Collections.Generic;

namespace VoteWeb.Models
{
    public class VoteModel
    {
        public int id { get; set; }
        public string voteName { get; set; }
        public string creator { get; set; }
        public DateTime startDate { get; set; }
        public DateTime endDate { get; set; }
        public Dictionary<string, int> voteSelect { get; set; }
    }
}
VoteServie跟上一個實作DrawServie不太一樣的地方是,我們需要多建立投票及新增投票選項的方法還有添加投票的方法,需要注意的是Dictory的泛型物件,他不能直接從直接從
屬性修改,只能以陣列方式修改,請看下面範例註解的地方,還有我們建立一個Test投票方法CreateTestVote在裡面。
using System;
using System.Collections.Generic;
using VoteWeb.Models;

namespace VoteWeb.Services
{
    public class VoteService
    {
        private List<VoteModel> voteModelList;
        private int i = 0;
        public VoteService()
        {
            voteModelList = new List<VoteModel>();
            CreateTestVote();
        }
        // 建立測試用投票
        public void CreateTestVote(){
            VoteModel voteModel = new VoteModel();
            voteModel.id = 1;
            voteModel.voteName = "Test Vote";
            voteModel.creator = "me";
            voteModel.startDate = DateTime.Now;
            string[] voteSelect = { "Red", "Blue", "Yellow", "Green", "Purple", "Orange" };
            Dictionary<string, int> _voteSelect = new Dictionary<string, int>();
            for (int i = 0; i < voteSelect.Length; i++)
            {
                _voteSelect.Add(voteSelect[i], 0);
            }
            voteModel.voteSelect = _voteSelect;
            voteModelList.Add(voteModel);

        }

        // 取得投票Model
        public VoteModel GetVoteModel(string voteName)
        {
            for (int i = 0; i < voteModelList.Count; i++)
            {
                if (voteModelList[i].voteName == voteName)
                {
                    return voteModelList[i];
                }
            }

            return new VoteModel();
        }

        // 建立新的投票
        public void CreateVote(VoteModel voteModel)
        {
            i++;
            voteModel.id = i;
            voteModelList.Add(voteModel);
        }

        // 新增投票選項
        public void AddVoteSelect(string voteName, string selectName)
        {
            for (int i = 0; i < voteModelList.Count; i++)
            {
                if (voteModelList[i].voteName == voteName)
                {
                    voteModelList[i].voteSelect.Add(selectName, 0);
                }
            }
        }
        // 投票
        public void AddVoteSelectCount(string voteName, string selectName)
        {
            foreach (var voteModel in voteModelList)
            {
                if (voteModel.voteName == voteName)
                {
                    foreach (var voteSelect in voteModel.voteSelect)
                    {
                        if (voteSelect.Key == selectName)
                        {
                            voteModel.voteSelect[selectName] = voteSelect.Value + 1;
                            break;
                        }
                    }
                }
            }
        }

        // 反對票
        public void SubVoteSelectCount(string voteName, string selectName)
        {
            foreach (var voteModel in voteModelList)
            {
                if (voteModel.voteName == voteName)
                {
                    foreach (var voteSelect in voteModel.voteSelect)
                    {
                        if (voteSelect.Key == selectName)
                        {
                            voteModel.voteSelect[selectName] = voteSelect.Value - 1;
                            break;

                        }
                    }
                }
            }
        }
    }
}
先建立VoteHub.cs,Hub在建構子先接收VoteService,再建立取得投票內容,這個方法傳給自己就好,然後投票和反對票則是傳給所有人還有這2個接收的事件一樣就行,不需要特別寫2種。
using System;
using Microsoft.AspNetCore.SignalR;
using VoteWeb.Models;
using VoteWeb.Services;
using System.Threading.Tasks;
using System.Collections.Generic;

namespace VoteWeb.Hubs
{
    public class VoteHub : Hub
    {
        private VoteService _voteService;
        public VoteHub(VoteService voteService)
        {
            _voteService = voteService;
        }

        public async Task GetVote(string voteName)
        {
            await Clients.Caller.SendAsync("ReceiveVote", _voteService.GetVoteModel(voteName));
        }

        public async Task AddVoteSelectCount(string voteName, string voteSelect)
        {
            _voteService.AddVoteSelectCount(voteName, voteSelect);

            var temp =  _voteService.GetVoteModel(voteName);
            int count = 0;
            foreach (var _voteSelect in temp.voteSelect)
            {
                if (_voteSelect.Key == voteSelect)
                {
                    count = _voteSelect.Value;
                }
            }

            await Clients.All.SendAsync("ReceiveVoteSelectCount", count, voteSelect);
        }
        public async Task SubVoteSelectCount(string voteName, string voteSelect)
        {
            _voteService.SubVoteSelectCount(voteName, voteSelect);

            var temp =  _voteService.GetVoteModel(voteName);
            int count = 0;
            foreach (var _voteSelect in temp.voteSelect)
            {
                if (_voteSelect.Key == voteSelect)
                {
                    count = _voteSelect.Value;
                }
            }

            await Clients.All.SendAsync("ReceiveVoteSelectCount", count, voteSelect);
        }
    }
}
後端最後在Startup.cs引用Hub和Service
using VoteWeb.Hubs;
using VoteWeb.Services;
註冊VoteService和signalR router
public void ConfigureServices(IServiceCollection services)
{
    services.AddSingleton<VoteService>();
    services.AddSignalR();
}

// This method gets called by the runtime. Use this method to configure the HTTP request pipeline.
public void Configure(IApplicationBuilder app, IHostingEnvironment env)
{
    if (env.IsDevelopment())
    {
        app.UseDeveloperExceptionPage();
    }

    app.UseSignalR(routes =>
    {
        routes.MapHub<VoteHub>("/voteHub");
    });

    app.UseDefaultFiles();
    app.UseStaticFiles();
}
首先報表的Data拉出來做一個變數,所以chartData裡面的data改成這樣
var data = [];
var chartData = {
    type: 'bar',
    data: {
        labels: ["Red", "Blue", "Yellow", "Green", "Purple", "Orange"],
        datasets: [{
            label: '# of Votes',
            data: data,
            backgroundColor: [
                'rgba(255, 99, 132, 0.2)',
                'rgba(54, 162, 235, 0.2)',
                'rgba(255, 206, 86, 0.2)',
                'rgba(75, 192, 192, 0.2)',
                'rgba(153, 102, 255, 0.2)',
                'rgba(255, 159, 64, 0.2)'
            ],
            borderColor: [
                'rgba(255,99,132,1)',
                'rgba(54, 162, 235, 1)',
                'rgba(255, 206, 86, 1)',
                'rgba(75, 192, 192, 1)',
                'rgba(153, 102, 255, 1)',
                'rgba(255, 159, 64, 1)'
            ],
            borderWidth: 1
        }]
    },
    options: {
        scales: {
            yAxes: [{
                ticks: {
                    beginAtZero: true
                }
            }]
        }
    }
}
再來建立基本的連線,記得SignalR JS函式庫也要引入,連接完成後取得投票資料GetVote,connection.on("ReceiveVote")接受到報表資料後,array.push()進變數內,完成後在開始畫出圖表。
var connection = new signalR.HubConnectionBuilder().withUrl("/voteHub").build();
var myChart;

// 連接事件
connection.start()
.then(function () {
    connection.invoke("GetVote", 'Test Vote').catch(function (err) {
        return console.error(err.toString());
    });
})
.catch(function (err) {
    return console.error(err.toString());
});

connection.on("ReceiveVote", function (json) {

    data.push(json.voteSelect.red);
    data.push(json.voteSelect.blue);
    data.push(json.voteSelect.yellow);
    data.push(json.voteSelect.green);
    data.push(json.voteSelect.purple);
    data.push(json.voteSelect.orange);

    myChart = new Chart(ctx, chartData);

});
建立投票及反對票的函數,接收回來由於data只是一個陣列,這時就要利用label的資料來搜尋是在哪個位置,使用indexOf就行了!
function AddVoteSelect(voteSelect) {
    connection.invoke("AddVoteSelectCount", 'Test Vote', voteSelect).catch(function (err) {
        return console.error(err.toString());
    });
}

function SubVoteSelect(voteSelect) {
    connection.invoke("SubVoteSelectCount", 'Test Vote', voteSelect).catch(function (err) {
        return console.error(err.toString());
    });
}
connection.on("ReceiveVoteSelectCount", function (json, voteSelect) {
    var index = chartData.data.labels.indexOf(voteSelect);
    chartData.data.datasets[0].data[index] = json;
    myChart.update();

});
最後在修改按鈕事件就大功告成!
red.onclick = function () {
    AddVoteSelect('Red');
}
blue.onclick = function () {
    AddVoteSelect('Blue');
}
yellow.onclick = function () {
    AddVoteSelect('Yellow');
}
green.onclick = function () {
    AddVoteSelect('Green');
}
purple.onclick = function () {
    AddVoteSelect('Purple');
}
orange.onclick = function () {
    AddVoteSelect('Orange');
}

// 反對票事件
red2.onclick = function () {
    SubVoteSelect('Red');
}
blue2.onclick = function () {
    SubVoteSelect('Blue');
}
yellow2.onclick = function () {
    SubVoteSelect('Yellow');
}
green2.onclick = function () {
    SubVoteSelect('Green');
}
purple2.onclick = function () {
    SubVoteSelect('Purple');
}
orange2.onclick = function () {
    SubVoteSelect('Orange');
}
還有記得安裝前端signal套件就完成啦!
忘記的往回看Day3啊!XD

本篇同步於個人BLOG
