看一下和 Jenkins 有關的應試目標,其中有一部分是 CI/CD,也就是持續整合和交付。昨天提到自動化前要先瞭解原本的流程,或者是設計一個更好的流程,而 CI/CD 或許可以作為一個思考的方向,將其視為一種開發至部署的流程框架或者是模型。接下來回到 Jenkins。
昨天原本要從 Guided Tour 開始,不過 Guided Tour 比較沒有一個完整的範例,所以先到 Tutorial 找了個範例,建立了一個簡單的 Pipeline,對於 Jenkins 到底在做些什麼比較有感。但作完 Tutorial 的範例後再回去看 Guided Tour,會發現它好像沒有多寫些什麼,大部分的內容將範例作完就知道了,所以看看官方文件還有什麼可以參考的內容,發現它有一份 User Handbook 的 PDF,有比較詳細的說明,所以就從裡面挑一些內容來看吧,請參考 https://jenkins.io/user-handbook.pdf。
昨天提到 Jenkins Pipeline 是一組 plugin,可支援實作以及將持續整合 pipeline 整合至 Jenkins 中,而持續整合 pipeline 是一個自動化的表達式 (automated expression),表現了軟體由版本控制系統到用戶的全部過程。Jenkins Pipeline 提供了豐富的工具組合,可用來表示各種簡單至複雜的過程,並將它們以程式碼的方式呈現,也就是 Jenkinsfile,可稱為 pipeline-as-code,將持續整合 pipeline 也視為應用程式中需被版本管理及審閱的程式碼的一部分。昨天看到 Jenkinsfile 的內容,不是 JSON、YAML 也不是 INI,這裡提到這種語法稱為 Pipeline Domain Specific Language (Pipeline DSL),一般來說可以用 Declarative 和 Script 的兩種寫法,目前的文件介紹都是以 Declarative 的寫法為主。Pipeline 在 Jenkins 的建立方法有兩種,一種是直接在 Web UI 上建立編寫,第二種是使用 Jenkinsfile 並將它簽入到版控系統之中,昨天採用的是第二種方式。
為什麼要使用 Pipeline 呢?有以下的好處:
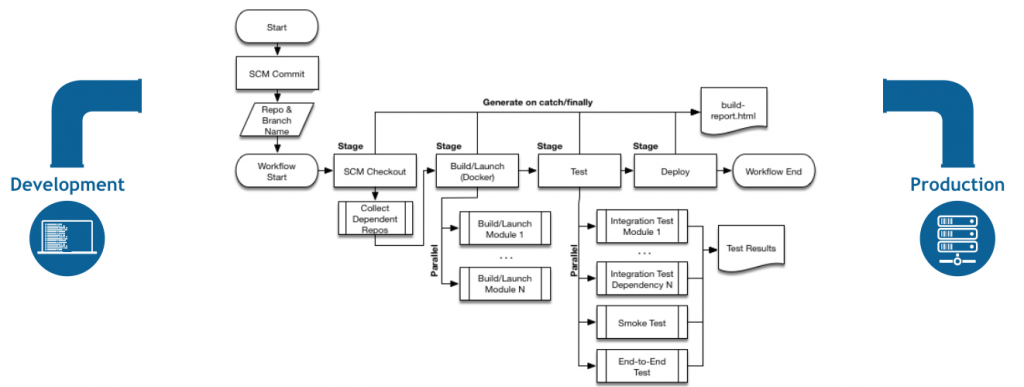
以下這張圖示範了一個可以使用 Jenkins 來建立模型的持續整合流程。
接下來文件中介紹了 Pipeline 中會用到的名詞,這裡舉了三個,分別是 Step、Node 和 Stage,其中 Step 和 Stage 在昨天已經看過了,而 Node 看起來在 script 的寫法中比較會用到,它有點類似 declarative 裡的 pipeline (請參考下面 Jenkinsfile 的片段),這裡就不多介紹。
關於 Jenkinsfile,以下先給一個範例,其實沒有什麼新的內容,只是看一下 Declarative 和 Script 兩種寫法有什麼差異,另外這裡將 Pipeline 分成三個階段,分別是建置 Build、測試 Test 及部署 Deploy,文件中指出對大部分的專案而言,這樣的切分方法是個好的起點。在前面的應試目標中知道關於 Jenkins 的一個重點是去瞭解 CI/CD 整體的 開發部署流程,以及是否有什麼比較好的實踐方法(不要用 best practice 的說法),因此這裡的範例可以作為參考,接著就來看看這三個階段在做些什麼,並介紹一些 Jenkinsfile 中會用到的指令。
// Jenkinsfile (Declarative Pipeline)
pipeline {
    agent any

    stages {
        stage('Build') {
            steps {
                echo 'Building..'
            }
        }
        stage('Test') {
            steps {
                echo 'Testing..'
            }
        }
        stage('Deploy') {
            steps {
                echo 'Deploying....'
            }
        }
    }
}

// Jenkinsfile (Scripted Pipeline)
node {
    stage('Build') {
        echo 'Building....'
    }
    stage('Test') {
        echo 'Building....'
    }
    stage('Deploy') {
        echo 'Deploying....'
    }
}
對大部分的專案而言,流程是由建置階段開始的,在這個階段會將程式碼組譯 (assemble)、編譯 (compile) 或打包 (package)。Jenkins 有一些建置工具的插件可以使用,不過在文件中的範例,大部分使用 sh 指令以在 shell 環境中執行例如 Make、Maven 等等工具。sh 用在 Linux based 的系統之中,如果是 Windows 環境則可以使用 bat 指令以執行批次 (batch) 檔案。下面是 Build stage 的 Jenkinsfile 片段。
// Declarative //
pipeline {
    agent any
    stages {
        stage('Build') {
            steps {
                sh 'make'
                archiveArtifacts artifacts: '**/target/*.jar', fingerprint: true
            }
        }
    }
}
這裡多了一個指令 archiveArtifacts,所謂的 artifact 大概是人工製造的產物或手工藝品之類的意思,這裡指的是在 Pipeline 執行過程中所產生的各種檔案,包括各種 binary、log 或暫存檔案等等。這個指令會將這些 artifact 中符合 **/target/*.jar 這個 pattern 的檔案留存(應該是指留存在 Jenkins master node 的意思),而 fingerprint: true 表示同時會記錄這些 artifact 的 fingerprint 訊息,例如 hash 值等。到底留存的檔案會怎麼在 Jenkins 中呈現這裡並沒有說的很清楚,我猜可能是在 dashboard 中可以查看到。
在任何成功的持續交付流程中,運行自動化測試都是極為關鍵的一環,Jenkins 也以插件的方式提供和測試記錄、報告與視覺化相關的工具,若測試執行失敗,也可以在網頁的 UI 中查閱相關的記錄,此時 Pipeline 會被標記為不穩定 (unstable),這些相關功能可用 jnit 插件來完成,如下面的範例。
pipeline {
    agent any
    stages {
        stage('Test') {
            steps {
                /* `make check` returns non-zero on test failures,
                * using `true` to allow the Pipeline to continue nonetheless
                */
                sh 'make check || true'
                junit '**/target/*.xml'
            }
        }
    }
}
這裡 sh 指令帶的是 make check || true,這是因為 shell 執行若取得非 0 的回應會視為失敗(照這裡的寫法,感覺起來也許會中斷 Pipeline 執行),因此使用 || true 這樣的寫法以確保可以順利執行下去,而 junit 可以補捉留存測試結果中符合 **/target/*.xml 的 XML 檔案。
部署階段可以涵蓋各種不同的步驟或作法,例如把 artifact 丟到 Artifactory 伺服器以管理 maven repository,或將程式碼推到生產環境,請參考下面的範例:
// Jenkinsfile (Declarative Pipeline)
pipeline {
    agent any

    stages {
        stage('Deploy') {
            when {
              expression {
                currentBuild.result == null || currentBuild.result == 'SUCCESS'
              }
            }
            steps {
                sh 'make publish'
            }
        }
    }
}

// Jenkinsfile (Scripted Pipeline)
node {
    /* .. snip .. */
    stage('Deploy') {
        if (currentBuild.result == null || currentBuild.result == 'SUCCESS') {
            sh 'make publish'
        }
    }
    /* .. snip .. */
}
請先看上面 declarative 的部分,有一個 when 指令是用來決定目前的 stage 是否繼續執行下去,其中的條件必須全為 true 才會繼續,expression 是負責執行運算。currentBuild.result 這裡是一個變數。下面的 script 部分,可以看到它有流程控制 if 的語法,其餘還有迴圈、錯誤補捉等,是 script 和 declarative 不同的地方 。
關於 Jenkinsfile 中的變數使用,大致上可分為環境變數及自定變數,環境變數的設定及取用請看以下範例:
pipeline {
    agent any
    environment {
        CC = 'clang'
    }
    stages {
        stage('Example') {
            steps {
                echo "Running ${env.BUILD_ID} on ${env.JENKINS_URL}"
            }
        }
    }
}
設定的部分放在 environment 指令之中,取用時使用 env,並用 ${ } 包裹。自定變數的使用方式也類似,請參考下列範例:
pipeline {
    agent any
    parameters {
        string(name: 'Greeting', defaultValue: 'Hello', description: 'How should I greet the world?')
    }
    stages {
        stage('Example') {
            steps {
                echo "${params.Greeting} World!"
            }
        }
    }
}
以下片段則示範了命令執行所容許的最長等待時間,以及命令重試的次數:
stage('Deploy') {
    steps {
        retry(3) {
            sh './flakey-deploy.sh'
        }

        timeout(time: 3, unit: 'MINUTES') {
            sh './health-check.sh'
        }
    }
}
將 flake-deploy.sh 重試 (retry) 3 次,接下來執行 health-check.sh,並等待至多 3 分鐘,若 health-check.sh 在 3 分鐘內沒有結束,則 Jenkins 會在 Deploy 階段中標示有錯誤發生。
而在 Pipeline 結束執行後,可能會依據 Pipeline 執行的結果作出不同的回應,結果包括 success、failure、unstable、changed 這一部分因為不屬於任何 stage,所以放在 post 段落中,請參考以以下範例:
pipeline {
    agent any
    stages {
        stage('Test') {
            steps {
                sh 'echo "Fail!"; exit 1'
            }
        }
    }
    post {
        always {
            echo 'This will always run'
        }
        success {
            echo 'This will run only if successful'
        }
        failure {
            echo 'This will run only if failed'
        }
        unstable {
            echo 'This will run only if the run was marked as unstable'
        }
        changed {
            echo 'This will run only if the state of the Pipeline has changed'
            echo 'For example, if the Pipeline was previously failing but is now successful'
        }
    }
}
關於 plugin 的說明請參考 https://plugins.jenkins.io,可由右上方的搜尋框查詢想要查找的 plugin 名稱。今天介紹的 plugin 以應試目標能力中有提到的為範圍,因為我自己也沒有使用過這些 plugin,所以就以文件的說明為主。
這個插件可以指定到其他專案把 artifact 給拷貝回來,也可以指定要從那一個建置版本中取得,或者加上過濾條件。拷貝回來的檔案物件會自動加上 fingerprint,請看以下範例:
stages {
     stage('Copy Archive') {
         steps {
             script {
                 step ([$class: 'CopyArtifact',
                 projectName: 'Create_archive',
                 filter: "packages/infra*.zip",
                 target: 'Infra']);
             }
         }
     }
}
這裡可能注意一下它的寫法,是把相關的指令放在 script 區段中,並且以陣列的方式來提供參數。首先它會到 Create_archive 這個專案,然後尋找 packages 目錄下符合 infra*.zip 格式的檔案,並將它拷貝至本地的 Infra 目錄之中,若該目錄不存在會自動建立。
這一個 plugin 已經好一陣子沒更新了,它的說明如下:
Adds the ability to generate fingerprints as build steps instead of waiting for a build to complete.
This is useful when the files used to create the fingerprint are generated before the end of the build since the owner of a fingerprint is based on the file age. It is also useful when using a plugin such as Join where you can call other jobs within the build steps. By generating the fingerprints prior calling the other jobs, the upstream build will really be the owner of the fingerprint.
看起來是可以讓 fingerprint 在建置階段就產生,不必等到建置完成。下面有要這麼做的好處是什麼,不過其實不是很瞭解。
提供在 Pipeline 中建置並使用容器的功能,這個在第一天的操作中已經使用過了,而它的說明也連結到官方文件中 Using Docker with Pipeline 一節,主要是搭配 agent 指令,以 Docker 作為執行環境之用。它也支援在 Docker 執行時傳入額外參數,或者使用 Dockerfile,請參考下面的範例。
// example 1
agent {
    docker {
        image 'myregistry.com/node'
        label 'my-defined-label'
        registryUrl 'https://myregistry.com/'
        registryCredentialsId 'myPredefinedCredentialsInJenkins'
    }
}

// example 2
agent {
    // Equivalent to "docker build -f Dockerfile.build --build-arg version=1.0.2 ./build/
    dockerfile {
        filename 'Dockerfile.build'
        dir 'build'
        label 'my-defined-label'
        additionalBuildArgs  '--build-arg version=1.0.2'
        args '-v /tmp:/tmp'
    }
}
可以在 Docker 容器的建置過程中加入更多的 Docker 指令,例如提交改變、從映像檔中建立新的容器、對容器進行操作等等。
關於 Jenkins 中如何保管並使用機敏性資料,這裡有一篇感覺起來算是比較詳細的資訊,請參考 https://github.com/jenkinsci/credentials-plugin/blob/master/docs/user.adoc。其中很多操作是從 UI 上進行的,這裡就先略過。
今天從官方文件的 User Handbook 中,再說明 Jenkins 中 Pipeline 的概念,並介紹 Jenkinsfile 常用的一些指令,以及一些 plugin 的說明。Jenkins 入門用法感覺起來不是很困難,但為了配合在建置開發流程中會遇到的種種步驟,有非常多的插件可以設置使用,而這些插件就等到大家遇到的時候再去研究吧。
