今天來介紹 HashiCorp 的 Packer,它是一個建立映像檔的工具。說到映像檔,到目前為止也在好幾種不同的平台上使用了不同格式的映像檔,像是 VirtualBox、Vagrant、Docker 等等。一般狀況下都是透過這些應用本身去下載管理映像檔,大部分會使用別人已經做好的映像檔,偶爾可能會需要一些客製化,這種時候通常會是使用一個映像檔再加上一些人為的操作或 script 來達成,如果說能把這些客製的內容直接打包在映像檔之中,應該可以省下不少的工夫。之前在 Docker 有學過如何使用 Dockerfile 依照自己的需要來建立一個映像檔,其他的應用平台,多多少少也有這樣的功能,只是可能它們是屬於比較進階的使用技巧,一般人並不會想要去嘗試。Packer 這個工具,就是要讓我們能夠以比較方便的方式來建立映像檔,官方文件說它有一些優點:
那麼就開始吧,一樣從 Get Started 開始,教學從安裝開始,請參考 https://www.packer.io/intro/getting-started/install.html。這一個範例使用的平台是 AWS,必須要申請 AWS 帳號,教學裡有提到如果不想要用雲端環境,可以選擇其他平台,不過因為怕沒有時間試驗,所以還是就用 AWS 吧,然後這裡有一個提示,這裡打包的映像檔雖然符合 free-tier 的規範,但如果之前有申請過帳號,可能會被收取費用,但費用應該不會太多(這邊是寫 few cents,所以就假設不超過 1 美元)。印象中如果是初次申請 AWS 這類型的雲端環境,一開始會有一段免費的體驗期,在這段時間可以使用不超過某個額度的資源,是免費的,這也就是文件中提到的,這個範例中所建立的映像檔,它取用的資源不會超過免費的額度,但如果帳號已經過了免費期間,那就要收費啦。申請 AWS 帳戶請由 https://aws.amazon.com/tw/free/。
首先來安裝 Packer。Packer 有提供預先編譯好的版本,請由 https://www.packer.io/downloads.html 依自己的作業環境下載合適的版本,下載後解開就可以使用。以 Ubuntu 環境為例,指令如下:
$ wget https://releases.hashicorp.com/packer/1.3.2/packer_1.3.2_linux_amd64.zip
$ sudo apt-get install unzip
$ unzip packer_1.3.2_linux_amd64.zip
$ sudo mv packer /usr/local/bin/
完成後執行 packer --version 確認一下是否成功。
$ packer --version
1.3.2
按照慣例,會新建一個目錄作為工作目錄,請進入該目錄並建立一新的文字檔案,名稱為 example.json,內容如下:
{
  "variables": {
    "aws_access_key": "",
    "aws_secret_key": ""
  },
  "builders": [{
    "type": "amazon-ebs",
    "access_key": "{{user `aws_access_key`}}",
    "secret_key": "{{user `aws_secret_key`}}",
    "region": "us-east-1",
    "source_ami_filter": {
      "filters": {
        "virtualization-type": "hvm",
        "name": "ubuntu/images/*ubuntu-xenial-16.04-amd64-server-*",
        "root-device-type": "ebs"
      },
      "owners": ["099720109477"],
      "most_recent": true
    },
    "instance_type": "t2.micro",
    "ssh_username": "ubuntu",
    "ami_name": "packer-example {{timestamp}}"
  }]
}
這是一個 JSON 格式的樣板,在執行建置命令的時候會需要傳入兩個變數,aws_access_key 和 aws_secret_key,請到 AWS 的管理介面去設置,頁面在 https://console.aws.amazon.com/iam/home?#/security_credential,access key 為第三項,建立好後下載一個 csv,裡面會有 AWSAccessKeyId 和 AWSSecretKey 兩個鍵值配對。example.json 其他的部分是一些跟映像檔內容有關的設置,這裡暫時先不管它。
接下來文件說先針對此 JSON 檔案的內容進行驗證,基本上是檢查 JSON 的語法以及設定值是否正確,指令和照理應該會出現的結果如下,但是請先不要執行。
$ packer validate example.json
Template validated successfully.
為什麼不要執行呢,因為這個步驟在我的環境卡了很久,不知道原因是什麼,因為照理說如果只是檢查語法和格式是否正確,應該一下子就可以結束了。先跳過這個步驟,直接進行 build 指令,格式如下,請把 AWSAccessKeyId 和 AWSSecretKey 剛才下載檔案申請的內容。
$ packer build \
    -var 'aws_access_key=AWSAccessKeyId' \
    -var 'aws_secret_key=AWSSecretKey' \
    example.json

amazon-ebs output will be in this color.

==> amazon-ebs: Prevalidating AMI Name: packer-example 1542001826
    amazon-ebs: Found Image ID: ami-0f9351b59be17920e
==> amazon-ebs: Creating temporary keypair: packer_5be914a3-dc92-8d71-ca22-3f7902983c3e
==> amazon-ebs: Creating temporary security group for this instance: packer_5be914a6-6a0e-70ce-5d87-20191576b91f
==> amazon-ebs: Authorizing access to port 22 from 0.0.0.0/0 in the temporary security group...
==> amazon-ebs: Launching a source AWS instance...
==> amazon-ebs: Adding tags to source instance
    amazon-ebs: Adding tag: "Name": "Packer Builder"
    amazon-ebs: Instance ID: i-08d53b86cbd90937b
==> amazon-ebs: Waiting for instance (i-08d53b86cbd90937b) to become ready...
==> amazon-ebs: Using ssh communicator to connect: 54.209.63.58
==> amazon-ebs: Waiting for SSH to become available...
==> amazon-ebs: Connected to SSH!
==> amazon-ebs: Stopping the source instance...
    amazon-ebs: Stopping instance, attempt 1
==> amazon-ebs: Waiting for the instance to stop...
==> amazon-ebs: Creating unencrypted AMI packer-example 1542001826 from instance i-08d53b86cbd90937b
    amazon-ebs: AMI: ami-01069d2804ef33d63
==> amazon-ebs: Waiting for AMI to become ready...
==> amazon-ebs: Terminating the source AWS instance...
==> amazon-ebs: Cleaning up any extra volumes...
==> amazon-ebs: No volumes to clean up, skipping
==> amazon-ebs: Deleting temporary security group...
==> amazon-ebs: Deleting temporary keypair...
Build 'amazon-ebs' finished.

==> Builds finished. The artifacts of successful builds are:
--> amazon-ebs: AMIs were created:
us-east-1: ami-01069d2804ef33d63
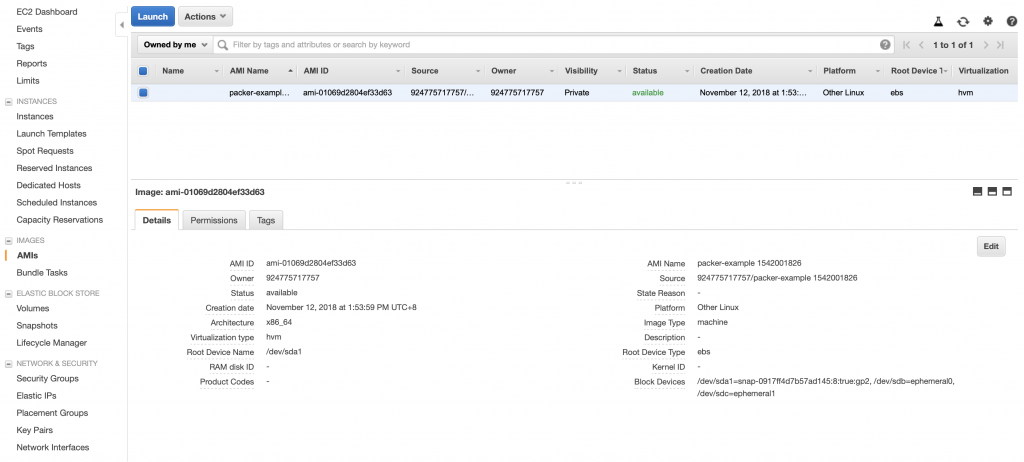
這樣映像檔就建置好了,可以在 AWS 的管理介面中看到它,依我的例子,網址是 https://console.aws.amazon.com/ec2/home?region=us-east-1#s=Images,畫面範例如下:
建立的映像檔為 AMI ( Amazon Machine Image) 格式,可以嘗試用這個映像檔來起一個 instance。接下來將它刪除,請先核取此映像檔,接著在這個頁面上方的 Actions 選擇 Deregister。之後在左側選單 ELASTIC BLOCK STORE 中 Snapshots 的選項,進入後將快照刪除。
在這個映像檔中並沒有特別做什麼,如果想要對映像檔先進行 provision,也就是先安裝一些套件或執行某些指令,請參考下面範例。
{
    "variables": {
        "aws_access_key": "{{env `AWS_ACCESS_KEY_ID`}}",
        "aws_secret_key": "{{env `AWS_SECRET_ACCESS_KEY`}}",
        "region":         "us-east-1"
    },
    "builders": [
        {
            "access_key": "{{user `aws_access_key`}}",
            "ami_name": "packer-linux-aws-demo-{{timestamp}}",
            "instance_type": "t2.micro",
            "region": "us-east-1",
            "secret_key": "{{user `aws_secret_key`}}",
            "source_ami_filter": {
              "filters": {
              "virtualization-type": "hvm",
              "name": "ubuntu/images/*ubuntu-xenial-16.04-amd64-server-*",
              "root-device-type": "ebs"
              },
              "owners": ["099720109477"],
              "most_recent": true
            },
            "ssh_username": "ubuntu",
            "type": "amazon-ebs"
        }
    ],
    "provisioners": [
        {
            "type": "file",
            "source": "./welcome.txt",
            "destination": "/home/ubuntu/"
        },
        {
            "type": "shell",
            "inline":[
                "ls -al /home/ubuntu",
                "cat /home/ubuntu/welcome.txt"
            ]
        },
        {
            "type": "shell",
            "script": "./example.sh"
        }
    ]
}
下面 provisioners 的區段,先將 welcome.txt 拷貝到映像檔中,接下來執行 ls、cat 及 example.sh。其中像 ls、cat 的執行結果會在 packer build 執行時被印出。此外這裡 credential 是用 env 變數指定的,這樣在執行 packer build 時就不用傳入 credentials。
Get Started 的部分到此結束,其他更深入的內容可參考 https://www.packer.io/docs/index.html。Packer 支援建立多種平台的映像檔,可以看一下左側 builder 的選單,目前大約有二十多種,而每一個 builder 也都會它的設定選項。
關於 Packer 的部分就先作到這裡,大概知道了它的用法以及支援的平台,之後若有需要建立自己的機器映像檔再來試試看吧。
