昨天我們把落單的 UI 元件跟其模組關聯完之後,今天接著要來設定路由的部份!
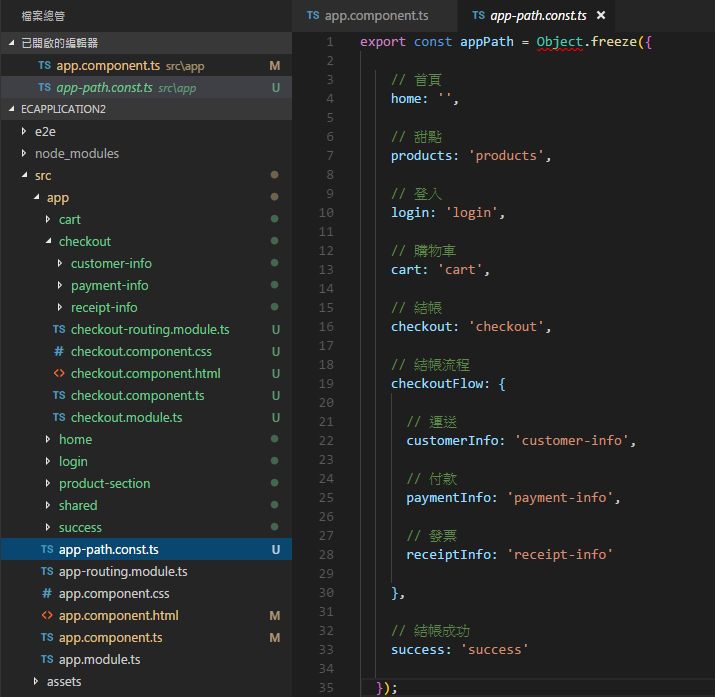
開始設定路由前,可以先看看我們準備好的路徑定義檔 - app-path.const.ts :
export const appPath = {

  // 首頁
  home: '',

  // 甜點
  products: 'products',

  // 登入
  login: 'login',

  // 購物車
  cart: 'cart',

  // 結帳
  checkout: 'checkout',

  // 結帳流程
  checkoutFlow: {

    // 運送
    customerInfo: 'customer-info',

    // 付款
    paymentInfo: 'payment-info',

    // 發票
    receiptInfo: 'receipt-info'

  },

  // 結帳成功
  success: 'success'

};
之所以會建立這個定義檔是因為不希望 Coding 的時候要在程式碼裡到處 Hard Code ,容易打錯字又不好維護。既然是會重複用到的東西,我們就把它寫成定義檔,以後要維護或是要調整的時候也會比較好處理。
雖然這個專案應該是不會需要被維護,但好的習慣很重要!
複習一下我們所規劃的路由:

按照我們原本所規劃的路由來設定的話,應該會長這樣:
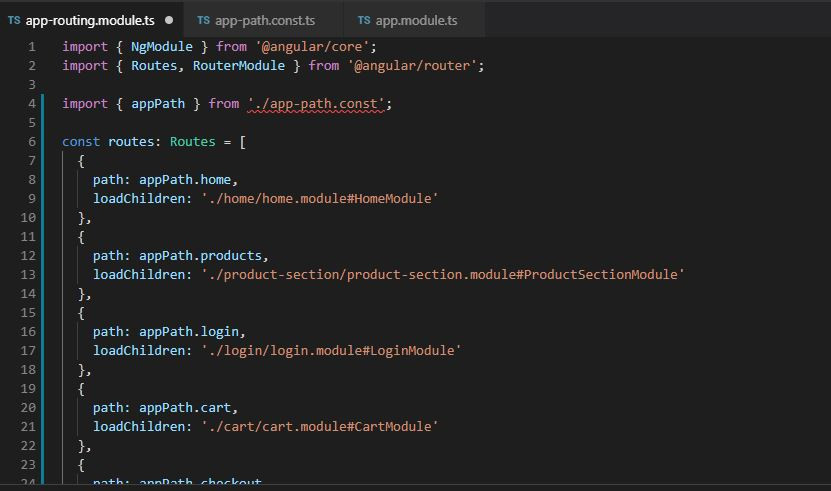
import { NgModule } from '@angular/core';
import { Routes, RouterModule } from '@angular/router';

// Constant
import { appPath } from './app-path.const';

// for Angular 7 以下
const routes: Routes = [
  {
    path: appPath.home,
    loadChildren: './home/home.module#HomeModule'
  },
  {
    path: appPath.products,
    loadChildren: './product-section/product-section.module#ProductSectionModule'
  },
  {
    path: appPath.login,
    loadChildren: './login/login.module#LoginModule'
  },
  {
    path: appPath.cart,
    loadChildren: './cart/cart.module#CartModule'
  },
  {
    path: appPath.checkout,
    loadChildren: './checkout/checkout.module#CheckoutModule'
  },
  {
    path: appPath.success,
    loadChildren: './success/success.module#SuccessModule'
  },
  {
    path: '**',
    redirectTo: appPath.home,
    pathMatch: 'full'
  }
];

// for Angular 8 以上
const routes: Routes = [
  {
    path: appPath.home,
    loadChildren: () => import('./home/home.module').then(m => m.HomeModule)
  },
  {
    path: appPath.products,
    loadChildren: () => import('./product-section/product-section.module').then(m => m.ProductSectionModule)
  },
  {
    path: appPath.login,
    loadChildren: () => import('./login/login.module').then(m => m.LoginModule)
  },
  {
    path: appPath.cart,
    loadChildren: () => import('./cart/cart.module').then(m => m.CartModule)
  },
  {
    path: appPath.checkout,
    loadChildren: () => import('./checkout/checkout.module').then(m => m.CheckoutModule)
  },
  {
    path: appPath.success,
    loadChildren: () => import('./success/success.module').then(m => m.SuccessModule)
  },
  {
    path: '**',
    redirectTo: appPath.home,
    pathMatch: 'full'
  }
];

@NgModule({
  imports: [RouterModule.forRoot(routes, {
    preloadingStrategy: PreloadAllModules
  })],
  exports: [RouterModule]
})
export class AppRoutingModule { }
用路徑定義檔來設定路由是不是清爽多啦?!未來就算路徑要變動,也只要修改定義檔裡的定義就好,不需要到處去尋找還有哪個地方沒有改到。
記得加上預先載入的設定,避免檔案變大之後,初次換頁時會有頓頓的感覺。
另外我們這次使用預設的 PathLocationStrategy 路由策略,注意網址後面不要有
#噢!
然後我們再到各模組裡處理自己的路由:
import { NgModule } from '@angular/core';
import { Routes, RouterModule } from '@angular/router';

import { HomeComponent } from './home.component';

const routes: Routes = [
  {
    path: '',
    component: HomeComponent
  }
];

@NgModule({
  imports: [RouterModule.forChild(routes)],
  exports: [RouterModule]
})
export class HomeRoutingModule { }
import { NgModule } from '@angular/core';
import { Routes, RouterModule } from '@angular/router';

import { ProductSectionComponent } from './product-section.component';
import { ProductListComponent } from './product-list/product-list.component';

const routes: Routes = [
  {
    path: '',
    component: ProductSectionComponent,
    children: [
      {
        path: ':type',
        component: ProductListComponent
      }
    ]
  }
];

@NgModule({
  imports: [RouterModule.forChild(routes)],
  exports: [RouterModule]
})
export class ProductSectionRoutingModule { }
import { NgModule } from '@angular/core';
import { Routes, RouterModule } from '@angular/router';

import { LoginComponent } from './login.component';

const routes: Routes = [
  {
    path: '',
    component: LoginComponent
  }
];

@NgModule({
  imports: [RouterModule.forChild(routes)],
  exports: [RouterModule]
})
export class LoginRoutingModule { }
import { NgModule } from '@angular/core';
import { Routes, RouterModule } from '@angular/router';

import { CartComponent } from './cart.component';

const routes: Routes = [
  {
    path: '',
    component: CartComponent
  }
];

@NgModule({
  imports: [RouterModule.forChild(routes)],
  exports: [RouterModule]
})
export class CartRoutingModule { }
import { NgModule } from '@angular/core';
import { Routes, RouterModule } from '@angular/router';

import { SuccessComponent } from './success.component';

const routes: Routes = [
  {
    path: '',
    component: SuccessComponent
  }
];

@NgModule({
  imports: [RouterModule.forChild(routes)],
  exports: [RouterModule]
})
export class SuccessRoutingModule { }
import { NgModule } from '@angular/core';
import { Routes, RouterModule } from '@angular/router';

// Constant
import { appPath } from '../app-path.const';

// Component
import { CheckoutComponent } from './checkout.component';
import { CustomerInfoComponent } from './customer-info/customer-info.component';
import { PaymentInfoComponent } from './payment-info/payment-info.component';
import { ReceiptInfoComponent } from './receipt-info/receipt-info.component';

const routes: Routes = [
  {
    path: '',
    component: CheckoutComponent,
    children: [
      {
        path: '',
        redirectTo: appPath.checkoutFlow.customerInfo,
        pathMatch: 'full'
      },
      {
        path: appPath.checkoutFlow.customerInfo,
        component: CustomerInfoComponent
      },
      {
        path: appPath.checkoutFlow.paymentInfo,
        component: PaymentInfoComponent
      },
      {
        path: appPath.checkoutFlow.receiptInfo,
        component: ReceiptInfoComponent
      },
      {
        path: '**',
        redirectTo: appPath.checkoutFlow.customerInfo,
        pathMatch: 'full'
      }
    ]
  }
];

@NgModule({
  imports: [RouterModule.forChild(routes)],
  exports: [RouterModule]
})
export class CheckoutRoutingModule { }
如此一來我們應該已經大致上將所有路由都設定完了,趕快來驗證一下我們設的路由有沒有問題。
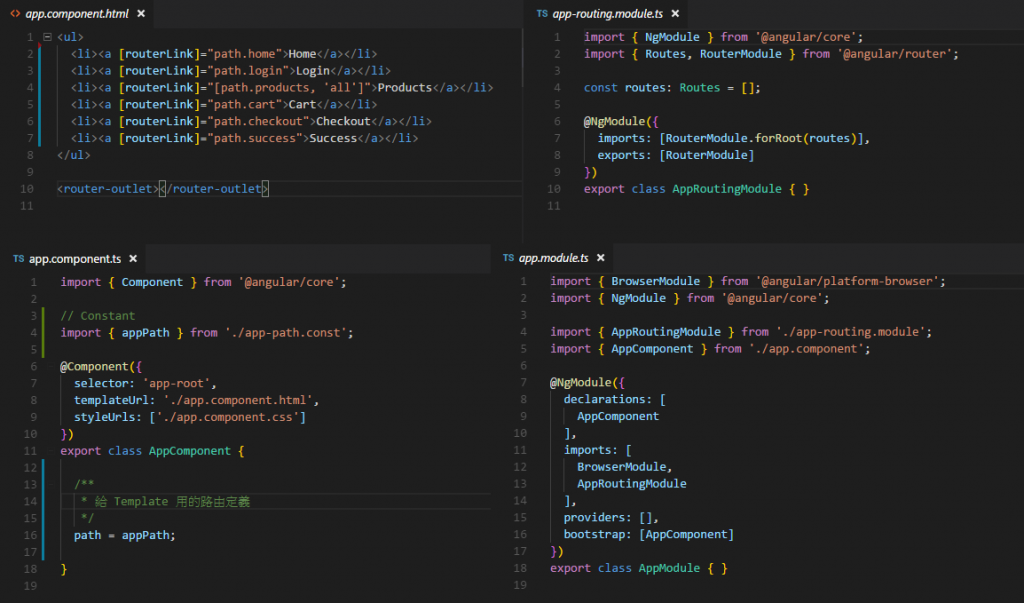
首先我們先打開 app.component.ts 檔,將裡面的程式碼改成這樣:
import { Component } from '@angular/core';

// Constant
import { appPath } from './app-path.const';

@Component({
  selector: 'app-root',
  templateUrl: './app.component.html',
  styleUrls: ['./app.component.css']
})
export class AppComponent {

  /**
   * 給 Template 用的路由定義
   *
   * @memberof AppComponent
   */
  path = appPath;

}
然後再將 app.component.html 裡的 Template 改成這樣:
<ul>
  <li><a [routerLink]="path.home">Home</a></li>
  <li><a [routerLink]="path.login">Login</a></li>
  <li><a [routerLink]="[path.products, 'all']">Products</a></li>
  <li><a [routerLink]="path.cart">Cart</a></li>
  <li><a [routerLink]="path.checkout">Checkout</a></li>
  <li><a [routerLink]="path.success">Success</a></li>
</ul>

<router-outlet></router-outlet>
最後再到 product-section.component.html 跟 checkout.component.html 裡加入路由插座 <router-outlet></router-outlet> :
<p>
  product-section works!
</p>

<router-outlet></router-outlet>
<p>
  checkout works!
</p>

<router-outlet></router-outlet>
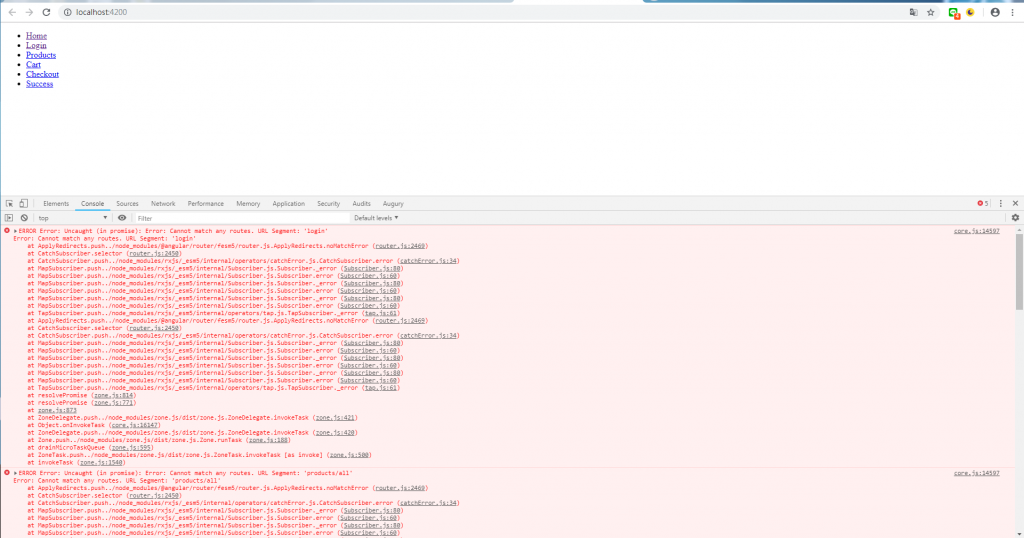
設定完成!!
如果我們的設定沒有任何問題的話,應該可以看到像這樣子的效果:

除了都能正常導頁之外,有注意到網址沒有 # 了嗎?!這是因為這次我們採用預設的 PathLocationStrategy 路由策略的關係。
所以如果設定完之後但沒有看到畫面時先別緊張,檢查一下你的 URL 是不是含有 # 。
如果有,拿掉之後再看看有沒有恢復正常;如果沒有,趕快留言告訴我你的問題吧!!
關於路由的設定就先到這邊,接下來要開始套版囉!!
我們明天見!!
優質好文^^
文件app-path.const.ts
// 結帳成功
success: 'suceess' 打錯一個字母喔
很高興你喜歡我的文章,也謝謝你特別留言告知!!
已修正囉!!

Leo大大 小弟卡關需要請教
Q1 無法獲取路徑
Q2 app-path.const 中 Object有紅線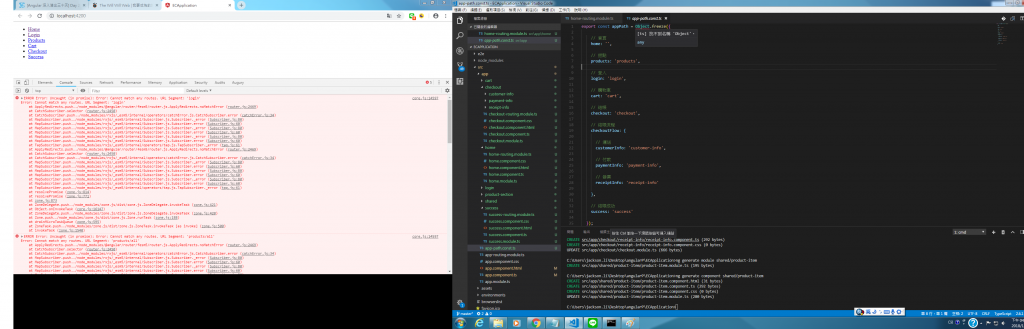

Hi Jackson,
抱歉這麼晚才回你,因為我前幾天人不在台灣^^"
關於你的問題:
Q1 無法獲取路徑
這個部分我可能要看你的 RouteModule 以及 HTML 、 TS 檔才會比較清楚你的問題是出在哪裡。
Q2 app-path.const 中 Object有紅線
這個是因為 TypeScript 不認得 Object 這個型別。
比較簡單的解決辦法是直接拿掉 Object.freeze() ,留下 {} 及其裡面的資料就好,如:
export const appPath = {

  // 首頁
  home: '',

  // 甜點
  products: 'products',

  // ...

};
因為這個 Object.freeze() 其實是我個人加上去,目的是為了避免 appPatch 這個 contant(常數)裡的值被誤改。
另外一種方式則是在最上方加上:
declare Object: any;
這樣也可以。
重做兩次還是卡在這個位子
別慌,有看到問題點了~
第一個問題是,你的 app-routing.module.ts 檔裡的第四行 - routes 這個變數是空陣列,裡面沒有任何設定,是不是忘記設定囉?!XD
第二個問題,你就直接把 Object.freeze() 拿掉沒關係,留下 {} 區間裡的所有設定就好。
Problem fixed感謝大大 小弟不才誤會app-routing.module.ts那段不用加 
至於第二個問題我發現Object即使有紅字也沒影響頁面,我就先不管了XD 再次謝謝您的回答
很高興有幫上你的忙!
麻煩大家留意一下!
原本我在 app-path.const.ts 裡,有使用 Object.freeze() 這個函式把 {} 裡所有的設定包起來,目的是為了防止定義檔不小心被修改。
不過目前發現,這個方式使用在路由的定義上時,在使用 Production 模式去編譯或是運行時,Angular 的路由會拿不到我們事先定義好的值。
因此,我在文章中的 app-path.const.ts 裡,已經將 Object.freeze() 拿掉,也請大家在路徑的定義檔裡先移除 Object.freeze() 這個函式!!
非常抱歉造成大家的困擾,還請大家多多留意!!
他說找不道模組欸 請問這個怎麼解決
Hi, brad840628
看起來是路徑的問題,可能要留意一下該檔案的擺放位置唷!
請問要怎麼新增這個檔案 他是module 還是 component
Hi brad840628,
它就只是個單純的 .ts 檔,直接新增檔案然後用 .ts 結尾命名即可唷!
HI 大大你好
我在終端機執行了ng serve
畫面是顯示建置成功了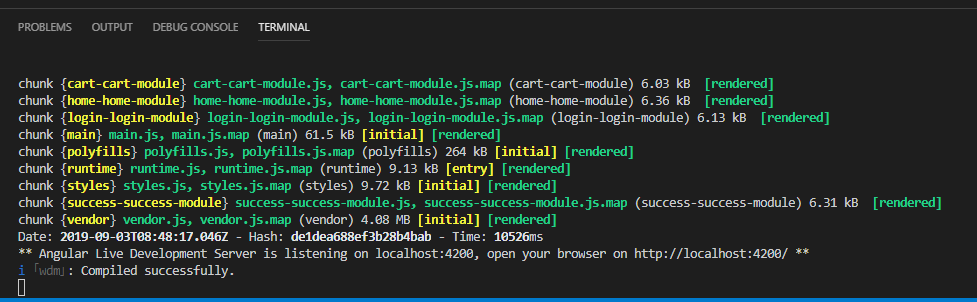
可是我點開localhost:4200卻什麼也沒有的一片空白
於是我點開F12查看了console
發現有一個錯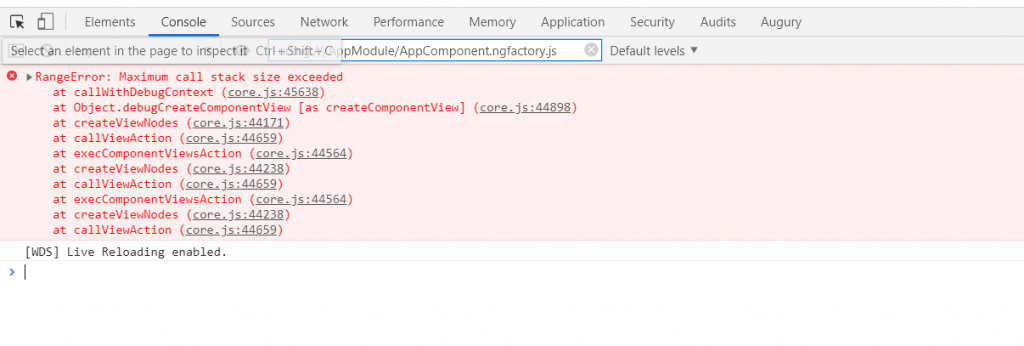
想問問這應該怎麼解決QQ
Hi a405066,
這個錯誤訊息是因為無窮迴圈的關係,原因是你在程式的某個地方有出現自己呼叫自己的函式造成的。
HI 大大你好
我後來有找到我自己呼叫自己的地方
謝謝回覆!
Hi a405066,
有找到就好! ^^
Hi Leo 大大,
很喜歡這篇文章, 可以跟著步驟一步步學習如何建立網站
剛才發現這篇教學似乎因為延遲聲明的方法在Angular後面版本有變更, 會找不到模組
core.js:6140 ERROR Error: Uncaught (in promise): Error: Cannot find module './login/login.module'
Error: Cannot find module './login/login.module'
已找到方法解決, 在這裡補充說明~
原本:
{
path: appPath.login,
loadChildren: './login/login.module#LoginModule'
}
變成:
{
path: appPath.login,
loadChildren: () => import('./login/login.module').then(m => m.LoginModule)
}
Hi Chil,
很高興你喜歡它,
另外也非常感謝你的補充,
我再把它加上去 ^^
您好 Leo大大
最近在看您的文章學習angular
有些關於路由的問題想請教
這是我目前所想的架構圖為下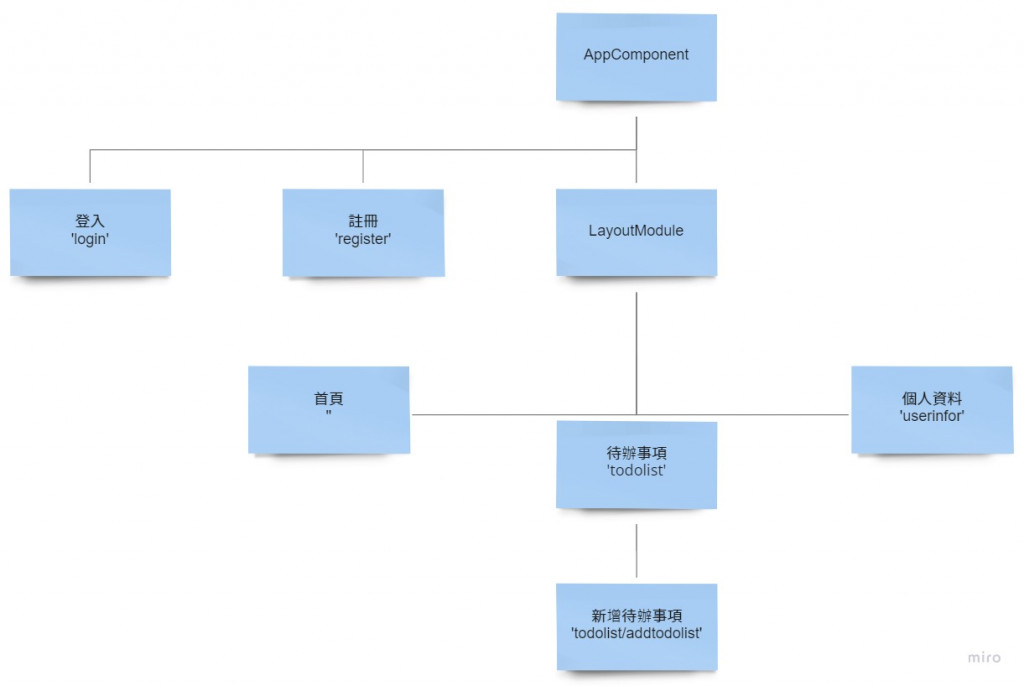
但因為想要新增一個進入頁面時URL為空的驗證頁
判斷是否有使用者權限再進入首頁所以修改架構圖為下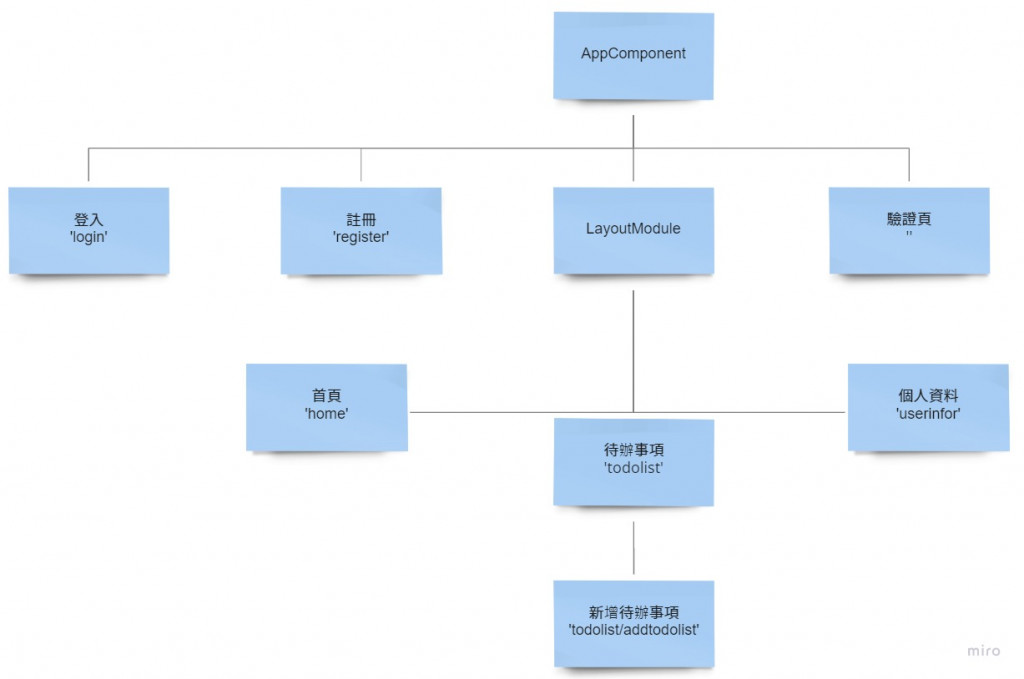
有做一個LayoutModule是因為下面3個子路由會共用到同一個FooterTab
想問一下修改後的架構有沒有問題
是否需要將LayoutModule加入路由
讓首頁的路徑調整成 'layout/home'
如有有錯誤理解請麻煩糾正我一下
Hi bsexp301479,
關於權限驗證,最好的檢查時機點是在路由守門員 Guard 裡噢
參考文章:https://ithelp.ithome.com.tw/articles/10208485
感謝您
現在是在路由的設定上有點錯亂
剛剛重新想了一下路由的邏輯有達到我想要的效果了~