在上一章介紹了PCA降維,但PCA是計算整體的特徵,然而主要特徵如果相同,而降為時非常細微的特徵被忽略掉,這時候PCA就無法達到所需的降維要求。而在人工智慧當中Auto Encoder使用神經網路運算,可以使得更細微的部分不被忽略,但個人認為PCA的還原程度會比Auto Encoder來的優,畢竟神經網路是用來近似出資料的特徵函數。主要參考[1]。
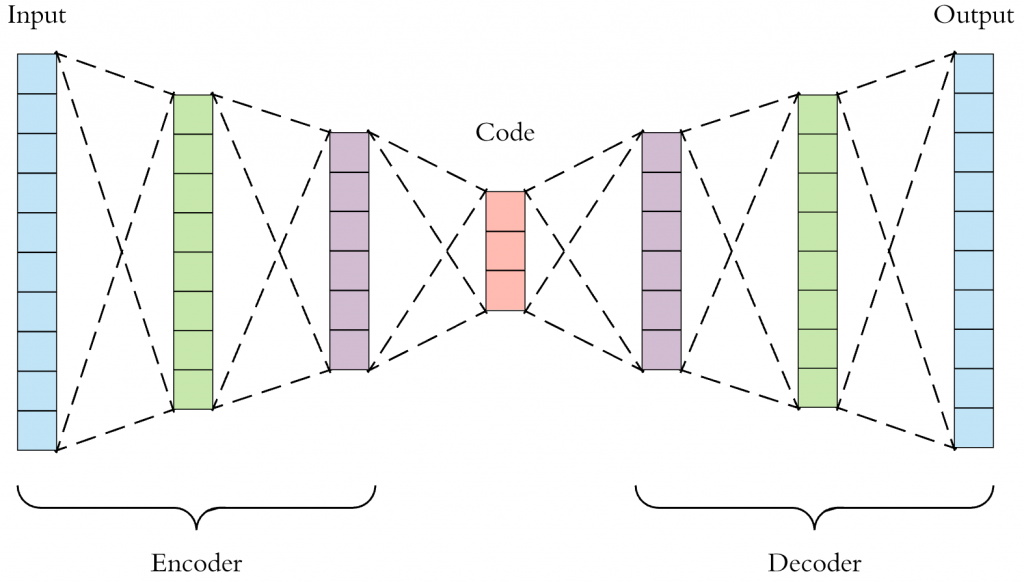
簡單介紹AutoEncoder。其實AutoEncoder主要是由兩個神經網路組合成,一個神經網路作為Encoder,另一個則是Decoder,而你可以用任意神經網路做訓練,而不同的地方為Decoder的輸出是一張圖片,簡單來說是一個由輸入少到輸出多的神經網路,但原理與之前的神經網路相同,如下圖。而這裡的Loss使用的為均方誤差函數,單純將輸入圖片與輸出圖片做比對。

來源[2]。
這次使用之前的神經網路來實作,差別並無太大。
learning_rate = 0.001
batch_size = 128
train_times = 30
train_step = 1

encoder_hidden1_size = 400
encoder_hidden2_size = 300
encoder_hidden3_size = 200
decoder_hidden1_size = 200
decoder_hidden2_size = 300
decoder_hidden3_size = 400

output_size = 20
之前有介紹,可前往網址觀看。
def layer_batch_norm(x, n_out, is_train):
    beta = tf.get_variable("beta", [n_out], initializer=tf.zeros_initializer())
    gamma = tf.get_variable("gamma", [n_out], initializer=tf.ones_initializer())

    batch_mean, batch_var = tf.nn.moments(x, [0], name='moments')
    ema = tf.train.ExponentialMovingAverage(decay=0.9)
    ema_apply_op = ema.apply([batch_mean, batch_var])

    def mean_var_with_update():
        with tf.control_dependencies([ema_apply_op]):
            return tf.identity(batch_mean), tf.identity(batch_var)

    mean, var = tf.cond(is_train, mean_var_with_update, lambda:(batch_mean, batch_var))

    x_r = tf.reshape(x, [-1, 1, 1, n_out])
    normed = tf.nn.batch_norm_with_global_normalization(x_r, mean, var, beta, gamma, 1e-3, True)
    return tf.reshape(normed, [-1, n_out])
這裡都使用全鏈結層做運算。softplus可當作是relu的平滑優化版本,
def layer(x, weights_shape, is_batch=True, activation='relu'):
    init = tf.random_normal_initializer(stddev=np.sqrt(2. / weights_shape[0]))
    weights = tf.get_variable(name="weights", shape=weights_shape, initializer=init)
    biases = tf.get_variable(name="biases", shape=weights_shape[1], initializer=init)
    mat_add = tf.matmul(x, weights) + biases
    if is_batch:
        mat_add = layer_batch_norm(mat_add, weights_shape[1], tf.constant(True, dtype=tf.bool))
    if activation == 'relu':
        output = tf.nn.relu(mat_add)
    elif activation == 'sigmoid':
        output = tf.nn.sigmoid(mat_add)
    elif activation == 'softplus':
        output = tf.nn.softplus(mat_add)
    return output
輸入資料x,與一般神經網路相同(可使用convolution來做)。
def encoder(x):
    with tf.variable_scope("encoder"):
        with tf.variable_scope("hide1"):
            hide1 = layer(x, [784, encoder_hidden1_size])
        with tf.variable_scope("hide2"):
            hide2 = layer(hide1, [encoder_hidden1_size, encoder_hidden2_size])
        with tf.variable_scope("hide3"):
            hide3 = layer(hide2, [encoder_hidden2_size, encoder_hidden3_size])
        with tf.variable_scope("output"):
            output = layer(hide3, [encoder_hidden3_size, output_size])
    return output
輸入向量x每一筆大小為output_size,最後使用sigmoid主要是因為輸出是一張圖片,盡量使用損原較小的活化函數(relu無負號,損失較大)。
def decoder(x):
    with tf.variable_scope("decoder", reuse=tf.AUTO_REUSE):
        with tf.variable_scope("hide1", reuse=tf.AUTO_REUSE):
            hide1 = layer(x, [output_size, decoder_hidden1_size])
        with tf.variable_scope("hide2", reuse=tf.AUTO_REUSE):
            hide2 = layer(hide1, [decoder_hidden1_size, decoder_hidden2_size])
        with tf.variable_scope("hide3", reuse=tf.AUTO_REUSE):
            hide3 = layer(hide2, [decoder_hidden2_size, decoder_hidden3_size])
        with tf.variable_scope("output", reuse=tf.AUTO_REUSE):
            output = layer(hide3, [decoder_hidden3_size, 784], is_batch=False, activation='sigmoid')
    return output
def predict(x):
    return decoder(encoder(x))
這裡使用平均誤差函數。
def loss(output, x):
    sqrt_loss = tf.sqrt(tf.reduce_sum(tf.square(tf.subtract(output, x)), 1))
    mean_loss = tf.reduce_mean(sqrt_loss)
    loss_his = tf.summary.scalar("loss", mean_loss)
    return mean_loss
這裡使用Adam。
def train(loss, index):
    return tf.train.AdamOptimizer(learning_rate=learning_rate, beta1=0.9, beta2=0.999, epsilon=1e-08).minimize(loss, global_step=index)
    #return tf.train.RMSPropOptimizer(learning_rate, decay=0.9).minimize(loss, global_step=index)
    #return tf.train.AdagradOptimizer(learning_rate).minimize(loss, global_step=index)
    #return tf.train.MomentumOptimizer(learning_rate, momentum=0.9).minimize(loss, global_step=index)
    #return tf.train.GradientDescentOptimizer(learning_rate).minimize(loss, global_step=index)
image_summary為將資料轉為圖片,並存到tensorboard顯示。
def image_summary(label, image_data):
    reshap_data = tf.reshape(image_data, [-1, 28, 28, 1])
    tf.summary.image(label, reshap_data)

def accuracy(output, t):
    image_summary("input_image", t)
    image_summary("output_image", output)
    sqrt_loss = tf.sqrt(tf.reduce_sum(tf.square(tf.subtract(output, t)), 1))
    y = tf.reduce_mean(sqrt_loss)
    tf.summary.scalar("accuracy error", y)

    return y
1.初始化資料。
2.預測函數。
3.損失函數。
4.訓練函數。
5.驗證函數。
6.tensorboard可視化。
7.開始訓練。
8.
if __name__ == '__main__':
    # init
    mnist = input_data.read_data_sets("MNIST/", one_hot=True)
    input_x = tf.placeholder(tf.float32, shape=[None, 784], name="input_x")

    # predict
    predict_op = predict(input_x)

    # loss
    loss_op = loss(predict_op, input_x)

    # train
    index = tf.Variable(0, name="train_time")
    train_op = train(loss_op, index)

    # accuracy
    accuracy_op = accuracy(predict_op, input_x)

    # graph
    summary_op = tf.summary.merge_all()
    session = tf.Session()
    summary_writer = tf.summary.FileWriter("log/", graph=session.graph)

    init_value = tf.global_variables_initializer()
    session.run(init_value)
    for time in range(train_times):
        avg_loss = 0.
        total_batch = int(mnist.train.num_examples / batch_size)
        for i in range(total_batch):
            minibatch_x, _ = mnist.train.next_batch(batch_size)
            session.run(train_op, feed_dict={input_x: minibatch_x})
            avg_loss += session.run(loss_op, feed_dict={input_x: minibatch_x}) / total_batch

        if (time + 1) % train_step == 0:
            accuracy = session.run(accuracy_op, feed_dict={input_x: mnist.validation.images})
            summary_str = session.run(summary_op, feed_dict={input_x: mnist.validation.images})
            summary_writer.add_summary(summary_str, session.run(index))
            print("train times:", (time + 1),
                        " avg_loss:", avg_loss,
                        " accuracy:", accuracy)

AutoEncoder的Decoder輸入向量可以產生圖片,但無法得知Decoder會產生出甚麼圖片,因為我們在訓練時只是讓訓練資料能產生出對應的數字圖片,而每一個數字可能有對應一個區間,但也可能區間內又有不同的數字或不是數字,而這是AutoEncoder的缺點,而下一次要介紹的則是解決這個缺點,名為變分自動編碼器(Variational Autoencoder),主要是在Encoder的輸出加上一些條件,並且也將loss改為條件的loss計算。
[1]籃子軒(譯者)(2018)。Deep Learning深度學習基礎|設計下一代人工智慧演算法。台灣:歐萊禮。
[2]https://towardsdatascience.com/applied-deep-learning-part-3-autoencoders-1c083af4d798
