iT邦幫忙

第 11 屆 iThome 鐵人賽

DAY 6
0
Google Developers Machine Learning

Machine Learning with TensorFlow on Google Cloud Platform系列 第 6

鐵人賽Day6 - How Google does Machine Learning (5/5)

  • 分享至 

  • xImage
  •  

Cloud Datalab

主旨:介紹雲端開發環境,Cloud Datalab

今天將會講到2個Lab,分別是:

  1. 使用Datalab 和 BigQuery來分析資料
  2. 使用ML的API

[GCP Lab實作-2]:使用 Datalab 和 BigQuery 來分析資料

Cloud Datalab的實作中,我們可以學到:

  • 開啟 Cloud Datalab
  • 使用 BigQuery
  • 在 Datalab 裡畫圖

[Part 1]:開啟 Cloud Datalab

  1. 登入GCP(如果步驟還不熟的,可以參考昨天的文章)

  2. 右上角有Cloud Shell的按鈕,點擊打開Cloud Shell(會在畫面下方開啟)

  1. 在Cloud Shell中輸入下方指令可以看到目前的區域列表(Zone list):
gcloud compute zones list
  1. 輸入下方指令創建Datalab,這裡<ZONE>的部分填入適當的地區,我們選擇us-east1-c
datalab create mydatalabvm --zone <ZONE>

  1. 創建的時間約需等5分鐘,過程中會問你ssh passphrase,這裡直接按Enter(沒有passphrase),創建成功後會顯示要你去按Web Preview

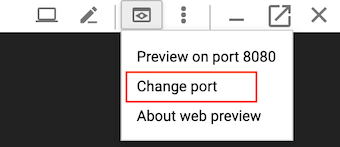
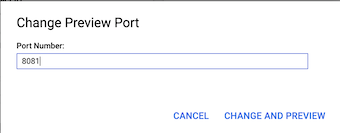
  1. 按下Cloud Shell上方的Web Preview,選擇Change Port,將Port number改為8081後,按下CHANGE AND PREVIEW

https://ithelp.ithome.com.tw/upload/images/20190907/20120208yc1IsALBIw.png

https://ithelp.ithome.com.tw/upload/images/20190907/20120208REXdcPGzDK.png

這樣我們就成功創建了一個Cloud Datalab了!

[Part 2]:使用 BigQuery

接著我們來使用BigQuery準備一些資料,以供後面做圖分析。

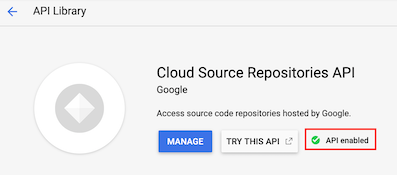
  1. 點進連結確定API有沒有打開

https://ithelp.ithome.com.tw/upload/images/20190907/20120208ufN92pbgkE.png

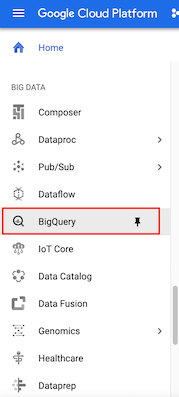
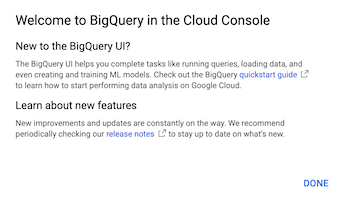
  1. 在 Navigation menu 選擇 BigQuery 後,再按Done

https://ithelp.ithome.com.tw/upload/images/20190907/20120208jZxpsqi0Vl.png

https://ithelp.ithome.com.tw/upload/images/20190907/20120208wn9W76nKB6.png

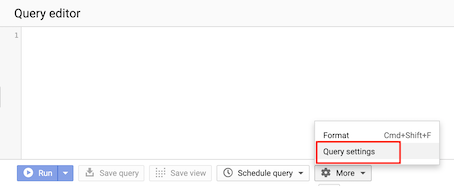
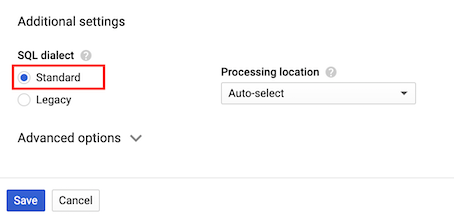
  1. 進入後在More鈕上,選擇Query Settings,確定裡面Additional Settings部分是使用Standard SQL後,按Save

https://ithelp.ithome.com.tw/upload/images/20190907/20120208HoDYhKNsRQ.png

https://ithelp.ithome.com.tw/upload/images/20190907/20120208coKYohYmDL.png

  1. 在Query editor裡面,輸入下方指令後按Run
#standardSQL
SELECT
  departure_delay,
  COUNT(1) AS num_flights,
  APPROX_QUANTILES(arrival_delay, 5) AS arrival_delay_quantiles
FROM
  `bigquery-samples.airline_ontime_data.flights`
GROUP BY
  departure_delay
HAVING
  num_flights > 100
ORDER BY
  departure_delay ASC

這樣我們就成功完成初次的BigQuery使用了!

[Part 3]:在 Datalab 裡畫圖

學會使用BigQuery後,我們來試著在 Datalab 裡面將Query後的結果做圖,用來後續資料的分析。

  1. 在Cloud Datalab頁面,移至notebook下,按下 +Notebook按鈕 ,新增一個notebook

  1. 將notebook取名,這邊取為flights

  1. 在第一個cell,輸入下方程式,按下Run(或按Shift+Enter)執行,執行完後便會將 BigQuery 的結果存入Pandas的dataframe
query="""
SELECT
  departure_delay,
  COUNT(1) AS num_flights,
  APPROX_QUANTILES(arrival_delay, 10) AS arrival_delay_deciles
FROM
  `bigquery-samples.airline_ontime_data.flights`
GROUP BY
  departure_delay
HAVING
  num_flights > 100
ORDER BY
  departure_delay ASC
"""

import google.datalab.bigquery as bq
df = bq.Query(query).execute().result().to_dataframe()
df.head()
  1. 執行下方程式,做出飛機延遲的十分位表
import pandas as pd
percentiles = df['arrival_delay_deciles'].apply(pd.Series)
percentiles = percentiles.rename(columns = lambda x : str(x*10) + "%")
df = pd.concat([df['departure_delay'], percentiles], axis=1)
df.head()

  1. 執行下方程式畫圖
without_extremes = df.drop(['0%', '100%'], 1)
without_extremes.plot(x='departure_delay', xlim=(-30,50), ylim=(-50,50));

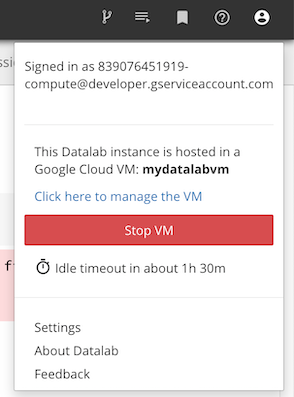
  1. 做完後若想要清除VM的話,可以從右上角的個人帳號按鈕那邊點開,選擇Stop VM

https://ithelp.ithome.com.tw/upload/images/20190907/20120208WQ1316g4OG.png

  1. 之後若想要重新連回來也不用擔心,回到Cloud shell,輸入下方指令,就可以連回Datalab了:
datalab connect mydatalabvm

今天的第一個Lab就到這邊,我們學會了怎麼使用Datalab和BigQuery,接著來學怎麼使用功能強大的ML API吧!

[GCP Lab實作-3]:使用ML的API

ML API的Lab實作中,我們可以學會:

  • 在 Datalab 中使用 ML APIs

[Part 1]:複製課程路徑到自己的Datalab下

  1. 登入GCP,並開啟Datalab(忘記步驟的話可以參考上面Lab的[Part 1])

  2. 打開Datalab後,移至notebook,按下 +Notebook 新增

  1. 重新命名notebook名稱,這邊取為repocheckout

  1. 執行下列指令,複製repo到這邊:
%bash
git clone https://github.com/GoogleCloudPlatform/training-data-analyst
rm -rf training-data-analyst/.git

[Part 2]:啟動API和獲得API key

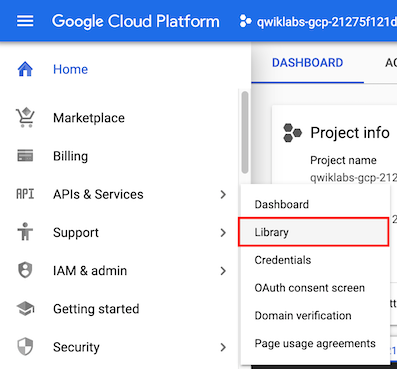
  1. 在GCP console menu 上,選擇 APIs and services 的 Library

https://ithelp.ithome.com.tw/upload/images/20190907/20120208YEPWbcZBcO.png

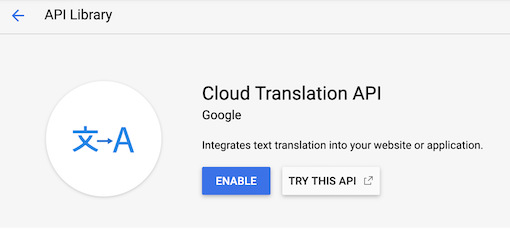
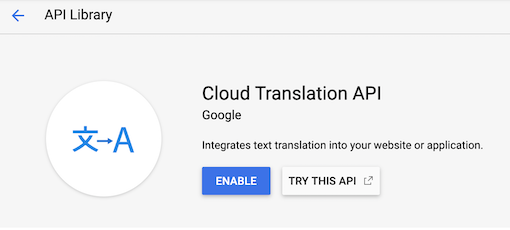
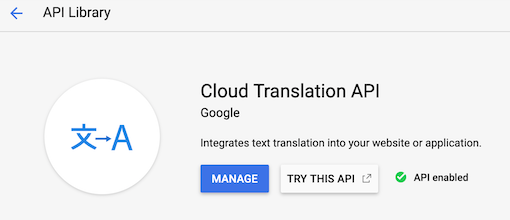
  1. 在搜尋欄分別輸入Vision、Translate API、Speech API 和 Natural Language API,確定都有被啟動(Enabled),這邊可以看到Vision API一開始就是 Enabled ,但是Translate API就沒有,需要點ENABLE啟動

https://ithelp.ithome.com.tw/upload/images/20190907/20120208I3uXFQczcr.pnghttps://ithelp.ithome.com.tw/upload/images/20190907/20120208lDhLiCoNuR.png

https://ithelp.ithome.com.tw/upload/images/20190907/20120208gS8m6OE2st.pnghttps://ithelp.ithome.com.tw/upload/images/20190907/2012020813ACVLyZ9F.png

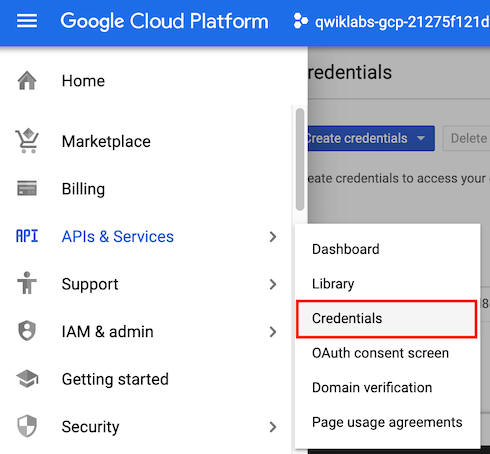
  1. 在GCP console menu 上,選擇 APIs and services 的 Credentials

https://ithelp.ithome.com.tw/upload/images/20190907/20120208nJLAaPgd8H.png

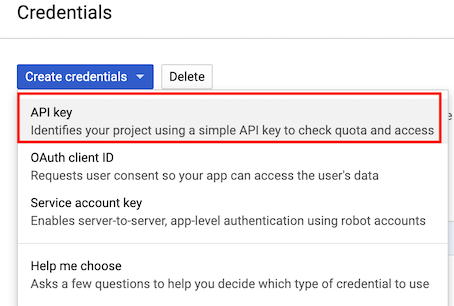
  1. 這時候會看到Credential的資訊,如果沒有API key的話,點選Create credentials,選擇API key

https://ithelp.ithome.com.tw/upload/images/20190907/20120208zEXMGrZ1zC.png

  1. Credential資訊就會多一個API keys的資訊

  1. 回到Datalab頁面,打開 training-data-analyst > courses > machine_learning > deepdive > 01_googleml > mlapis.ipynb 的這個檔案

  1. 打開mlapis.ipynb 這個檔案後,輸入剛才創建的API key資訊

  1. 每個cell依序執行,看看每個不同API的功用

這就是第二個Lab啦,從這個實作你學會了創建API key,並且使用ML APIs了!


今天介紹了如何使用Cloud Datalab與ML APIs,明天我們將開始第二個子課程Launching into Machine Learning


上一篇
鐵人賽Day5 - How Google does Machine Learning (4/5)
下一篇
鐵人賽Day7 - Launching into Machine Learning (1/4)
系列文
Machine Learning with TensorFlow on Google Cloud Platform30
圖片
  直播研討會
圖片
{{ item.channelVendor }} {{ item.webinarstarted }} |
{{ formatDate(item.duration) }}
直播中

尚未有邦友留言

立即登入留言