我們大致上試過在AWS上建立API Gateway,並發出request讓Lambda產生回應了,但是上次的HelloLambda無法處理經過Proxy integration的request/response。這次我們來嘗試透過在SAM Local上運行API Gateway模式,進一步了解request/response的處理方式。
首先,調整之前Run Configurations中設定的AWS SAM Local->LambdaExample SAM Local,將Run as:模式改選為API Gateway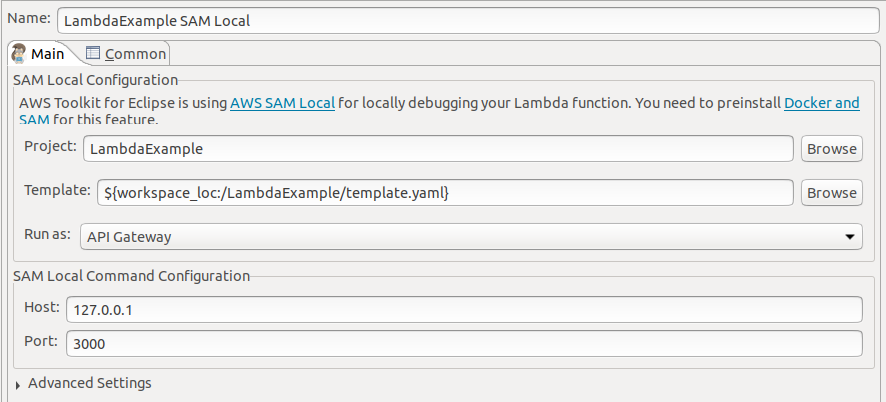
下面的SAMlocal Coommand Configuration預設值,這將是我們本機測試運行的Host/Port
而再次執行LambdaExample SAM Local,編譯完成後將會在Console中啟動SAM Local並輸出內容,保持仍在運行的狀態
Mounting HelloLambda at http://127.0.0.1:3000/hello [DELETE, GET, HEAD, OPTIONS, PATCH, POST, PUT]
You can now browse to the above endpoints to invoke your functions. You do not need to restart/reload SAM CLI while working on your functions, changes will be reflected instantly/automatically. You only need to restart SAM CLI if you update your AWS SAM template
2019-09-17 15:12:19  * Running on http://127.0.0.1:3000/ (Press CTRL+C to quit)
會看到SAM Local按照 template.yaml當中的設定,將HelloLambda(template設定的名稱)掛載在http://127.0.0.1:3000/hello 的所有方法上。(使用ANY並不是好作法,但是我們之後再調整)
另外也有一段說明,你並不需要每次都restart/reload SAM Local,這是因為SAM Local直到request觸發event,SAM Local透過Docker invoke Lambda的時候每次都會重新載入程式(jar)。所以你只有第一次啟動SAM Local或修改template.yaml 的時候會需要再次執行Run as AWS SAM Local,而只是變更Java code的時候只要重新進行Maven package即可,所以也在Run as中新增一個Maven build吧。
當然,如果是需要重新啟動SAM Local,請記得將中止原本的SAM Local console,否則會因為port已經被佔用而啟動失敗喔。
你也可以在專案目錄下執行CLI以預設值啟動SAM Local
$ sam local start-api
現在可以使用SAM Local測試API了
隨意發出一個request,這次就可以不用在header提供x-api-key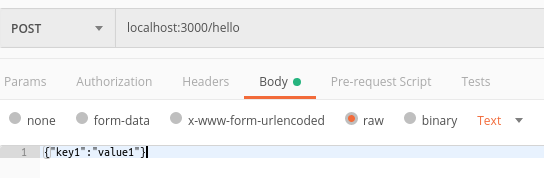
當然,因為 response格式還是錯的,我們得到了http 502
但是SAM Local當中可以看到HelloLambda log輸出的request 內容
{
   httpMethod=POST,
   body=   {
      "key1":"value1"
   },
   resource=/hello,
   requestContext=   {
      resourceId=123456,
      apiId=1234567890,
      resourcePath=/hello,
      httpMethod=POST,
      requestId=c6af9ac6-7b61-11e6-9a41-93e8deadbeef,
      accountId=123456789012,
      stage=Prod,
      identity=      {
         apiKey=null,
         userArn=null,
         cognitoAuthenticationType=null,
         caller=null,
         userAgent=Custom User Agent String,
         user=null,
         cognitoIdentityPoolId=null,
         cognitoAuthenticationProvider=null,
         sourceIp=127.0.0.1,
         accountId=null
      },
      extendedRequestId=null,
      path=/hello
   },
   queryStringParameters=null,
   multiValueQueryStringParameters=null,
   headers=   {
      Cache-Control=no-cache,
      Postman-Token=4d185495-a813-47de-8631-c2bcfd27d30c,
      Content-Type=text/plain,
      User-Agent=PostmanRuntime/7.6.0,
      Accept=*/*,
      Host=localhost:3000,
      Accept-Encoding=gzip,
      deflate,
      Content-Length=17,
      Connection=keep-alive,
      X-Forwarded-Proto=http,
      X-Forwarded-Port=3000
   },
   multiValueHeaders=   {
      Cache-Control=      [
         no-cache
      ],
      Postman-Token=      [
         4         d185495-a813-47de-8631-c2bcfd27d30c
      ],
      Content-Type=      [
         text/plain
      ],
      User-Agent=      [
         PostmanRuntime/7.6.0
      ],
      Accept=      [
         */*
      ],
      Host=      [
         localhost:3000
      ],
      Accept-Encoding=      [
         gzip,
         deflate
      ],
      Content-Length=      [
         17
      ],
      Connection=      [
         keep-alive
      ],
      X-Forwarded-Proto=      [
         http
      ],
      X-Forwarded-Port=      [
         3000
      ]
   },
   pathParameters=null,
   stageVariables=null,
   path=/hello,
   isBase64Encoded=false
}
Lambda Proxy integration轉換好所有的http request細節資料也增加了一些東西在裡面,而body中也有收到的json
但是我們想要先能正常運行,所以想先處理response的問題
按照接下來的log紀錄
Function returned an invalid response (must include one of: body, headers, multiValueHeaders or statusCode in the response object). Response received: "Hello from Lambda!"
原來是回傳的內容至少要包含body, headers, multiValueHeaders or statusCode之其一在response object。
那麼首先,我們需要將handleRequest return type以及implements RequestHandler都改為Object(記得將專案中的test code一起修改或拿掉,否則會編譯錯誤)。然後先改成用簡單的Anonymous class回傳代替
public class LambdaFunctionHandler implements RequestHandler<Object, Object> {

    @Override
    public Object handleRequest(Object input, Context context) {
        context.getLogger().log("Input: " + input);
        // TODO: implement your handler
        return new Object() {
            public int statusCode = 200;
            public String body = "Hello from Lambda!";
        };
    }
}
這時候我們再次送出request就能正確response了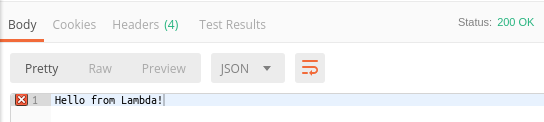
只不過因為預設在response自動產生的Content-Type: application/json這個header,而目前的body並未符合json 格式,postman還表示不美麗呢...
明天再來試試看讀取request中的內容並且產生response好了...

