昨天我們把該註冊的帳號都註冊完了,今天就可以好好的來利用暴力破解法創造我們第一個 LINE 聊天機器人囉。為什麼說是暴力破解法呢?因為創造 LINE 聊天機器人的過程中,其實涉及了不少 HTTP Request、HTTP Response,以及GET、POST,等等現在依然很困擾著我的概念,以及許多 Python 模組的應用,要在一時三刻之內說明清楚,我的話是辦不到的。有興趣的話,卡米狗的作者在這方面討論的非常詳細➀,我也是拜讀他的大作走過來的。不過想想我們最初的目的吧,我們最終目標是要成為草泥馬訓練大師,而不是網路大師。只要能做出幫我們好好照顧草泥馬的 LINE 聊天機器人,對這些異次元的概念一知半解又有何妨(X)。
網路上不少地方都可以找到 LINE 聊天機器人相關的程式碼。各位強者寫出來的 LINE 聊天機器人其功能五花八門,有些可以幫你查天氣,有些可以幫你查美女圖片,有些甚至可以幫你查美女的 LINE(?)。不過這之中,都有一個最核心的部分,就是接收 LINE 的資訊,向 LINE 宣告這名機器人存在的程式碼。不囉嗦,直接來看看它的核心架構。
# 載入需要的模組
from __future__ import unicode_literals
import os
from flask import Flask, request, abort
from linebot import LineBotApi, WebhookHandler
from linebot.exceptions import InvalidSignatureError

app = Flask(__name__)

# LINE 聊天機器人的基本資料
line_bot_api = LineBotApi('聊天機器人的 Chennel access token')
handler = WebhookHandler('聊天機器人的 Channel secret')

# 接收 LINE 的資訊
@app.route("/callback", methods=['POST'])
def callback():
    signature = request.headers['X-Line-Signature']

    body = request.get_data(as_text=True)
    app.logger.info("Request body: " + body)

    try:
        handler.handle(body, signature)
    except InvalidSignatureError:
        abort(400)

    return 'OK'

if __name__ == "__main__":
    app.run()
上面那段程式碼真是看得令人眼花撩亂,是吧?我們先挑其中 3 個部份來講:
載入需要的模組
這是第一部分。其中最重要的兩個模組是flask跟linebot。flask是為了架設網站用的,而linebot應該就不用我再多說了吧,當然是 LINE 提供給 Python 讓我們控制 LINE 聊天機器的的模組。
LINE 聊天機器人的基本資料
你登入你的 LINE 需要輸入帳號密碼,聊天機器人登入它的 LINE 當然也要。要去哪裡找到這些資料呢?請到我們昨天在 LINE Developers 裡創立的 Provider 的 Channel 裡,在 "Messaging Settings" 裡,有一欄 "Channel access token",如圖一。如果是空白的,右邊有個 "Issue" 按下去,LINE 會幫你產生一個。"Channel secret" 則是在 "Channel ID" 下面一欄,如圖二。這兩個都是很重要的聊天機器人個資,請小心保存。如果懷疑資料外洩了,也不要太緊張,按 "Issue",請 LINE 重新發給你一個。
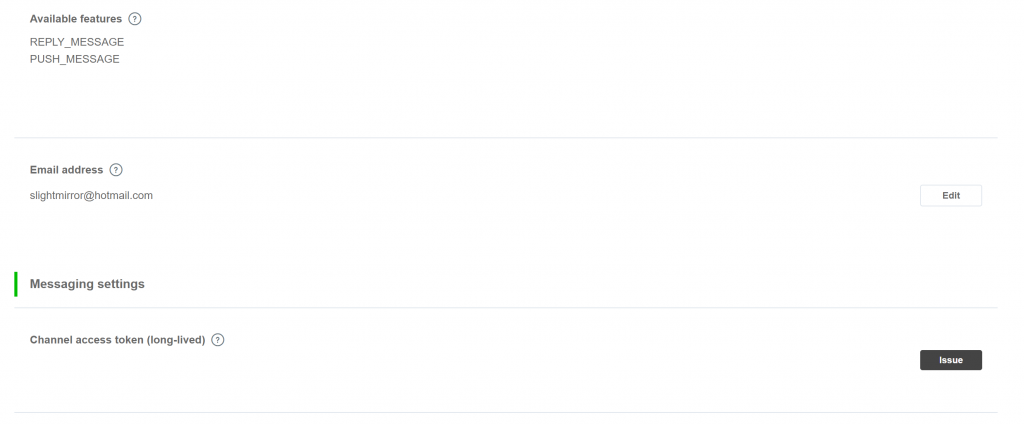
圖一、Channel access token
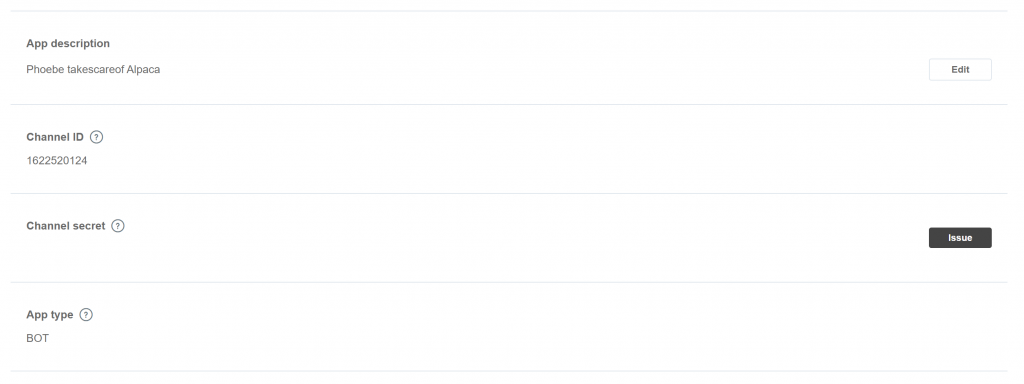
圖二、Channel secret
@app.route("/callback", methods=['POST'])就有得講了。簡而言之,這是flask模組特有的方法。因為 LINE 確認聊天機器人存在的方法,以及所有 LINE 的資訊,就是要送到一個叫 "/callback" 的地方。因此我們利用這行程式碼,告訴我們的聊天機器人,當 LINE 來 "/callback" 敲門的時候,要做什麼動作。基本上,這段程式碼是一個標準流程➁,我們之後也鮮少機會去更動它。因此你注意到了嗎,這段程式碼是非常重要,但我們可以不知道它在寫什麼的一段程式碼。當然,如果有時間我們再回過頭來討論,不過今天先講別的。 昨天已經註冊好 Heroku 也安裝了 Heroku CLI,那麼今天開啟命令提示字元(cmd)之後,輸入heroku login,應該就會看到如下畫面:
C:\Users\MyName>heroku login
heroku: Enter your login credentials
Email:
請輸入你的 Heroku 帳號跟密碼。成功的話,應該會像這樣:
C:\Users\MyName>heroku login
heroku: Enter your login credentials
Email: 你的 Heroku 帳號
Password: *************
Logged in as 你的 Heroku 帳號
利用heroku create的指令創造一個 Heroku 應用:
C:\Users\MyName>heroku create 你-APP-的名字
Creating ⬢ 你-APP-的名字... done
https://你-APP-的名字.herokuapp.com/ | https://git.heroku.com/你-APP-的名字.git
首先 Heroku 會確認"你-APP-的名字"是否有人使用,若沒有,那麼就會幫你建立一個伺服器,而伺服器的首頁在這裡:https://你-APP-的名字.herokuapp.com/。
Heroku 的應用程式需要幾個特殊的檔案,讓它知道你所啟用的應用程式類型,需要在什麼環境下,有哪些條件,有哪些附加的套件等等的。這些特殊的檔案分別是Procfile、requirements.txt,以及runtime.txt。我一項一項介紹:
Procfileapp_core,那麼我們的Procfile裡面會寫成這樣:web: gunicorn app_core:app –preload
需要注意的是,Procfile是一個沒有副檔名的檔案,你可以先用記事本將上面那段文字存成Procfile.txt之後,再把檔案重新命名成Procfile。
requirements.txtrequirements.txt裡面是長這樣的:Flask==1.1.1
gunicorn==19.9.0
line-bot-sdk==1.14.0
哈哈注意到了嗎,基本上都是我沒有安裝的套件。
python-3.6.9
所有的這些設定檔,包括Procfile、requirements.txt、以及runtime.txt,必須要同時放在 "Heroku 可以讀到的最外層資料夾" 裡面,而Procfile要讀的 Python 檔案也要放在一起。以我而言,我都把這四個檔案放在 "alpaca_fighting" 這個資料夾裡面。而 "alpaca_fighting" 就是我希望 "Heroku 可以讀到的最外層資料夾"。如果我在 "alpaca_fighting" 這個位置開啟命令提示字元,並輸入tree /F,應該會看起來像這樣:
D:\alpaca_fighting>tree /F
Folder PATH listing
Volume serial number is 9C33-6XDD
D:.
    Procfile
    requirements.txt
    runtime.txt
    app_core.py

No subfolders exist
現在,我們要透過 Git 將我們的資料夾推向 Heroku 了。講白話一點,就是我們要把我們存放有聊天機器人程式碼的資料夾傳到 Heroku 幫我們設立好的伺服器上面了。不懂也沒關係,推久了就會有感覺?
第一件事,確認我們是把資料夾推到這邊 https://git.heroku.com/你-APP-的名字.git。先從命令提示字元裡,進到你想要推向 Heroku 的資料夾裡,然後初始化 Git,如下:
D:\alpaca_fighting>git init
Initialized empty Git repository in D:/alpaca_fighting/.git/
D:\alpaca_fighting>git init
Reinitialized existing Git repository in D:/alpaca_fighting/.git/
第一次初始化 Git 應該會是上面那種情況。以我而言,我想要將D:\alpaca_fighting這個資料夾推向 Heroku,那麼我就進到 "alpaca_fighting" 裡,然後輸入git init。
接著告訴 Git 我要推向 Heroku,而且是推向 "你-APP-的名字" 那邊:
D:\alpaca_fighting>heroku git:remote -a 你-APP-的名字
set git remote heroku to https://git.heroku.com/你-APP-的名字.git
輸入git add .,先準備好清單,請 Git 推,所有檔案都推。
D:\alpaca_fighting>git add .
warning: LF will be replaced by CRLF in app_core.py.
The file will have its original line endings in your working directory
warning: LF will be replaced by CRLF in app_echo.py.
The file will have its original line endings in your working directory
warning: LF will be replaced by CRLF in requirements.txt.
The file will have its original line endings in your working directory
回應不重要,只是 Git 的一些說明。接著輸入git commit -m "一些註解","一些註解" 你愛打什麼都可以。因為這是我們初始化的第一推,所以我說 "init"。
D:\alpaca_fighting>git commit -m "init"
[master (root-commit) 63788c6] init
 4 files changed, 90 insertions(+)
 create mode 100644 Procfile
 create mode 100644 app_core.py
 create mode 100644 requirements.txt
 create mode 100644 runtime.txt
最後就是push了!
D:\alpaca_fighting>git push heroku master
… 以下略
remote: Verifying deploy... done.
To https://git.heroku.com/phoebe-takescareof-alpaca.git
中間會跳出一些訊息蠻有趣的,大家可以試著閱讀一下。今天因為時間有點趕,我就先不解釋了。最後看到Verifying deploy… done,就是成功透過 Git 將我們的資料夾推向 Heroku 了!
最後的最後,回到 LINE Developers 上。登入,進到我們昨天創造的 Provider 的 Messaging API 裡。有一個 "Messaging Settings" 的設定區,如圖三,記得要將紅框處的 "Use webhooks" 用右邊的 "Edit" 改成 "Enabled"。在綠框處 "Webhook URL" 透過右邊的 "Edit" 改成 "https://你-APP-的名字.herokuapp.com/callback"。按下 "Verify",如果出現"Success" 那就是成功了。
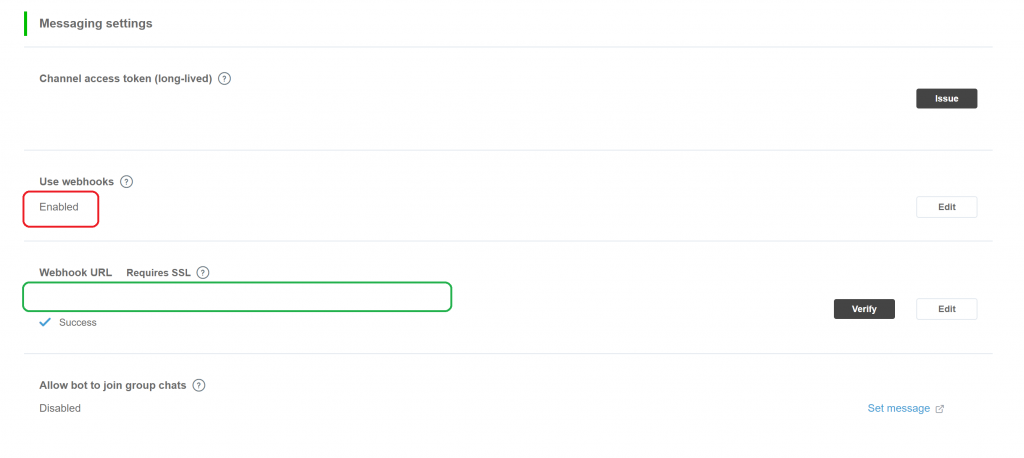
圖三、Messaging Settings
最後放上學你說話的 LINE 聊天機器人程式碼,有興趣的人可以試看看,明天我們再仔細翻譯翻譯。
from __future__ import unicode_literals
import os
from flask import Flask, request, abort
from linebot import LineBotApi, WebhookHandler
from linebot.exceptions import InvalidSignatureError

from linebot.models import MessageEvent, TextMessage, TextSendMessage

app = Flask(__name__)

# LINE 聊天機器人的基本資料
line_bot_api = LineBotApi('聊天機器人的 Chennel access token')
handler = WebhookHandler('聊天機器人的 Channel secret')

# 接收 LINE 的資訊
@app.route("/callback", methods=['POST'])
def callback():
    signature = request.headers['X-Line-Signature']

    body = request.get_data(as_text=True)
    app.logger.info("Request body: " + body)

    try:
        handler.handle(body, signature)
    except InvalidSignatureError:
        abort(400)

    return 'OK'

# 學你說話
@handler.add(MessageEvent, message=TextMessage)
def echo(event):

    if event.source.user_id != "Udeadbeefdeadbeefdeadbeefdeadbeef":
        line_bot_api.reply_message(
            event.reply_token,
            TextSendMessage(text=event.message.text)
        )

if __name__ == "__main__":
    app.run()
➀ 卡米狗
➁ 官方 LINE-Bot-SDK
➂ 官方 Heroku Create APP
➃ Heroku 網站部署
註:對於此系列文有興趣的讀者,歡迎參考由此系列文擴編成書的 LINE Bot by Python,以及最新的系列文《賴田捕手:追加篇》
第 31 天 初始化 LINE BOT on Heroku
第 32 天 快速回覆 QuickReply 介紹
第 33 天 妥善運用 Heroku APP 暫存空間
第 34 天 妥善運用 LINE Notify 免費推播
第 35 天 製造 Deploy to Heroku 按鈕
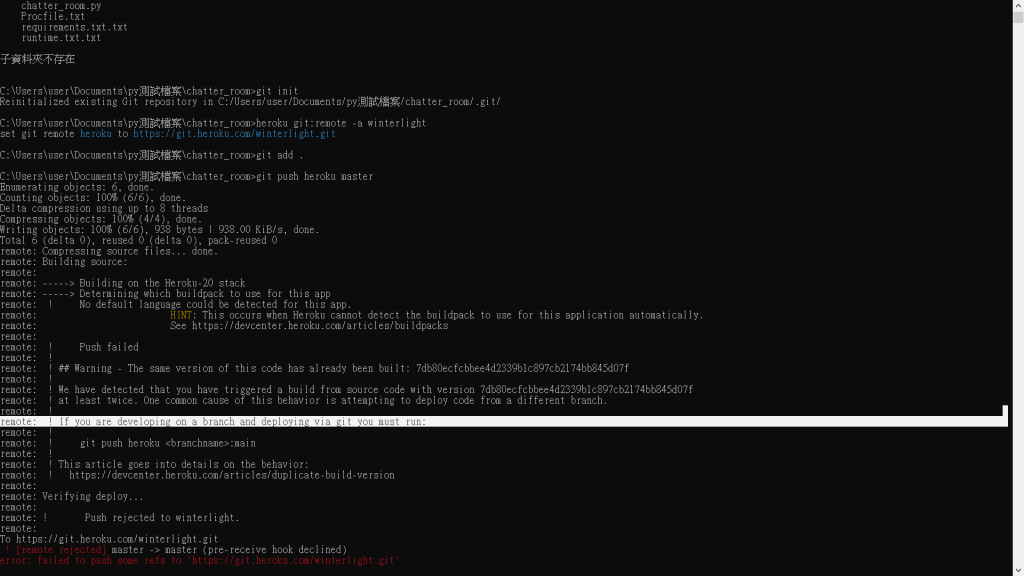
請問我在執行git push heroku master 時遇到了
! [remote rejected] master -> master (pre-receive hook declined)
這個問題,請問是遇到了什麼狀況呢?
python版本是3.7.4
我requirement.txt文件是跟您設定的一樣
你好 ~
設定檔的檔名是 requirements.txt 而不是 requirement.txt
要多一個 s 在後面喔
你參考看看 如果還是無法解決我們再討論看看~
你好 我也同樣出現
To https://git.heroku.com/diudiubot.git
! [rejected] master -> master (fetch first)
error: failed to push some refs to 'https://git.heroku.com/diudiubot.git'
hint: Updates were rejected because the remote contains work that you do
hint: not have locally. This is usually caused by another repository pushing
hint: to the same ref. You may want to first integrate the remote changes
hint: (e.g., 'git pull ...') before pushing again.
hint: See the 'Note about fast-forwards' in 'git push --help' for details.
這是確認後的分支
D:\LineBot\alpaca_fighting>git branch -vv
文件中的資料為
D:\LineBot\alpaca_fighting>tree /F
列出磁碟區 DATA 的資料夾 PATH
磁碟區序號為 5A12-0DFC
D:.
│ app_core.py
│ Procfile
│ requirements.txt
│ runtime.txt
│
└─.vs
ProjectSettings.json
slnx.sqlite
你好 ~
抱歉回覆來的慢了點。
再一個抱歉,看你的敘述我也想不出問題可能在哪裡呢 QQ
查了下網路上碰到跟你相同狀況的人,可能會這麼做:
https://gitbook.tw/chapters/github/fail-to-push.html
https://noootown.wordpress.com/2015/06/19/git-first-use/
或許可以試試看?
若有什麼更新也可以再留言討論看看
你好,我想請教你一個問題,我照著步驟一步一步的設定下來,但是到了heroku設定那邊會出錯,我推送完設定檔上去之後就會出現Error,但該做的我都有用,請問是哪邊設定錯誤了呢?
renfu25
很可能是python版本所造成的結果,heroku的官網資料有說明只支援特定版本的python。我的電腦有裝3.8.3跟3.9.6的python,3.9.6的可以成功push,參考看看。
3.9.6 成功push+1
在"git push heroku master"之前先試試"heroku buildpacks:clear"
ref: https://devcenter.heroku.com/articles/buildpacks#using-a-third-party-buildpack
請問我在執行Verify時,出現了<Response 503>這是在過程中出了什麼錯誤嗎,還是說我在Heroku時出現了錯誤。
但是因為過程的部分都照著上面來操作,一開始剛用時還是成功的,但是之後每次只要Verify時,變會回復<Response 503>,所以不太了解是哪個環節出了問題,還請前輩解答!
謝謝前輩!!
您好
根據您提供的資訊,我沒辦法做太多的判斷。您可以試著觀察 Heroku Logs (App 運作紀錄),看看在您按下【Verify】時,Heroku Logs 上出現的錯誤訊息是什麼。
Heroku Logs 可以從 Heroku Dashboard 上找到:
首先來到您 App 的控制面板 (網址應該是 https://dashboard.heroku.com/apps/您-APP-的名字)
右上角,點選【More】 -> 【View Logs】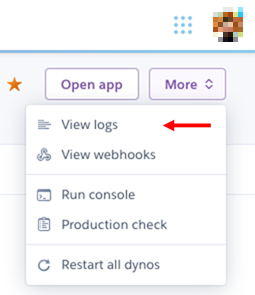
接著到 Line Developers 點擊【Verify】驗證 Webhook,看一下 Heroku Logs 會記錄下什麼訊息。也許您看到這些紀錄,就會知道該怎麼調整程式碼了。
! [remote rejected] master -> master (pre-receive hook declined)
error: failed to push some refs to 'https://git.heroku.com/winterlight.git'
大佬這如何解
python版本是3.8
我requirement.txt文件是跟您設定的一樣
您好
謝謝您提供的推送紀錄。在我看起來應該是資料夾內檔案名稱的問題。Heroku 在建構我們的 App 時,需要認幾個檔案:
-	Procfile
-	requirements.txt
-	runtime.txt
-	我們的 Python 檔案.py
其中,Profile是沒有副檔名的檔案,requirements.txt和runtime.txt都是 txt 檔。這些檔案的檔名、副檔名都不能搞錯,否則 Heroku 認不出來,就沒辦法開始建構 App。
唯一可以自由命名的,只有程式碼的 python 檔案。
但電腦會強制設定成文字檔
老師好,一系列文章非常受用,感激不盡!
在這個章節中,我卡在Webhook URL【VERIFY】,LINE的錯誤訊息如下:
Error
The webhook returned an HTTP status code other than 200.(400 Bad Request)
Confirm that your bot server returns status code 200 in response to the HTTP POST request sent from the LINE Platform. For more information, see Response in the Messaging API Reference.
照您的建議去看HEROKU的LOG,但功力不夠:
2021-08-22T07:47:37.547806+00:00 heroku[router]: at=info method=POST path="/callback" host=iyar0810.herokuapp.com request_id=bae8a1be-90c0-4eb8-93da-74ab339dd797 fwd="147.92.150.197" dyno=web.1 connect=1ms service=7ms status=400 bytes=362 protocol=https
2021-08-22T07:47:37.549154+00:00 app[web.1]: 10.63.70.187 - - [22/Aug/2021:07:47:37 +0000] "POST /callback HTTP/1.1" 400 192 "-" "LineBotWebhook/2.0"
想跟您請益一下,該怎麼解?感謝感謝!!
問題解決了!!還是很謝謝這系列文章!!


 iThome鐵人賽