確定完主題與畫面,好讓之後的製作過程能有個明確的目標,接下來要開始正式進入android studio一步一步來完成app。
第一步先開一個新的project,這邊選擇Empty Activity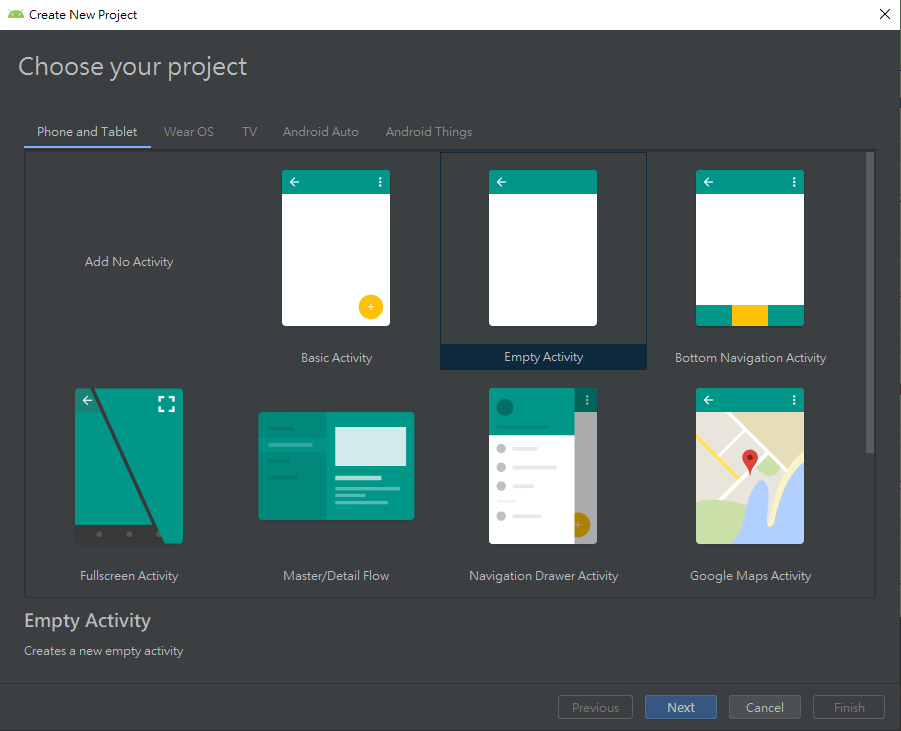
接下來的地方可以為專案命名或者是修改一些設定,像是要使用Kotlin的話在Language的地方要記得做更改。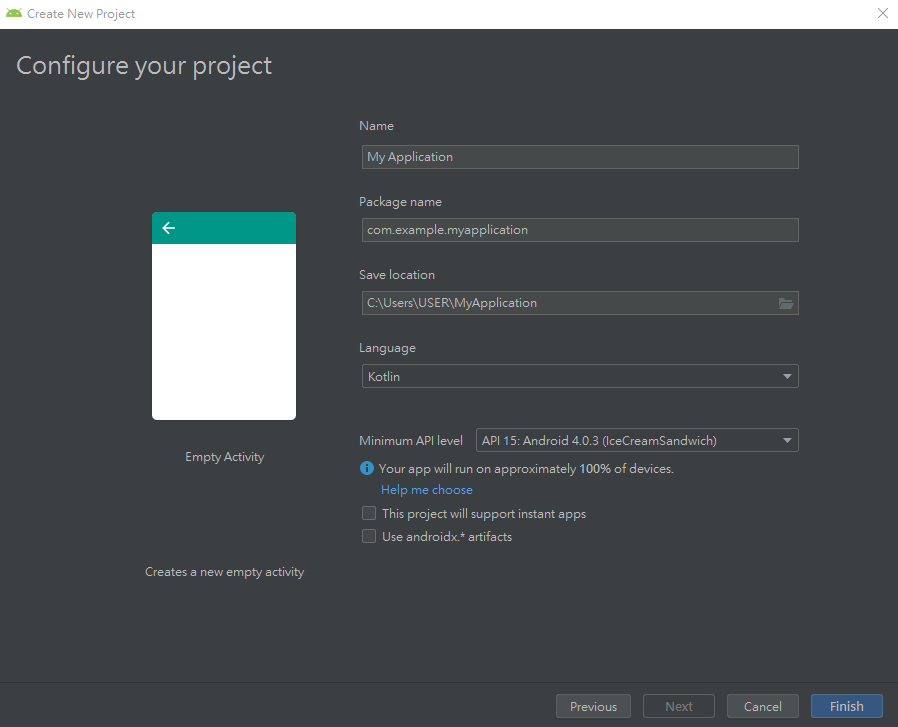
再來便進入到開發環境中了,首先要來完成畫面,在res > layout 中主要是用來存放版面用的,先在layout下點擊右鍵選擇 new > Layout resiurce file 來創建我們的主畫面。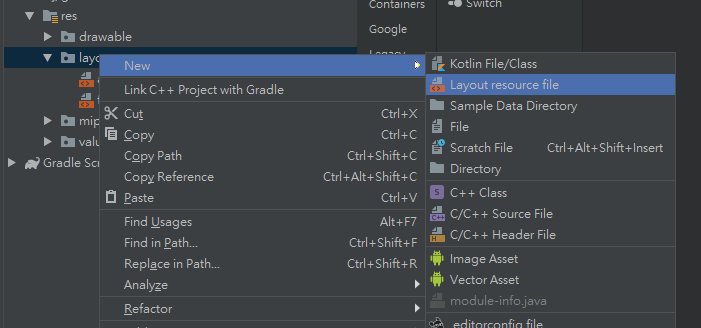
選擇後替檔案命名完成後按下OK便創建完成。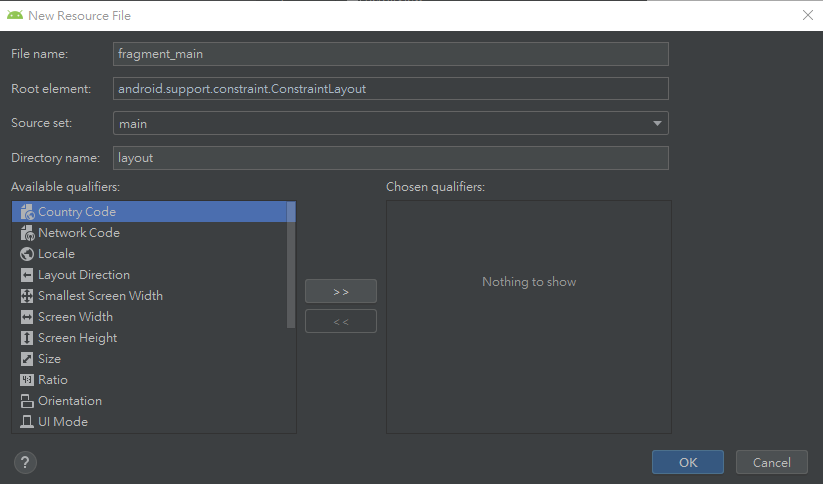
接下來要先完成主畫面,這邊先放上預期中的樣子。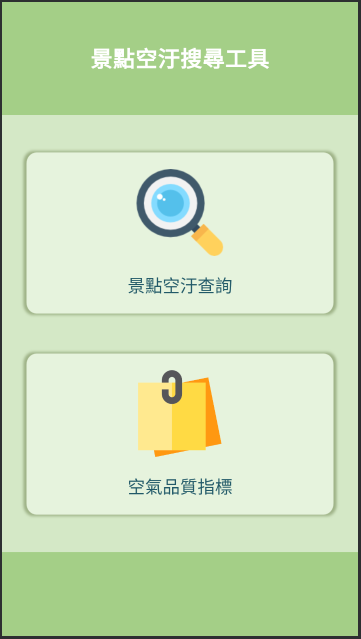
在畫面簡潔物件較少時我習慣使用LinearLayout,布局的方法有很多種,不過我一般只會使用到LinearLayout、RelativeLayout這兩種布局。
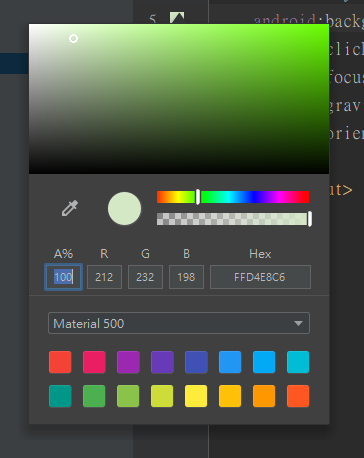
首先來設置背景,這邊先貼上程式碼,完成後會看到一片綠色的背景,先說明一下各個屬性功能。
<LinearLayout xmlns:android="http://schemas.android.com/apk/res/android"
              android:layout_width="match_parent"
              android:layout_height="match_parent"
              android:background="#D4E8C6"
              android:gravity="center_horizontal"
              android:orientation="vertical">
</LinearLayout>
android:layout_width:寬度設定,一般常用的有match_parent、wrap_content或是調整大小像是50dp。
match_parent 會自動填滿可以使用的空間
wrap_content 會依據元件內容調整大小
android:layout_height:高度設定。
android:background:設置背景顏色,可以直接輸入色碼表或是輸入完成後再點擊旁邊的方塊調整。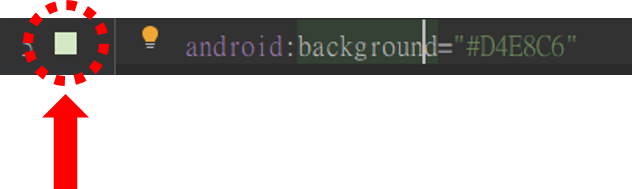
android:gravity:設定子物件要如何對齊,center_horizontal設為水平置中。
android:orientation:決定要垂直或水平呈現,一般使用vertical、horizontal。
vertical: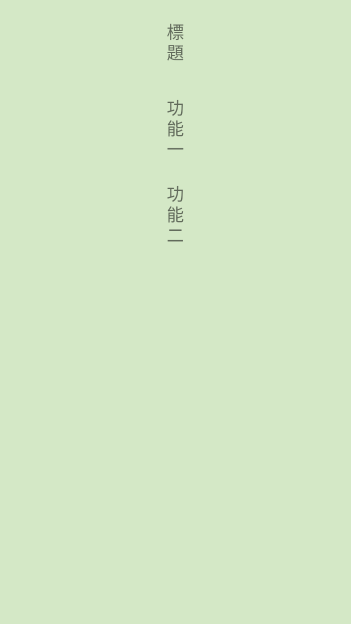
horizontal:
大致了解後,回到畫面地方這邊可以預想成四個部分。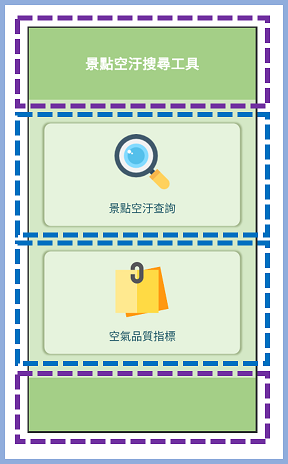
這邊有很多種方法,因為中間兩個部分的元件是垂直置中所以我直接使用LinearLayout來當作四個部分的外框。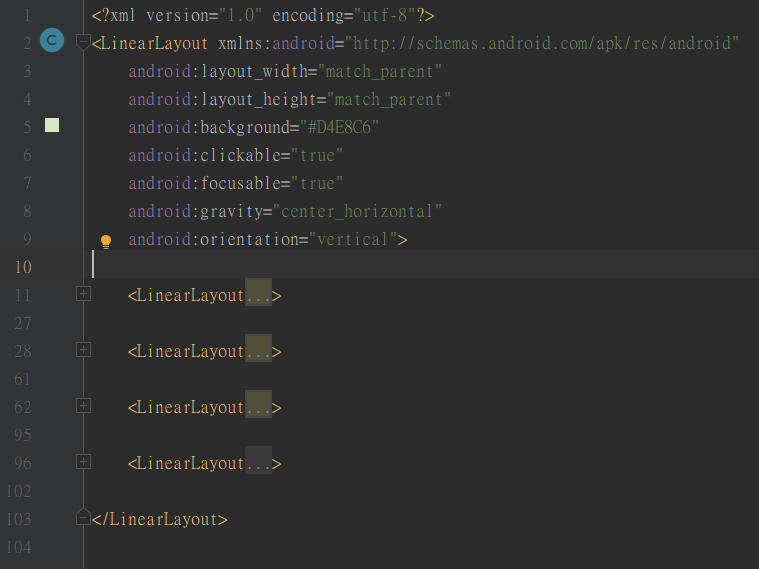
接下來就附上四個部分的內容。
標題:
<LinearLayout
        android:layout_width="match_parent"
        android:layout_height="wrap_content"
        android:layout_weight="3"
        android:background="#A4CF87">

        <TextView
            android:id="@+id/title"
            android:layout_width="match_parent"
            android:layout_height="match_parent"
            android:gravity="center"
            android:text="景點空汙搜尋工具"
            android:textColor="#ffffff"
            android:textSize="25sp"
            android:textStyle="bold" />
    </LinearLayout>
功能一:
<LinearLayout
        android:layout_width="match_parent"
        android:layout_height="wrap_content"
        android:layout_weight="1"
        android:gravity="center"
        android:orientation="vertical">

        <LinearLayout
            android:id="@+id/select"
            android:layout_width="match_parent"
            android:layout_height="200dp"
            android:layout_marginLeft="20dp"
            android:layout_marginTop="20dp"
            android:layout_marginRight="20dp"
            android:background="#F0FDE7"
            android:gravity="center"
            android:orientation="vertical">

            <ImageView
                android:layout_width="100dp"
                android:layout_height="100dp"
                android:background="#91DAC9" />

            <TextView
                android:layout_width="wrap_content"
                android:layout_height="wrap_content"
                android:layout_marginTop="20dp"
                android:text="景點空汙查詢"
                android:textColor="#215968"
                android:textSize="20sp" />

        </LinearLayout>
    </LinearLayout>
功能二:
<LinearLayout
        android:layout_width="match_parent"
        android:layout_height="wrap_content"
        android:layout_weight="1"
        android:gravity="center"
        android:orientation="vertical">

        <LinearLayout
            android:id="@+id/note"
            android:layout_width="match_parent"
            android:layout_height="200dp"
            android:layout_marginLeft="20dp"
            android:layout_marginRight="20dp"
            android:layout_marginBottom="20dp"
            android:background="#F0FDE7"
            android:gravity="center"
            android:orientation="vertical">

            <ImageView
                android:layout_width="100dp"
                android:layout_height="100dp"
                android:background="#91DAC9"/>

            <TextView
                android:layout_width="wrap_content"
                android:layout_height="wrap_content"
                android:layout_marginTop="20dp"
                android:text="空氣品質指標"
                android:textColor="#215968"
                android:textSize="20sp" />

        </LinearLayout>
    </LinearLayout>
底部方塊:
<LinearLayout
        android:layout_width="match_parent"
        android:layout_height="wrap_content"
        android:layout_weight="3"
        android:background="#A4CF87">
</LinearLayout>
這邊要注意一下layout_weight這個屬性,會依照比例來分配元件大小,上面的部分完成後會長這個樣子,距離完成只差最後一步了。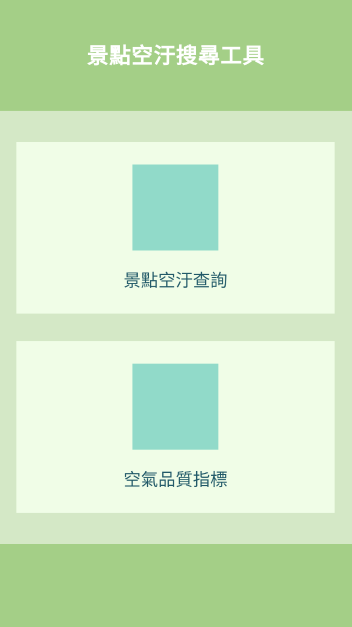
功能一、二中間的小方塊可以改成自己喜歡的小圖示,圖示的部分可以上網搜尋免費的icon來使用,我大部分的圖示都是從這裡找的https://www.flaticon.com或者是用一些工具自己完成,不過要多花蠻多時間的。
未來要使用的圖示可以放在 res > drawable 下。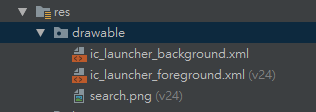
接下來便可以替功能一、二中的ImageView設定圖片了。
<ImageView
                android:layout_width="100dp"
                android:layout_height="100dp"
                android:src="@drawable/search"/>
外層陰影的部分就稍微麻煩一點的,未來會再提到,這邊先使用ppt圖案陰影效果簡單自製一下,這邊因為是LinearLayout所就直接使用android:background來設定圖示。
功能一:
<LinearLayout
        android:layout_width="match_parent"
        android:layout_height="wrap_content"
        android:layout_weight="1"
        android:gravity="center"
        android:orientation="vertical">

        <LinearLayout
            android:id="@+id/select"
            android:layout_width="match_parent"
            android:layout_height="200dp"
            android:layout_marginLeft="20dp"
            android:layout_marginTop="20dp"
            android:layout_marginRight="20dp"
            android:background="@drawable/button_tp01"
            android:gravity="center"
            android:orientation="vertical">

            <ImageView
                android:layout_width="100dp"
                android:layout_height="100dp"
                android:src="@drawable/search" />

            <TextView
                android:layout_width="wrap_content"
                android:layout_height="wrap_content"
                android:layout_marginTop="20dp"
                android:text="空氣品質指標"
                android:textColor="#215968"
                android:textSize="20sp" />

        </LinearLayout>
    </LinearLayout>
功能二:
<LinearLayout
        android:layout_width="match_parent"
        android:layout_height="wrap_content"
        android:layout_weight="1"
        android:gravity="center"
        android:orientation="vertical">

        <LinearLayout
            android:id="@+id/note"
            android:layout_width="match_parent"
            android:layout_height="200dp"
            android:layout_marginLeft="20dp"
            android:layout_marginRight="20dp"
            android:layout_marginBottom="20dp"
            android:background="@drawable/button_tp01"
            android:gravity="center"
            android:orientation="vertical">

            <ImageView
                android:layout_width="100dp"
                android:layout_height="100dp"
                android:src="@drawable/notes" />

            <TextView
                android:layout_width="wrap_content"
                android:layout_height="wrap_content"
                android:layout_marginTop="20dp"
                android:text="空氣品質指標"
                android:textColor="#215968"
                android:textSize="20sp" />

        </LinearLayout>
    </LinearLayout>
最後總算是完成主畫面的部份的,今天的部分就到這裡結束。