想說應該比較多人熟悉 python 的語法,我把前四天的區塊鏈的檔案都改成了 python3 版本了,左法邏輯基本上是一樣的,所以可以搭配前幾天看一下喔~
import sys
import time
import hashlib
current_difficulty = 12
# 區塊的 class
class Block:
# 區塊包含的資料
def __init__(self, timestamp, data, prevblockhash, hash_value, nonce):
self.timestamp = timestamp
self.data = data
self.prevblockhash = prevblockhash
self.hash = hash_value
self.nonce = nonce
# 創建區塊
def CreateBlock(data, prevblockhash):
b = Block(time.time(), data, prevblockhash, '', 0)
# 進行 POW
POW = CreatePOW(b, current_difficulty)
nonce, hash_value = POW.Proof()
b.hash = hash_value[:]
b.nonce = nonce
return b
# 創建創始區塊
def CreateGenesisBlock():
return CreateBlock("Genesis Block", '')
# 區塊鏈的 class
class Blockchain:
def __init__(self, block):
self.blocks = block
# 在區塊鏈上新增區塊
def AddBlock(self, data):
prevblock = self.blocks[len(self.blocks) - 1]
new_block = CreateBlock(data, prevblock.hash)
self.blocks.append(new_block)
# 創建區塊鏈
def CreateBlockchain():
return Blockchain([CreateGenesisBlock()])
maxNonce = sys.maxsize
# 創建 POW
class ProofOfWork():
def __init__(self, block, difficulty, target):
self.block = block
self.difficulty = difficulty
self.target = target
# 準備資料以方進行 POW
def PrepareData(self, nonce):
self.block.timestamp = str(self.block.timestamp)
data = self.block.prevblockhash + self.block.data + self.block.timestamp + str(self.target) + hex(nonce)
return data
# 進行證明
def Proof(self):
n = 0
print("Start mining...")
while n < maxNonce:
data = self.PrepareData(n)
s = hashlib.sha256()
s.update(data.encode())
s = s.hexdigest()
print("\r{:s}".format(s), end='')
if int(s, 16) < self.target:
break
else:
n += 1
print('\n')
s = '0' * (64 - len(s)) + s
return n, s
# 對已被證明的區塊進行驗證
def Validate(self):
data = data = self.PrepareData(self.block.nonce)
s = hashlib.sha256()
s.update(data.encode())
s = s.hexdigest()
isValid = int(s, 16) < self.target
return isValid
# 創建POW
def CreatePOW(block, difficulty):
target = 0x10 ** (64 - difficulty/4)
return ProofOfWork(block, difficulty, target)
# 以下都是操作介面
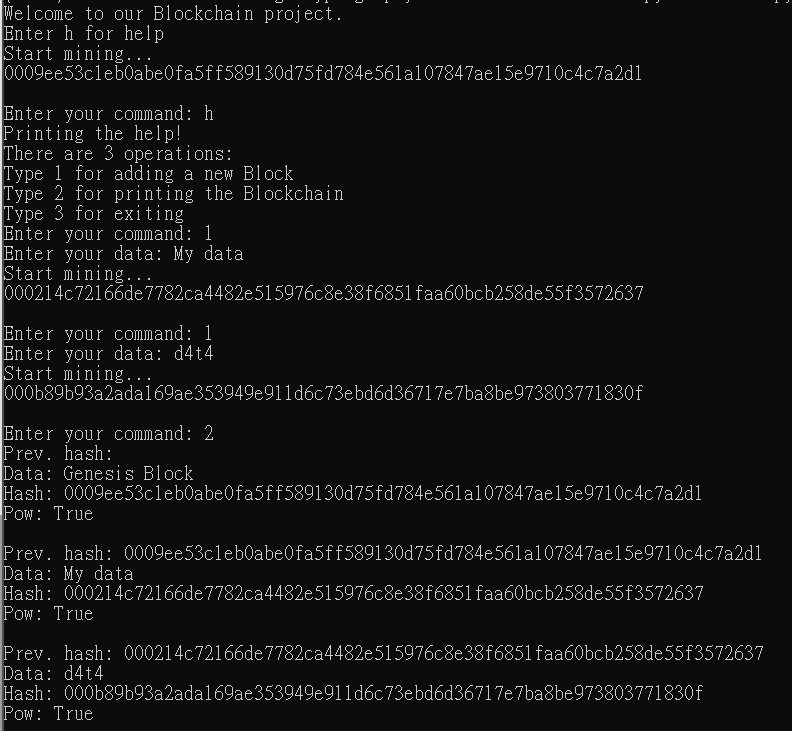
def Help():
print("There are 3 operations:")
print("Type 1 for adding a new Block")
print("Type 2 for printing the Blockchain")
print("Type 3 for exiting")
def main():
print("Welcome to our Blockchain project.")
print("Enter h for help")
new_blockchain = CreateBlockchain()
while True:
op = input("Enter your command: ")
if op == 'h':
print("Printing the help!")
Help()
elif op == '1':
data = input("Enter your data: ")
new_blockchain.AddBlock(data)
elif op == '2':
for b in new_blockchain.blocks:
print("Prev. hash: {:s}".format(b.prevblockhash))
print("Data: {:s}".format(b.data))
print("Hash: {:s}".format(b.hash))
POW = CreatePOW(b, current_difficulty)
print("Pow: {:s}".format(str(POW.Validate())))
print()
elif op == '3':
break
else:
print("Please Enter h, 1, 2, 3")
if __name__ == '__main__':
main()