相較 PixiJS,three.js 應用 Shader 的方式就相當多種
先前的自己,看到程式碼裡有 Shader 時,會覺得
"啊,是Shader,看不懂啦,最多改改參數啦"
看著系列文到這,或多或少能看得懂原理了
本篇介紹一個 three.js 範例的寫法
先前文章裡提到的範例:
three.js examples - WebGL buffergeometry rawshader: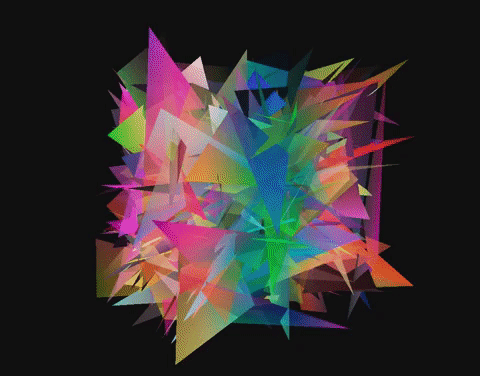
系列文先前的文章,提到 WebGL 的運算流程: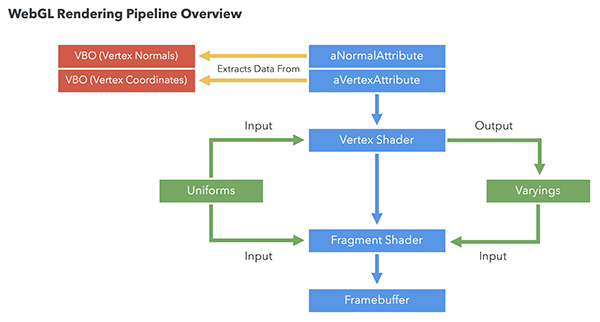
attribute 把值帶到 vertex shader
varying 把值帶到 fragment shader
uniform 帶值給 vertex shader 與 fragment shader
接著,大概能看懂這個範例的寫法了 - Source Code
JavaScript:
var positions = [];
var colors = [];
for ( var i = 0; i < vertexCount; i ++ ) {
	// adding x,y,z
	positions.push( Math.random() - 0.5 );
	positions.push( Math.random() - 0.5 );
	positions.push( Math.random() - 0.5 );
	// adding r,g,b,a
	colors.push( Math.random() * 255 );
	colors.push( Math.random() * 255 );
	colors.push( Math.random() * 255 );
	colors.push( Math.random() * 255 );
}
var positionAttribute = new THREE.Float32BufferAttribute( positions, 3 );
var colorAttribute = new THREE.Uint8BufferAttribute( colors, 4 );
colorAttribute.normalized = true; // this will map the buffer values to 0.0f - +1.0f in the shader
geometry.addAttribute( 'position', positionAttribute );
geometry.addAttribute( 'color', colorAttribute );
首先是用 attribute 把值帶進 Vertex Shader,帶了 position 與 color
Vertex Shader 程式碼:
<script id="vertexShader" type="x-shader/x-vertex">
	precision mediump float;
	precision mediump int;
	uniform mat4 modelViewMatrix; // optional
	uniform mat4 projectionMatrix; // optional
	attribute vec3 position;
	attribute vec4 color;
	varying vec3 vPosition;
	varying vec4 vColor;
	void main()	{
		vPosition = position;
		vColor = color;
		gl_Position = projectionMatrix * modelViewMatrix * vec4( position, 1.0 );
	}
</script>
attribute vec3 position 與 attribute vec4 color 是剛剛透過 attribute 帶進來的變數
接著再定義兩個 varying 的變數: vPosition 與 vColor,
會傳給 fragment shader
Fragment Shader 程式碼:
<script id="fragmentShader" type="x-shader/x-fragment">
	precision mediump float;
	precision mediump int;
	uniform float time;
	varying vec3 vPosition;
	varying vec4 vColor;
	void main()	{
		vec4 color = vec4( vColor );
		color.r += sin( vPosition.x * 10.0 + time ) * 0.5;
		gl_FragColor = color;
	}
</script>
varying vec3 vPosition 與 varying vec4 vColor 由 vertex shader 傳入
void main()	{
	vec4 color = vec4( vColor );
	color.r += sin( vPosition.x * 10.0 + time ) * 0.5;
	gl_FragColor = color;
}
輸出的顏色:
R,會跟著時間做簡諧運動 (且與 vPosition 有關)x 變化,所以顏色變化看起來是直的往旁移動time:
Fragment Shader 還有一個值 - time
uniform float time
uniform 變數會由 JavaScript 帶入
var material = new THREE.RawShaderMaterial( {
	uniforms: {
		time: { value: 1.0 }
	},
	vertexShader: document.getElementById( 'vertexShader' ).textContent,
	fragmentShader: document.getElementById( 'fragmentShader' ).textContent,
	side: THREE.DoubleSide,
	transparent: true
} );
與更新
function render() {
	var time = performance.now();
	var object = scene.children[ 0 ];
    ...
	object.material.uniforms.time.value = time * 0.005;
}
好像...看得懂了?
覺得從 WebGL pipeline 來理解 WebGL JavaScript library 的一些實作,
是學習與應用 Shader 方法之一
純 WebGL 應用的寫法會更複雜些,本系列暫不討論
同樣的,系列文希望大家不會覺得 Shader 很可怕
只是 Shader 需要前置學習的部分真的很多,
但真的很有趣


 iThome鐵人賽