打給後,大家還記得我們昨天提的暫時類別繼承方法嗎?
是不是覺得落落長,不太好理解呢?
沒問題,今天我們來講講更簡潔的方法吧!
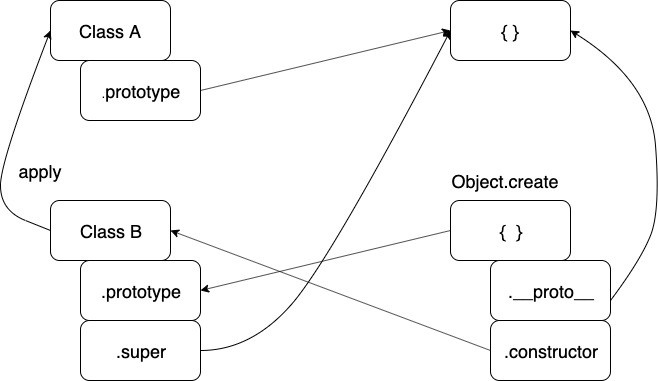
Object.create 是一個建立新物件,並同時指定物件的__ proto __ 原型鏈,因此可以取代昨天我們使用臨時類別的方式。
如果想對 Object.create 有更多了解的朋友,老樣子,我們下方會提供相關的參考資料哦!
現在就讓我們來看一下程式碼
    // 在 Function 的 原型上擴充一個叫 inherits 的方法

    Function.prototype.inherits = function(superCtor) {
        this.prototype = Object.create(superCtor.prototype);
        // 子類別 super 方法設定父類別的 prototype
        this.super = superCtor.prototype;
        // 設定子類別 的 prototype.constructor 到子類別
        this.prototype.constructor = this;
    };

    function A(abc) {
        this.abc = abc || 12;
        console.log("A Class");
    };

    A.prototype.show = function() {
        console.log(this.abc);
    };

    function B() {
        A.apply(this, arguments);
    }

    B.inherits(A);
    var objB = new B(11);

    B.prototype.square = function() {
        console.log( this.abc * this.abc );
    };

    objB.square(); // 121
原先我們在 Function 中必須依靠下面這四行來做一個暫時的類別去避免重複執行父類別的建構函式。
    function F() {};
    // 利用暫時類別的 prototype 設定父類別的 prototype
    F.prototype = superCtor.prototype;
    // 子類別的 prototype 設定成暫時類別產生出來的物件
    this.prototype = new F();
    // 子類別 super 方法設定父類別的 prototype
    this.super = superCtor.prototype;
但透過 Object.create 簡化了這段程式碼,是不是又覺得自己更厲害一點了呢?
以下是提供各位讀者參考的原型鏈圖
相信各位還並不滿足於此,其實 Function.prototype.inherits 還能再簡化,這次我們會藉由 Object.setPrototypeOf 這個方法來實現。
    Function.prototype.inherits = function(superCtor) {
        Object.setPrototypeOf( this.prototype, superCtor.prototype );
        this.super = superCtor.prototype;
    };
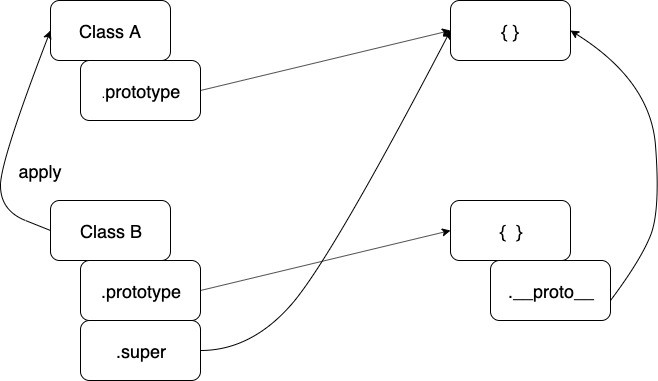
使用 Object.setPrototypeOf 可以不需要重新設定子類別的 prototype.constructor,因為其作用勢將目前子類別的 prototype 中的 __ proto __ 原型鏈設定為父類別的 prototype ,因此子類別的 constructor 仍然是指向子類別。
短短的兩行,我們就做到了之前用五、六行才能做到的事情,是不是感覺非常過癮呢!
以下是這次簡化過後的原型鏈圖
好了,前面講了這麼多概念,現在該來一個繼承的實際案例了
以下是我們會再案例中實作的順序與項目
    // 在 Function 原型上新增繼承方法

    Function.prototype.inherits = function(superCtor) {
        Object.setPrototypeOf(this.prototype, superCtor.prototype);
        this.super = superCtor.prototype;
    };

    // 建立 Point 類別

    function Point() {
        this.x = 0;
        this.y = 0;
    }

    // 在 Point 原型中建立 write 與 read 方法

    Point.prototype.write = function(x, y) {
        this.x = x;
        this.y = y;
    };

    Point.prototype.read = function() {
        return {x: this.x, y: this.y};
    };

    var p = new Point();
    p.write(5, 7);

    // 驗證程式碼
    console.log(p.read()); // {x: 5, y: 7}


    // 建立 RangePoint 類別

    function RangePoint(min,max) {
        Point.apply(this,arguments);
        this.min = min;
        this.max = max;
    }

    // 繼承 Point 類別

    RangePoint.inherits(Point);

    // 限制 x & y 參數範圍,並複寫 write 方法
    RangePoint.prototype.write = function(x, y) {
        x = x < this.min ? this.min : x;
        x = x > this.max ? this.max : x;
        y = y < this.min ? this.min : y;
        y = y > this.max ? this.max : y;
        RangePoint.super.write.apply(this,arguments);
    };

    var rp = new RangePoint(-50, 50);
    rp.write(-100, 100);

    // 驗證程式碼
    console.log(rp.read()); // {x: -50, y: 50}

    //建立IntegerRangePoint類別

    function IntegerRangePoint() {
        RangePoint.apply(this,arguments);
    }

    // 繼承 RangePoint 類別

    IntegerRangePoint.inherits(RangePoint);

    // 複寫 write 方法,並四捨五入

    IntegerRangePoint.prototype.write = function(x, y) {
        x = Math.round(x);
        y = Math.round(y);
        IntegerRangePoint.super.write.apply(this, arguments);
    };

    var irp = new IntegerRangePoint(0, 10);
    irp.write(9.1, 7.8);

    // 驗證程式碼
    console.log(irp.read()); //{x: 9, y:8}
以上就是繼承的實際案例,藉由這段 code 讀者們可以想一下,如果要在日常工作中使用繼承,該怎麼去運用較為恰當。
呼,繼承章節終於告一個段落了,要來講設計模式了 ( design pattern ) ( 握拳
參考資料:
Tommy - 深入 JavaScript 核心課程
MDN - Object.create()
MDN - Object.setPrototypeOf()


 iThome鐵人賽