MVVM與MVP的TDD只有ViewModel的地方有不一樣,
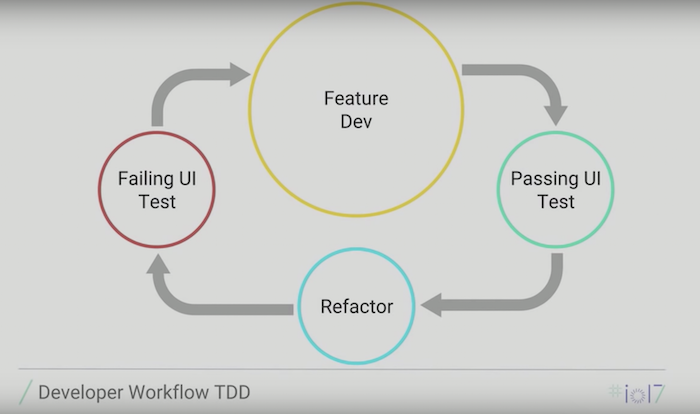
一樣用下圖的Android TDD來實作
1.先寫Failing UI測試
2.接著依序完成裡面的Feature Dev
3.等所有的Feature Dev完成之後,最後Passing UI Test
4.再進行重構
出版書:
Android TDD 測試驅動開發:從 UnitTest、TDD 到 DevOps 實踐
這樣就是一個TDD的循環。
圖片來源Google IO 2017
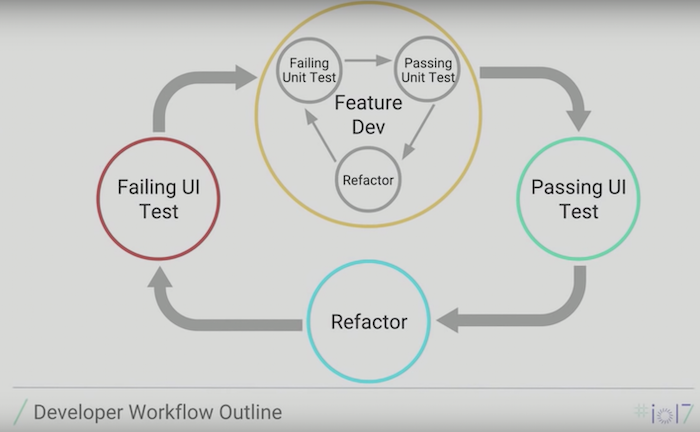
而每個Feature Dev裡會有自已的TDD小循環,這個裡面的測試就會是單元測試。

圖片來源Google IO 2017
步驟:
1.先寫失敗的UI測試
2.寫失敗的ViewModel測試
3.實作通過ViewModel測試
4.重構ViewModel
5.寫失敗的Repository測試
6.實作通過Repository測試
7.重構Repository
8.實作UI通過UI測試
9.重構UI
我們就以先前MVVM+Retrofit架構的範例來講MVVM的TDD。每個步驟會放在github上的每個commit。

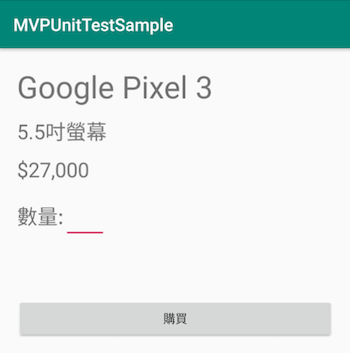
先把UI拉好。建立好ProductActivity、activity_main.xml
新增UI測試ProductScreenTest
在這個測試,我們要將WebAPI用注入的方式讓它直接從json取得Response,而不是從真實的WebAPI。
在sharedTest/fakeJson下加入product.json
{
   "id":"pixel4",
   "name":"Google Pixel 4",
   "desc":"5.5吋全螢幕",
   "price":27000
}
新增UI測試 androidTest/ProductScreenTest。載入Json做為假的Response,測試是否有出現如Json上的產品名稱Google Pixel 4
class ProductActivityTest {

    @get:Rule
    var activityActivityTestRule = ActivityTestRule(ProductActivity::class.java, true, false)

    @Test
    fun productViewTest() {

        val interceptor = MockInterceptor()

        interceptor.setInterceptorListener(object : MockInterceptor.MockInterceptorListener {
            override fun setAPIResponse(url: String): MockAPIResponse? {
                if (url == ApiConfig.productUrl) {
                    val mockAPIResponse = MockAPIResponse()
                    mockAPIResponse.status = 200
                    mockAPIResponse.responseString = Utils.readStringFromResource("product.json")
                    return mockAPIResponse
                }

                return null
            }
        })

        val networkService = NetworkService(interceptor)
        ProductRepository.getInstance(networkService.serviceAPI)

        val intent = Intent()

        activityActivityTestRule.launchActivity(intent)

        Thread.sleep(2000)
        Espresso.onView(ViewMatchers.withId(R.id.productName))
            .check(ViewAssertions.matches(ViewMatchers.withText("Google Pixel 4")))
    }
}
APIConfig加上WebAPI網址
object ApiConfig {
    const val productUrl = "https://firebasestorage.googleapis.com/v0/b/phoneauth-e70bb.appspot.com/o/product.json?alt=media&token=c051df05-399a-42af-b60f-b5430643d78e”
}
執行UI測試,得到失敗的UI測試。
從Repository 開始寫測試,repository的getProduct應回傳Response
class ProductRepositoryTest {

    @get:Rule
    var instantExecutorRule = InstantTaskExecutorRule()
    private lateinit var repository: IProductRepository

    @Test
    fun getProduct() {

        val interceptor = MockInterceptor()

        interceptor.setInterceptorListener(object : MockInterceptor.MockInterceptorListener {
            override fun setAPIResponse(url: String): MockAPIResponse? {
                val mockAPIResponse = MockAPIResponse()
                mockAPIResponse.status = 200
                mockAPIResponse.responseString = Utils.readStringFromResource("product.json")
                return mockAPIResponse
            }
        })

        val networkService = NetworkService(interceptor)
        repository = ProductRepository(networkService.serviceAPI)

        val id = "pixel4"
        val name = "Google Pixel 4"
        val desc = "5.5吋全螢幕"
        val price = 27000

        val product = repository.getProduct().blockingGet()

        Assert.assertEquals(id, product.id)
        Assert.assertEquals(desc, product.desc)
        Assert.assertEquals(name, product.name)
        Assert.assertEquals(price, product.price)
    }
}
在這時候產生ProductResponse。
class ProductResponse {
    lateinit var id: String
    lateinit var name: String
    lateinit var desc: String
    var price: Int = 0
}
而ProductRepository 這時尚未實作。
class ProductRepository(private val serviceApi: ServiceApi) : IProductRepository {
    override fun getProduct(): Single<ProductResponse> {
        TODO("not implemented")
    }
}
執行測試,得到失敗的測試。
kotlin.NotImplementedError: An operation is not implemented: not implemented
實作getProduct,讓測試通過。
override fun getProduct(): Single<ProductResponse> {
    return serviceApi.getProduct()
        .map {
            it.body()
        }
}

interface ServiceApi {

    @GET(ApiConfig.productUrl)
    fun getProduct(): Single<Response<ProductResponse>>

}
執行測試,通過測試。這樣就完成了Repository與ServiceApi了。
@Test
fun getProduct() {
    val product = ProductResponse()
    product.id = "pixel3"
    product.name = "Google Pixel3"
    product.price = 27000
    product.desc = "5.5吋全螢幕"

    `when`(stubRepository.getProduct()).thenReturn(Single.just(product))
    val viewModel = ProductViewModel(stubRepository)
    viewModel.getProduct()

    Assert.assertEquals(product.name, viewModel.productName.value)
    Assert.assertEquals(product.desc, viewModel.productDesc.value)
    Assert.assertEquals(product.price, viewModel.productPrice.value)
}
getProduct這時尚未實作。
class ProductViewModel(private val productRepository: IProductRepository) :
    ViewModel() {

    var productId: MutableLiveData<String> = MutableLiveData()
    var productName: MutableLiveData<String> = MutableLiveData()
    var productDesc: MutableLiveData<String> = MutableLiveData()
    var productPrice: MutableLiveData<Int> = MutableLiveData()
    var productItems: MutableLiveData<String> = MutableLiveData()

    init {
        productItems.value = ""
    }

    fun getProduct() {

    }
}
執行測試,得到失敗的測試。
java.lang.AssertionError:
Expected :Google Pixel3
Actual   :null
讓Production code 通過測試。
fun getProduct() {
    productRepository.getProduct()
        .subscribeOn(SchedulerProvider.io())
        .observeOn(SchedulerProvider.mainThread())
        .subscribe({ data ->
            productId.value = data.id
            productName.value = data.name
            productDesc.value = data.desc
            productPrice.value = data.price
        },
            { throwable ->
                println(throwable)
            })
}
執行測試,測試通過。在這裡應該就能很明顯感受到MVVM的好處,不用再去測試與View的互動。
接著可以開始處理Activity了,想辦法讓這個UI測試通過。
activity_product.xml加上DataBinding,並將TextView的text指定到ViewModel的屬性。
<layout xmlns:android="http://schemas.android.com/apk/res/android" xmlns:tools="http://schemas.android.com/tools"
        xmlns:app="http://schemas.android.com/apk/res-auto">
    <data>
        <variable
                name="productViewModel"
                type="evan.chen.tutorial.tddmvvmsample.ProductViewModel"/>
    </data>
    <LinearLayout
            android:layout_width="match_parent"
            android:layout_height="match_parent"
            android:padding="20dp"
            android:orientation="vertical"
            tools:context=".ProductActivity">
        <TextView
                android:layout_width="wrap_content"
                android:layout_height="wrap_content"
                android:textSize="36sp"
                android:id="@+id/productName"
                android:text="@{productViewModel.productName}"/>
        <TextView
                android:layout_width="wrap_content"
                android:layout_height="wrap_content"
                android:layout_marginTop="12dp"
                android:textSize="24sp"
                android:text="@{productViewModel.productDesc}"/>
        <TextView
                android:layout_width="wrap_content"
                android:layout_height="wrap_content"
                android:layout_marginTop="12dp"
                android:textSize="24sp"
                android:id="@+id/productPrice"
                android:text="@{`$` +Integer.toString(productViewModel.productPrice)}"/>
        <LinearLayout
                android:layout_width="match_parent"
                android:layout_height="wrap_content"
                android:layout_marginTop="12dp"
                android:orientation="horizontal">
            <TextView
                    android:layout_width="wrap_content"
                    android:layout_height="wrap_content"
                    android:textSize="24sp"
                    android:text="數量:"/>
            <EditText android:layout_width="50dp"
                      android:layout_height="wrap_content"
                      android:textSize="24sp"
                      android:id="@+id/productItems"
                      android:text="@={productViewModel.productItems}"/>
        </LinearLayout>
        <TextView
                android:layout_width="wrap_content"
                android:layout_height="wrap_content"
                android:layout_marginTop="12dp"
                android:textSize="24sp"
                android:layout_gravity="end"
                android:id="@+id/totalPrice" />
        <Button android:layout_width="match_parent"
                android:layout_height="wrap_content"
                android:layout_marginTop="24dp"
                android:padding="10dp"
                android:layout_gravity="center"
                android:text="購買"
                android:id="@+id/buy"/>
    </LinearLayout>
</layout>
ProductActivity
class ProductActivity : AppCompatActivity() {

    private val productId = "pixel3"
    private val productViewModel: ProductViewModel by viewModel()

    override fun onCreate(savedInstanceState: Bundle?) {
        super.onCreate(savedInstanceState)
        setContentView(R.layout.activity_product)

        val dataBinding = DataBindingUtil.setContentView<ActivityProductBinding>(this, R.layout.activity_product)

        dataBinding.productViewModel = productViewModel
        dataBinding.lifecycleOwner = this

        productViewModel.getProduct(productId)
    }
}
補上DI,Appdule.kt。
val appModule = module {

    viewModel {
        val networkServiceApi = NetworkService(BaseInterceptor())
        val productRepository = ProductRepository(networkServiceApi.serviceAPI)

        ProductViewModel(productRepository)
    }
}
補上DI,MVVMApplication。
class MVVMApplication : Application() {

    override fun onCreate() {
        super.onCreate()
        startKoin { modules(listOf(appModule)) }
    }
}
執行ProductActivityTest,UI測試通過、接著重構。這樣就完成TDD的一個循環了。
範例下載:
https://github.com/evanchen76/TDDMvvmSample
出版書:
Android TDD 測試驅動開發:從 UnitTest、TDD 到 DevOps 實踐
線上課程:
Android 動畫入門到進階
Android UI 進階實戰(Material Design Component)
