對於視窗裡面基本上會見到的按鍵,大多就是:一般按鍵(Button)、勾選框格(checkbutton)與下拉式選單(menubutton),而今天最主要就是要來看看這三個功能要怎麼使用;不過,在進一步的學習之前,還是必須了解一下怎麼製造窗
[Day 25]感覺又是新的開始:GUI介面開發
1.一般按鍵Button
這邊就直接帶入程式碼來教一下該怎麼運用吧:
from tkinter import *
top = Tk()
top._root().title("Title here")

"""text1 = Text(top)
text1.insert(INSERT, "Text here.")
text1.insert(END, "Put text here.")
text1.pack()
"""
#上面四行是昨天的程式碼,不清楚的話可以看看昨天的文章

button1 = Button(top, text="Try me")
#在tkinter裡面,若要建立一個按鍵的話,就是以宣告一個參數作為'Button'的設計
#而在Button的屬性中,可以設定是要在哪個視窗顯示按鍵、按鍵內的文字是什麼
#以及要在按下按鍵之後做出什麼回應,預設的話是沒有反應(None)

button1.pack()#每個物件都要透過pack做結尾

top.mainloop()
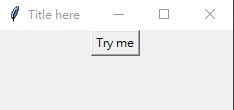
上面的圖片就是執行結果,但是在執行的時候,視窗只會以剛好可以顯示視窗基本的「最小化」、「最大化」與「關閉」這三個選項的大小,圖片這個視窗尺寸是我自己拖曳放大的結果。
那就順便在這裡教一下視窗基本大小Canvas的設定好了,來看看程式碼吧:
from tkinter import *
top = Tk()
top._root().title("Title here")

window_scale = Canvas(top, color=None, height="300", width="450")
#一樣是要先宣告參數來存放'Canvas'的設定,內容包含要進行相關設定的視窗、視窗的顏色
#以及尺寸大小...等,對於顏色的部分,預設是Windows預設的視窗底色(難以形容的顏色)

"""text1 = Text(top)
text1.insert(INSERT, "Text here.")
text1.insert(END, "Put text here.")
text1.pack()
"""

button1 = Button(top, text="Try me")
button1.pack(side=BOTTOM)
#剛剛忘了說,在button的pack裡面可以設定按鍵要放置於視窗的位置
#有left, right, top, bottom(都要大寫)

window_scale.pack()#別忘了一樣要pack做結尾
top.mainloop()
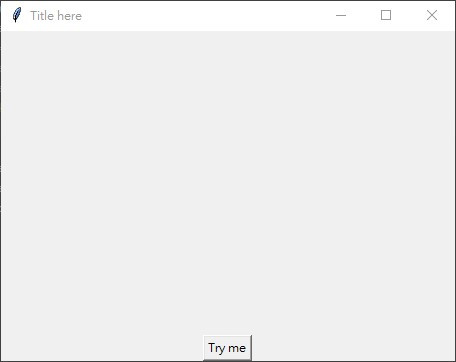
不得不說,這個按鍵的位置設計真的很醜
2.勾選框格checkbutton
就還是以程式碼直接帶入吧:
from tkinter import *

top = Tk()
top._root().title("Title here")
window_scale = Canvas(top, color=None, height="100", width="450")
"""text1 = Text(top)
text1.insert(INSERT, "Text here.")
text1.insert(END, "Put text here.")
text1.pack()
"""

def clicker():
    check1_in.set(0)
    check2_in.set(0)
#在這裡就先補充說明一下有關button的功能指令(也就是command設定)
#可以先宣告方法,後面就可以將其套用到button的onclick事件(也就是被點擊之後的反應)

check1_in = IntVar()
check2_in = IntVar()
#上面兩行是用來存放checkbutton的數據所使用的參數

check1 = Checkbutton(top, text="Was this a test?", variable=check1_in, \
                     onvalue=1, offvalue=0, height=5, width=20)
check2 = Checkbutton(top, text="Say hello to iTalthon", variable=check2_in, \
                     onvalue=1, offvalue=0, height=5, width=25)
#一樣要設定這個物件要存放的視窗是哪一個,以及搭配的文字是什麼,要存放數據的變數為何
#以及與其他物件的間距
#有關onvalue與offvalue,其實就是設定checkbutton的勾選與否
#系統設定必定是以'1'為勾選,以'0'作為無勾選

check1.pack()
check2.pack()#pack做結尾不要忘記!!!
button1 = Button(top, text="Try me", command=clicker)
#這裡就是我說的,將功能導入按鍵,在經過點擊就可以執行上面的方法

button1.pack(side = BOTTOM)
window_scale.pack()
top.mainloop()
就來看看有什麼好玩的事情發生了
沒錯,我剛剛設計的方法就是讓已經勾選的選項取消勾選,很好玩吧 (並沒有)
3.下拉式選單(menubutton)
就直接透過程式碼來說明了:
from tkinter import *

top = Tk()
top._root().title("Title here")
window_scale = Canvas(top, color=None, height="100", width="450")
"""text1 = Text(top)
text1.insert(INSERT, "Text here.")
text1.insert(END, "Put text here.")
text1.pack()
"""
def clicker():
    check1_in.set(0)
    check2_in.set(0)


lister = Menubutton(top, text="Sample", relief=RAISED)
#昨天忘記說明有關relief的相關設定,其實這個就是針對視窗的功能鍵(或選項)的外觀設定
#可以設定為raised(突出)、flat(無突出)、solid(以框線包覆)groove(下陷)
#ridge(突起,但在點擊後沒有下陷反應)和sunken(下陷,但在點擊後沒有突出反應)

lister.grid()#建立框架
lister.menu = Menu(lister, tearoff=0)#設定有關下拉式選單的內容存放框架
lister["menu"] = lister.menu#建立類似list的內容來記錄選項

lister_opt1 = IntVar()
lister_opt2 = IntVar()
#一樣是在進行變數的設定
lister.menu.add_checkbutton(label="option 1", variable = lister_opt1)
lister.menu.add_checkbutton(label="option 2", variable = lister_opt2)
#經過這樣的設定,其實是透過下拉式選單來進行選項的勾選與否

lister.pack()#記住,pack做結尾才能驅使功能進行!!

check1_in = IntVar()
check2_in = IntVar()

check1 = Checkbutton(top, text="Was this a test?", variable=check1_in, \
                     onvalue=1, offvalue=0, height=5, width=20)
check2 = Checkbutton(top, text="Say hello to iTalthon", variable=check2_in, \
                     onvalue=1, offvalue=0, height=5, width=20)
check1.pack()
check2.pack()
button1 = Button(top, text="Try me", command=clicker)
button1.pack(side = BOTTOM)
window_scale.pack()
top.mainloop()
來看看成果吧:
Day 26, 結束

 iThome鐵人賽