上一篇我們初步將專案架構建置起來了,這一篇將會開始撰寫功能,並從 Government 與 Host 開始製作。
在開始之前先思考一件事情,我們開發的時候會將不同功能的頁面切割成不同的元件(Component),但我們這個 DApp 的功能元件經常圍繞在 表單處理 與 交易處理 ,所以我們乾脆把這部分的事情提取出來做成 父類別 來減少重複的程式碼。在 app 路徑下新增一個名為 base 的資料夾,並建立component.base.ts,類別名稱為 ComponentBase 。
export class ComponentBase {
}
建立完成後我們再繼續思考,既然會圍繞在 交易處理 這方面,就表示會使用到 ProviderService 中的方法,所以我們乾脆把 ProviderService 引入到 ComponentBase 中,再透過 Angular 的 Injector 來注入到其他繼承的元件當中,如此一來,只要繼承 ComponentBase 的元件都可以使用 ProviderService 。
import { Injector } from '@angular/core';
import { ProviderService } from '../services/provider/provider.service';

export class ComponentBase {
    protected providerSvc: ProviderService;

    constructor(
        injector: Injector
    ) {
        this.providerSvc = injector.get(ProviderService);
    }
}
交易處理的狀態大致可分為 傳送中(pending) 、 確認(confirmed) 及 錯誤(error) ,我們將每個狀態單獨設立一個變數來作為判斷依據,其中發生錯誤時,應將錯誤訊息提供給使用者,所以設置變數來存放錯誤訊息。我們表單將採用 Model-Driven 的方法來設計,而 Model-Driven 可以自行定義驗證格式,我們的 DApp 會需要驗證帳戶位址的格式,所以直接在這裡設置驗證功能,帶入的參數會是 FormControl 。最後要讓表單在 pending 的時候進入 disabled 狀態,且在 confirmed 或 error 的時候取消 disabled 狀態,所以設置方法來使表單可以切換狀態:
import { Injector } from '@angular/core';
import { FormControl, FormGroup } from '@angular/forms';
import { ProviderService } from '../services/provider/provider.service';
import { Web3Utils } from '../utils';

export class ComponentBase {
    public isPending = false;
    public isConfirmed = false;
    public isError = false;
    public errorMessage = '';

    protected providerSvc: ProviderService;

    constructor(
        injector: Injector
    ) {
        this.providerSvc = injector.get(ProviderService);
    }

    public resetConfirmState(): void {
        this.isConfirmed = false;
    }

    public resetErrorState(): void {
        this.isError = false;
        this.errorMessage = '';
    }

    public transactionConfirmed(): void {
        this.isPending = false;
        this.isConfirmed = true;
    }

    public transactionError(err?: string): void {
        this.isPending = false;
        this.isError = true;
        if (err) {
            this.errorMessage = err;
        }
    }

    protected addressValidator(control: FormControl): any {
        const address = control.value;
        return Web3Utils.isAddress(address) ? null : { message: `invalid address: ${ address }` };
    }

    protected setFormDisabled(formGroup: FormGroup, disable = true): void {
        Object.keys(formGroup.controls).forEach(elem => {
            if (disable) {
                formGroup.controls[elem].disable();
            } else {
                formGroup.controls[elem].enable();
            }
        });
    }

}
我們知道透過 web3.js 呼叫合約的函式可以使用 Promise 或 EventEmitter 的方式來處理,為了方便統一管理,我們將會在 ProviderService 中擴充一個方法,將 Promise 轉換為 Observable :
public executeMethod(method: any): Observable<any> {
    return from(method);
}
大致上會有兩個功能區塊,一個是用來編輯權限的,一個是用來部署履歷合約的,我們會把這兩大功能再切割成兩個元件(Component),並放在 government 資料夾下的 components 資料夾中。
由於我的介面打算使用 Tabset 來呈現切換功能的效果,所以添加 NgbTabsetModule 到 bootstrap.module.ts 中:
import { NgModule } from '@angular/core';
import { NgbTabsetModule } from '@ng-bootstrap/ng-bootstrap';

@NgModule({
    imports: [
        NgbTabsetModule
    ],
    exports: [
        NgbTabsetModule
    ]
})
export class BootstrapModule { }
透過 AngularCLI 產生部署履歷合約用的元件:
ng g c modules/main/government/components/government-create-resume
將該元件添加到 government.module.ts 的 declarations ,並要引入 FormsModule 與 ReactiveFormsModule 來使用表單功能:
...
declarations: [
    GovernmentComponent,
    GovernmentCreateResumeComponent,
],
imports: [
    ...
    FormsModule,
    ReactiveFormsModule,
    ...
]
...
先將合約的列舉 Gender 與 OrganizationType 添加到我們的 type 中,為了方便管理,另外新增一個 form.ts 到 types 資料夾中,並從 index.ts 來 export :
export enum Gender {
    male,
    female,
    other
}

export enum OrganizationType {
    school = 1,
    company
}
打開 government-create-resume.component.ts 進行設計,先繼承 ComponentBase 並用 Injector 來注入。我們將會使用 FormGroup 來管理所有的 FormControl ,並使用 FormBuilder 來建立,在建立的同時進行表單內容的定義,然後使用 Validators 來做簡單的驗證:
import { Component, Injector } from '@angular/core';
import { FormGroup, FormBuilder, Validators } from '@angular/forms';
import { Gender, ResumeInitialOptions } from 'src/app/types';
import { ComponentBase } from 'src/app/base/component.base';

@Component({
    selector: 'app-government-create-resume',
    templateUrl: './government-create-resume.component.html',
    styleUrls: ['./government-create-resume.component.scss']
})
export class GovernmentCreateResumeComponent extends ComponentBase {
    public deployForm: FormGroup;
    public resumeInfo;

    constructor(
        private injector: Injector,
        private formBuider: FormBuilder
    ) {
        super(injector);
        this.deployForm = this.formBuider.group({
            name: ['', [Validators.required]],
            address: ['', [Validators.required, this.addressValidator]],
            age: [null, [Validators.required]],
            gender: [Gender.male, [Validators.required]]
        });
    }

    // 讓年齡選單有16~100歲可以選擇
    public get ageRange(): Array<number> {
        const range = [];
        for (let i = 16; i <= 100; i++) {
            range.push(i);
        }
        return range;
    }

    // 將gender轉換成文字的形式展示給使用者
    public get hostGender(): string {
        let result = '';
        switch (this.resumeInfo.gender) {
            case Gender.male:
              result = '男';
              break;
            case Gender.female:
              result = '女';
              break;
            case Gender.other:
              result = '其他';
        }
        return result;
    }

    // 部署合約的方法。成功時就將資料寫入this.resumeInfo並把合約位址添加進去,用途是展示給使用者看
    public deployResume(data: ResumeInitialOptions): void {
        if (Array.isArray(data.age)) {
            data.age = data.age[0];
        }
        this.isPending = true;
        this.setFormDisabled(this.deployForm);
        this.providerSvc.deployResume(data).subscribe(
            instance => {
                this.transactionConfirmed();
                this.setFormDisabled(this.deployForm, false);
                this.deployForm.reset();
                this.resumeInfo = data;
                this.resumeInfo.address = instance.address;
            },
            err => {
                this.transactionError(err.message);
                this.setFormDisabled(this.deployForm, false);
                this.deployForm.reset();
            }
        );
    }

}
接著來修改 government-create-resume.component.html 。如果在交易確認後或是發生錯誤,就不顯示表單頁面,如果是交易確認後就顯示履歷的資料與合約位址,如果發生錯誤就顯示錯誤訊息:
<div class="my-3" *ngIf="!isConfirmed && !isError">
    <form
        [formGroup]="deployForm"
        (ngSubmit)="deployResume(deployForm.value)"
    >
        <div class="form-group">
            <label for="name">姓名</label>
            <input
                type="text"
                class="form-control"
                id="name"
                placeholder="輸入姓名"
                [formControlName]="'name'"
            >
        </div>
        <div class="form-group">
            <label for="address">帳戶位址</label>
            <input
                type="text"
                class="form-control"
                id="address"
                placeholder="輸入帳戶位址"
                [formControlName]="'address'"
            >
        </div>
        <div class="form-group">
            <label for="gender">性別</label>
            <select class="form-control" id="gender" [formControlName]="'gender'">
                <option [ngValue]="0">男</option>
                <option [ngValue]="1">女</option>
                <option [ngValue]="2">其他</option>
            </select>
        </div>
        <div class="form-group">
            <label for="age">年齡</label>
            <select multiple class="form-control" id="age" [formControlName]="'age'">
                <option *ngFor="let age of ageRange" [ngValue]="age">{{ age }}</option>
            </select>
        </div>
        <div class="text-right">
            <button type="submit" class="btn btn-primary" [disabled]="deployForm.invalid || isPending">新增</button>
        </div>
    </form>
</div>
<div class="my-3" *ngIf="isConfirmed">
    <div class="card">
        <ul class="list-group list-group-flush">
            <li class="list-group-item">{{ resumeInfo.name }}</li>
            <li class="list-group-item">{{ resumeInfo.age }}</li>
            <li class="list-group-item">{{ hostGender }}</li>
            <li class="list-group-item"><b>{{ resumeInfo.address }}</b></li>
        </ul>
        <div class="card-body text-right">
            <button class="btn btn-primary" (click)="resetConfirmState()">關閉</button>
        </div>
    </div>
</div>
<div class="my-3" *ngIf="isError">
    <div class="alert alert-danger alert-dismissible fade show" role="alert">
        <strong>發生錯誤</strong> {{ errorMessage }}
        <button type="button" class="close" (click)="resetErrorState()">
          <span aria-hidden="true">×</span>
        </button>
    </div>
</div>
透過 AngularCLI 來產生元件:
ng g c modules/main/government/components/government-edit-permission
並將該元件添加到 government.module.ts 的 declarations :
...
declarations: [
    GovernmentComponent,
    GovernmentCreateResumeComponent,
    GovernmentEditPermissionComponent
],
...
打開 government-edit-permission.component.ts 進行設計,與部署履歷合約的元件大同小異,但需要注意的是要先取得合約實例,再透過合約實例來使用合約中的函式,另外,如果設置無權限則是透過 removePermission() 來執行:
import { Component, Injector } from '@angular/core';
import { FormGroup, FormBuilder, Validators } from '@angular/forms';
import { ComponentBase } from 'src/app/base/component.base';
import { OrganizationType } from 'src/app/types';

@Component({
    selector: 'app-government-edit-permission',
    templateUrl: './government-edit-permission.component.html',
    styleUrls: ['./government-edit-permission.component.scss']
})
export class GovernmentEditPermissionComponent extends ComponentBase {
    public editForm: FormGroup;

    constructor(
        private injector: Injector,
        private formBuilder: FormBuilder
    ) {
        super(injector);
        this.editForm = this.formBuilder.group({
            contract: ['', [Validators.required, this.addressValidator]],
            address: ['', [Validators.required, this.addressValidator]],
            permission: [true, [Validators.required]],
            name: ['', [Validators.required]],
            type: [OrganizationType.school, [Validators.required]]
        });
    }

    public editPermission(data: any): void {
        this.isPending = true;
        this.setFormDisabled(this.editForm);
        const resume = this.providerSvc.getResume(data.contract);
        if (data.permission) {
            this.providerSvc.executeMethod(
                resume.methods.setPermission(data.address, data.name, data.type, data.permission)
                .send({ from: this.providerSvc.defaultAccount })
            ).pipe(
                take(1)
            ).subscribe(
                receipt => {
                    this.transactionConfirmed();
                    this.editForm.reset();
                    this.setFormDisabled(this.editForm, false);
                },
                err => {
                    this.transactionError(err.message);
                    this.editForm.reset();
                    this.setFormDisabled(this.editForm, false);
                }
            );
        } else {
            this.providerSvc.executeMethod(
                resume.methods.removePermission(data.address)
                .send({ from: this.providerSvc.defaultAccount })
            ).pipe(
                take(1)
            ).subscribe(
                receipt => {
                    this.transactionConfirmed();
                    this.editForm.reset();
                    this.setFormDisabled(this.editForm, false);
                },
                err => {
                    this.transactionError(err.message);
                    this.editForm.reset();
                    this.setFormDisabled(this.editForm, false);
                }
            );
        }
    }

}
修改 government-edit-permission.component.html :
<div class="my-3" *ngIf="!isConfirmed && !isError">
    <form
        [formGroup]="editForm"
        (ngSubmit)="editPermission(editForm.value)"
    >
        <div class="form-group">
            <label for="contract">履歷位址</label>
            <input
                type="text"
                class="form-control"
                id="contract"
                placeholder="輸入履歷位址"
                [formControlName]="'contract'"
            >
        </div>
          <div class="form-group">
              <label for="address">帳戶位址</label>
              <input
                  type="text"
                  class="form-control"
                  id="address"
                  placeholder="輸入帳戶位址"
                  [formControlName]="'address'"
              >
          </div>
          <div class="form-group">
              <label for="permission">編輯權限</label>
              <select class="form-control" id="permission" [formControlName]="'permission'">
                  <option [ngValue]="true">是</option>
                  <option [ngValue]="false">否</option>
              </select>
          </div>
          <div class="form-group">
              <label for="name">單位名稱</label>
              <input
                  type="text"
                  class="form-control"
                  id="name"
                  placeholder="輸入單位名稱"
                  [formControlName]="'name'"
              >
          </div>
          <div class="form-group">
              <label for="type">機構類別</label>
              <select class="form-control" id="type" [formControlName]="'type'">
                  <option [ngValue]="1">教育單位</option>
                  <option [ngValue]="2">企業單位</option>
              </select>
          </div>
          <div class="text-right">
              <button type="submit" class="btn btn-primary" [disabled]="editForm.invalid || isPending">送出</button>
          </div>
      </form>
</div>
<div class="my-3" *ngIf="isConfirmed">
    <div class="alert alert-success alert-dismissible fade show" role="alert">
        <strong>編輯完成</strong>
        <button type="button" class="close" (click)="resetConfirmState()">
            <span aria-hidden="true">×</span>
        </button>
    </div>
</div>
<div class="my-3" *ngIf="isError">
  <div class="alert alert-danger alert-dismissible fade show" role="alert">
      <strong>發生錯誤</strong> {{ errorMessage }}
      <button type="button" class="close" (click)="resetErrorState()">
        <span aria-hidden="true">×</span>
      </button>
  </div>
</div>
修改 government.component.html :
<div class="container my-3">
    <div class="jumbotron jumbotron-fluid">
        <div class="container">
            <h1 class="display-4">政府專區</h1>
            <p class="lead">提供政府單位新增公民履歷以及編輯單位權限</p>
        </div>
    </div>
</div>
<div class="container">
    <ngb-tabset>
        <ngb-tab title="編輯權限">
            <ng-template ngbTabContent>
                <app-government-edit-permission></app-government-edit-permission>
            </ng-template>
        </ngb-tab>
        <ngb-tab title="新增履歷">
            <ng-template ngbTabContent>
                <app-government-create-resume></app-government-create-resume>
            </ng-template>
        </ngb-tab>
    </ngb-tabset>
</div>
編輯權限頁面: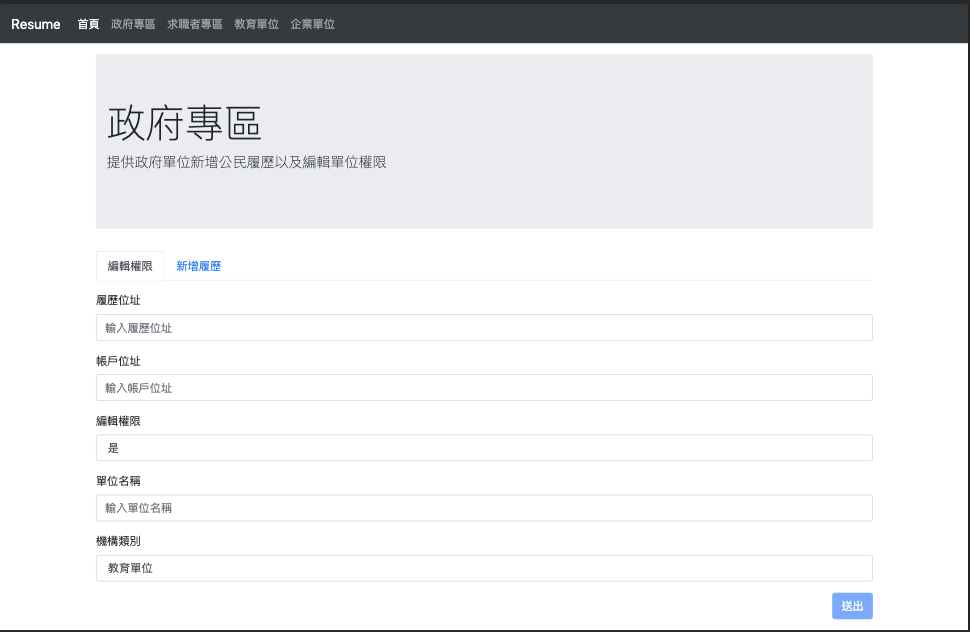
新增履歷頁面: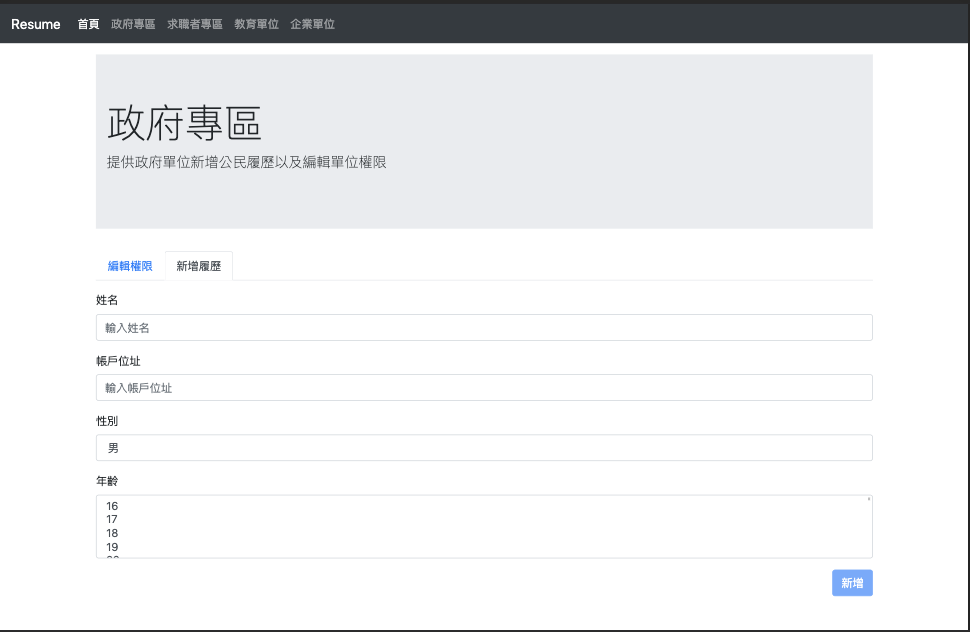
成功部署履歷的頁面: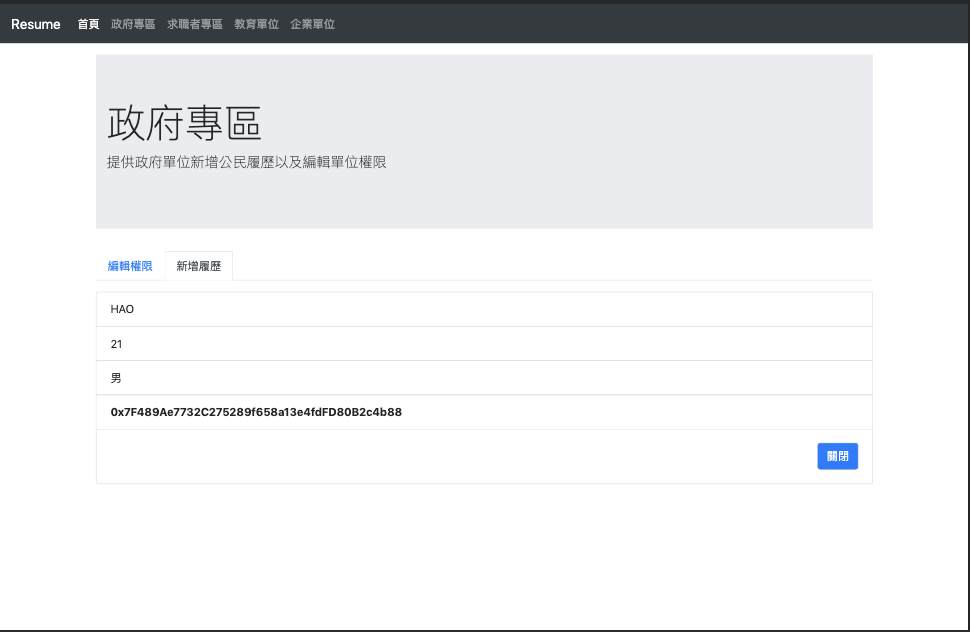
基本上跟政府單位專區的設計思維差不多,所以前面的開發有理解清楚的話,接下來的開發都不是問題了!
在修改元件之前,要先到 host.module.ts 裡引入 FormsModule 與 ReactiveFormsModule 來使用表單功能:
imports: [
    ...
    FormsModule,
    ReactiveFormsModule,
    ...
]
接著打開 host.component.ts 來進行設計。這裡與 government 比較不同的地方是表單使用了 FormArray ,因為我們專業技能需要能夠動態增減項目,用陣列的方式來存放對應的表單資料。還有一個值得注意的是在呼叫合約的地方使用了 forkJoin 來處理,它有點類似於 Promise.all() ,全部成功了才算完成,只要有一項發生錯誤就會直接報錯。那為什麼使用 forkLoin 呢?因為理論上要全部交易都確認了才算完整的更改表單:
import { Component, Injector } from '@angular/core';
import { FormGroup, FormBuilder, Validators, FormArray } from '@angular/forms';
import { ComponentBase } from 'src/app/base/component.base';
import { from, forkJoin } from 'rxjs';
import { take } from 'rxjs/operators';

@Component({
    selector: 'app-host',
    templateUrl: './host.component.html',
    styleUrls: ['./host.component.scss']
})
export class HostComponent extends ComponentBase {
    public profileForm: FormGroup;

    constructor(
        private injector: Injector,
        private formBuilder: FormBuilder
    ) {
        super(injector);
        this.profileForm = this.formBuilder.group({
            contract: ['', [Validators.required, this.addressValidator]],
            contact: ['', [Validators.required]],
            autobiography: ['', [Validators.required]],
            skills: this.formBuilder.array([this.createSkillFields()])
        });
    }

    public updateProfile(data: any): void {
        this.isPending = true;
        this.setFormDisabled(this.profileForm);
        const resume = this.providerSvc.getResume(data.contract);
        const request = [];
        request.push(
            from(resume.methods.setContact(data.contact).send({ from: this.providerSvc.defaultAccount })),
            from(resume.methods.setAutobiography(data.autobiography).send({ from: this.providerSvc.defaultAccount }))
        );
        for (const skill of data.skills) {
            request.push(from(resume.methods.setSkill(skill.class, skill.name).send({ from: this.providerSvc.defaultAccount })));
        }
        forkJoin(request).pipe(take(1)).subscribe(
            res => {
                this.transactionConfirmed();
                this.profileForm.reset();
                this.setFormDisabled(this.profileForm, false);
            },
            err => {
                this.transactionError(err.message);
                this.profileForm.reset();
                this.setFormDisabled(this.profileForm, false);
            }
        );
    }

    // 運用淺拷貝的特性先將專業技能的陣列寫入變數,再 push 一個新的 group 進去
    public addSkillField(): void {
        const skills = this.profileForm.controls.skills as FormArray;
        skills.push(this.createSkillFields());
    }

    // 運用淺拷貝的特性先將專業技能的陣列寫入變數,再根據 index 來移除指定的項目
    public removeSkillField(index: number) {
        const skills = this.profileForm.controls.skills as FormArray;
        skills.removeAt(index);
    }

    // 建立 group 並回傳,用於增加一筆新的專業技能
    private createSkillFields(): FormGroup {
        return this.formBuilder.group({
            class: ['', [Validators.required]],
            name: ['', [Validators.required]]
        });
    }

}
然後設計我們的頁面:
<div class="container my-3">
    <div class="jumbotron jumbotron-fluid">
        <div class="container">
            <h1 class="display-4">求職者專區</h1>
            <p class="lead">提供求職者撰寫自傳、聯絡方式及專業技能的頁面</p>
        </div>
    </div>
</div>
<div class="container">
    <div class="my-3" *ngIf="!isConfirmed && !isError">
        <form
            [formGroup]="profileForm"
            (ngSubmit)="updateProfile(profileForm.value)"
        >
            <div class="form-group">
                <label for="contract">履歷位址</label>
                <input
                    type="text"
                    class="form-control"
                    id="contract"
                    placeholder="輸入履歷位址"
                    [formControlName]="'contract'"
                >
            </div>
            <div class="form-group">
                <label for="contact">聯絡方式</label>
                <input
                    type="text"
                    class="form-control"
                    id="contact"
                    placeholder="輸入聯絡方式"
                    [formControlName]="'contact'"
                >
            </div>
            <div class="form-group">
                <label for="autobiography">自傳</label>
                <textarea
                    class="form-control"
                    id="autobiography"
                    rows="5"
                    [formControlName]="'autobiography'"
                ></textarea>
            </div>
            <label>專業技能</label>
            <div [formArrayName]="'skills'">
                <div class="form-group" *ngFor="let address of profileForm.controls['skills']['controls']; let i=index" [formGroupName]="i" >
                    <input type="text" class="form-control" placeholder="輸入類別" [formControlName]="'class'">
                    <input type="text" class="form-control" placeholder="輸入技能名稱" [formControlName]="'name'">
                    <div class="text-right">
                        <button type="button" class="btn btn-danger btn-circle" (click)="removeSkillField(i)">-</button>
                    </div>
                    <hr>
                </div>
            </div>
            <button type="button" class="btn btn-info btn-circle" (click)="addSkillField()">+</button>
            <div class="text-right">
                <button type="submit" class="btn btn-primary" [disabled]="profileForm.invalid || isPending">新增</button>
            </div>
        </form>
    </div>
<div class="my-3" *ngIf="isConfirmed">
    <div class="alert alert-success alert-dismissible fade show" role="alert">
        <strong>更新完成</strong>
        <button type="button" class="close" (click)="resetConfirmState()">
          <span aria-hidden="true">×</span>
        </button>
    </div>
</div>
<div class="my-3" *ngIf="isError">
    <div class="alert alert-danger alert-dismissible fade show" role="alert">
        <strong>發生錯誤</strong> {{ errorMessage }}
        <button type="button" class="close" (click)="resetErrorState()">
          <span aria-hidden="true">×</span>
        </button>
    </div>
</div>
</div>
這是對應的 SCSS :
.btn-circle {
    width: 30px;
    height: 30px;
    padding: 6px 0px;
    border-radius: 15px;
    text-align: center;
    font-size: 12px;
    line-height: 1.42857;
}
這是填寫聯絡方式、自傳及專業技能的頁面: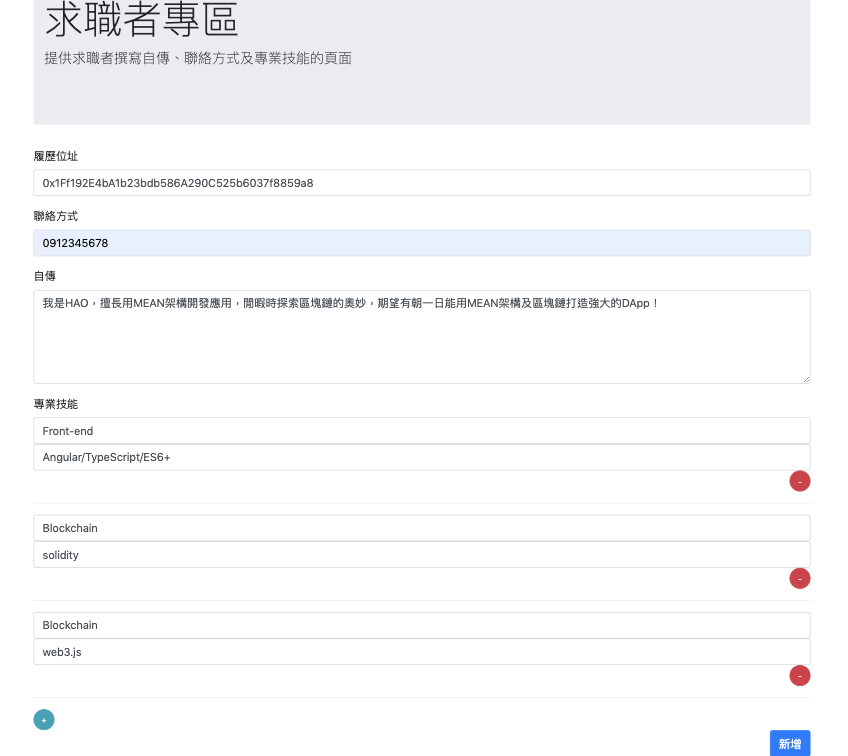
資料填妥後發送出去會有很多筆交易需要確認: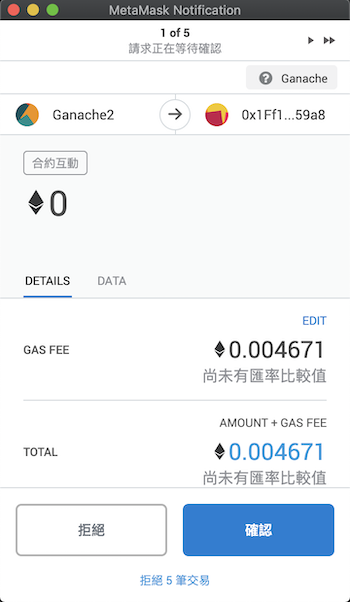
等待交易全部完成後就會顯示更新成功: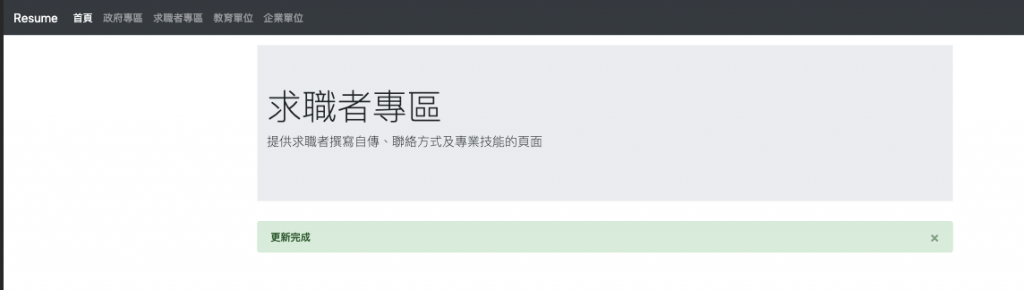
將大部分元件(Component)會使用的的共同功能製作成 ComponentBase ,讓有需要這些功能的元件來繼承,並製作簡單的政府單位專區頁面來進行部署履歷合約及編輯合約權限,還同時製作了求職者專區來編輯聯絡方式、自傳及專業技能。今天的內容比較多,讀者需要花多一點的時間來整理開發的過程及思路,一旦理解了,接下來的開發對各位來說就是一塊蛋糕了(a piece of cake),加油各位!
想問一下,此部分的履歷位址跟帳戶位要填ganache的哪個?不知道是我操作方法不對還是其他,我的會跑出錯誤
履歷位址:當你新增一個履歷的時候,回傳的合約位址
帳戶位址:根據前面篇章來設定的話,會是 Ganache 列表第一個
各角色的位址分配可以看這篇:https://ithelp.ithome.com.tw/m/articles/10223271
希望有幫到你!
你好,感謝回答。
我對於新增履歷已經沒有問題,但是在編輯權限的部分,會產生以下錯誤
我履歷位址設為Ganache的第三個,而帳戶位址依然設置第一個
想請問是何種原因造成其導致而成
履歷位址非 Ganache 中的帳戶位址,而是部署合約所產生的位址,也就是本文中 成功部署履歷的頁面 中的 hash 值(不是圖片裡面那串,是你自己部署完之後的),所以新增完履歷後要將它記下來喔~
希望有幫到你!
有了,有成功了!不過有時還是會跑出錯誤碼,有時又沒有
目前繼續鑽研下去
加油,有問題都可以提問!
你好,有時候會跑出這種BUG,但是不知道如何解決
如果你的 Ganache 有重新跑過,你的 Metamask 必須重置帳戶,因為對 Metamask 來說是不同的區塊鏈網路
我有重新跑過,也確認過帳戶重開是一樣的,但是重新安裝後,問題就解決了,謝謝回答,已經全部實作完畢。
為我提供了很大的幫助
NgbTabsetModule
在使用以上的語法時,出現已經淘汰的提示,
我該如何去修改這例子呢?
在 ng-bootstrap 的官方文件中有提到已經棄用以及替代方案:
https://ng-bootstrap.github.io/#/components/tabset/examples
希望有幫到你~
好的謝謝你~
在部署履歷合約之元件已經輸入了
"ng g c modules/main/government/components/government-create-resume"
然後在編輯權限之元件再輸入這個command,這個很不明白,怎樣要再一次去輸入?
"ng g c modules/main/government/components/government-create-resume"
thank you very much.
我想你是要"ng g c modules/main/government/components/government-edit-resume"?
你好,謝謝你的提醒,我已經修正為:ng g c modules/main/government/components/government-edit-permission
在
<label>專業技能</label>
   <div [formArrayName]="'skills'">
   <div class="form-group" *ngFor="let address of profileForm.controls['skills'].controls; let i=index" [formGroupName]="i" >
當我compile時顯示錯誤。
這部份應該更改為以下:
<div class="form-group" *ngFor="let address of profileForm.get('skills')['controls']; let i=index" [formGroupName]="i" >
我不知道你compile時有沒有錯誤出現。我還在編輯權限頁面努力中,還不知道為什麼不能顯示頁面的表格。
我是參考以下網頁去更改。
https://blog.csdn.net/qq_35843543/article/details/81564362
你好,我 compile 是沒有問題的呦
想了解一下錯誤訊息是?
它顯示"Property 'controls' does not exist on type 'AbstractControl'."這個錯誤。
我想是你的angular版本是8, 我的版本是9, 所以就會有這個問題
你好,我這邊會做調整,謝謝你的提醒!
當我在新增履歷,它會出現了"The send transactions "from" field must be defined!",我是否還未做其他設定才會出現這個錯誤?
thank you very much.
因為我是智能合約初學者,才比較多問題問,希望你不介意。
原來是我沒有在app.components.ts 寫入
` constructor(private provider: ProviderService) {
this.provider.getAccount().pipe(take(1)).subscribe(accounts => {
this.provider.defaultAccount = accounts[0];
});
}`
所以它不能得到metamask 帳號帳號碼