今天要製作語音機器人,我會使用 Azure 的 「Speech To Text」 服務將用戶的語音訊息轉成文字,讓 Line Bot 可以支援語音操作。
這篇內容會接續之前介紹的東西,想了解完整過程的讀者可以先看。
[Day02] 使用 C# 建立 LINE Bot 聊天機器人 - LineMessagingApi
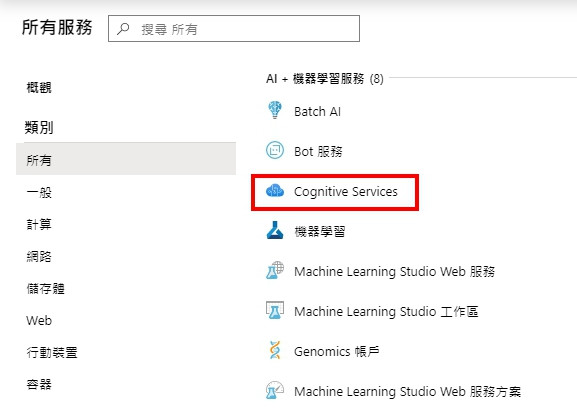
開啟 Azure 後新增 「Cognitive Services 認知服務」,該服務被歸類在 AI + 機器學習 分類下。
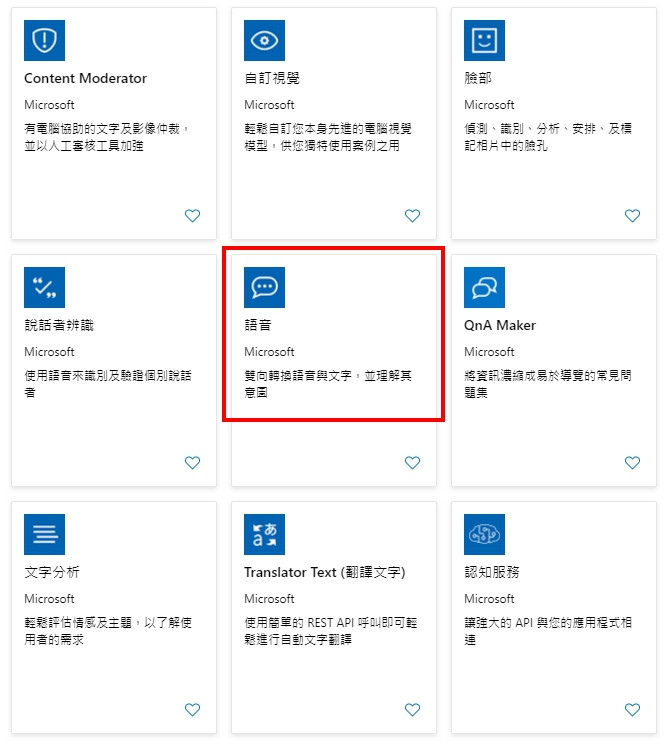
接著選擇 「語音」 項目。
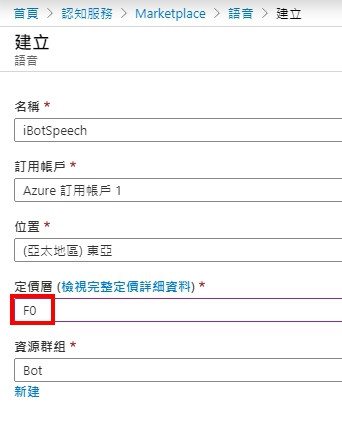
定價層記得要選免費的 「F0」。
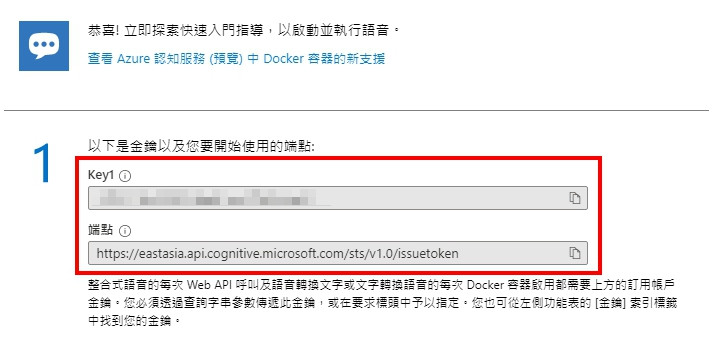
要記住 「Key」 和 「端點」 之後程式中會用到。
收費方式可以參考: 認知服務定價 — 語音服務
需要安裝的套件 (Nuget):
修改 appsettings.json 新增參數。
完整的 appsettings.json
{
  "Logging": {
    "LogLevel": {
      "Default": "Information",
      "Microsoft": "Warning",
      "Microsoft.Hosting.Lifetime": "Information"
    }
  },
  "AllowedHosts": "*",
  "LineBot": {
    "channelSecret": "...",
    "accessToken": "...",
    "speechKey": "...",
    "speechDomain": "eastasia"
  }
}
調整 LineBotConfig.cs
public class LineBotConfig
{
    public string channelSecret { get; set; }
    public string accessToken { get; set; }
    public string speechKey { get; set; }
    public string speechDomain { get; set; }
}
調整 Startup.cs
services.AddSingleton<LineBotConfig, LineBotConfig>((s) => new LineBotConfig
{
    channelSecret = Configuration["LineBot:channelSecret"],
    accessToken = Configuration["LineBot:accessToken"],
    speechKey = Configuration["LineBot:speechKey"],
    speechDomain = Configuration["LineBot:speechDomain"]
});
在 LineBotController 內初始化 SpeechConfig 物件。
services.AddSingleton<LineBotConfig, LineBotConfig>((s) => new LineBotConfig
{
    channelSecret = Configuration["LineBot:channelSecret"],
    accessToken = Configuration["LineBot:accessToken"],
    speechKey = Configuration["LineBot:speechKey"],
    speechDomain = Configuration["LineBot:speechDomain"]
});
完整的 LineBotController.cs
[Route("api/linebot")]
public class LineBotController : Controller
{
    private readonly IHttpContextAccessor _httpContextAccessor;
    private readonly HttpContext _httpContext;
    private readonly LineBotConfig _lineBotConfig;
    private readonly ILogger _logger;

    public LineBotController(IServiceProvider serviceProvider,
        LineBotConfig lineBotConfig,
        ILogger<LineBotController> logger)
    {
        _httpContextAccessor = serviceProvider.GetRequiredService<IHttpContextAccessor>();
        _httpContext = _httpContextAccessor.HttpContext;
        _lineBotConfig = lineBotConfig;
        _logger = logger;
    }

    [HttpPost("run")]
    public async Task<IActionResult> Post()
    {
        try
        {
            //lineMessagingClient
            var events = await _httpContext.Request.GetWebhookEventsAsync(_lineBotConfig.channelSecret);
            var lineMessagingClient = new LineMessagingClient(_lineBotConfig.accessToken);

            //SpeechConfig
            var speechConfig = SpeechConfig.FromSubscription(_lineBotConfig.speechKey, _lineBotConfig.speechDomain);

            var lineBotApp = new LineBotApp(lineMessagingClient, speechConfig);
            await lineBotApp.RunAsync(events);
        }
        catch (Exception ex)
        {
            _logger.LogError(JsonConvert.SerializeObject(ex));
        }
        return Ok();
    }
}
最後調整 LineBotApp.cs 建後式,設定部分就完成了。
...
private readonly SpeechConfig _speechConfig;
public LineBotApp(LineMessagingClient lineMessagingClient, SpeechConfig speechConfig)
{
    ...
    _speechConfig = speechConfig;
}
接下來就開始今天的重點,將 Line Bot 接收到的語音訊息轉成文字。
語音服務只支援 wav 格式的檔案,所以需要先使用 NAudio 將 aac 轉檔。
要注意 Line 的錄音檔,不同平台會使用不同格式,Andriod 的是 .aac 格式。
//將 AAC 轉成 WAV
using (var reader = new MediaFoundationReader(originalFilePath))
using (var pcmStream = new WaveFormatConversionStream(
    //需為 16KHz
    new WaveFormat(16000, 1), reader))
{
    WaveFileWriter.CreateWaveFile(filePath, pcmStream);
}
接著設定語言和聲音名稱,聲音可以選擇男生或女生。
//設定語言為繁體中文
_speechConfig.SpeechRecognitionLanguage = "zh-TW";

//設定語音名稱
//zh-TW-Yating-Apollo、zh-TW-HanHanRUS、zh-TW-Zhiwei-Apollo
_speechConfig.SpeechSynthesisVoiceName ="zh-TW-Yating-Apollo";
語音說明: 語音服務的語言和區域支援
最後將語音送出取得分析結果,這邊使用的 RecognizeOnceAsync 只支援 15 秒內的語音,要注意一下。
//將語音轉為文字
using (var audioInput = AudioConfig.FromWavFileInput(filePath))
using (var recognizer = new SpeechRecognizer(_speechConfig, audioInput))
{
    //語音超過 15 秒需改用 StartContinuousRecognitionAsync 方法
    var result = await recognizer.RecognizeOnceAsync();
    //識別成功
    if (result.Reason == ResultReason.RecognizedSpeech)
    {
        await _messagingClient.ReplyMessageAsync(ev.ReplyToken,
            new List<ISendMessage>
            {
                new TextMessage(result.Text)
            });
    }
    //識別失敗
    else
    {
        await _messagingClient.ReplyMessageAsync(ev.ReplyToken,
            new List<ISendMessage>
            {
                new TextMessage("語音識別失敗!!")
            });
    }
}
詳細用法可以參考文件: Quickstart: Recognize speech from an audio file
完整程式:
protected override async Task OnMessageAsync(MessageEvent ev)
{
    switch (ev.Message.Fix())
    {
        case AudioEventMessage audioMessage:
        {
            if (audioMessage.ContentProvider.Type != ContentProviderType.Line)
                break;

            //轉換後的語音檔路徑
            var guid = Guid.NewGuid().ToString();
            var filePath = $@"D:\home\site\wwwroot\audio-{guid}.wav";
            var originalFilePath = $@"D:\home\site\wwwroot\audio-{guid}.aac";

            //儲存檔案
            using (var stream =
                await _messagingClient.GetContentStreamAsync(audioMessage.Id))
            using (var fs = File.Create(originalFilePath))
            {
                stream.CopyTo(fs);
            }

            //將 AAC 轉成 WAV
            using (var reader = new MediaFoundationReader(originalFilePath))
            using (var pcmStream = new WaveFormatConversionStream(
                //WAV 需為 16KHz
                new WaveFormat(16000, 1), reader))
            {
                WaveFileWriter.CreateWaveFile(filePath, pcmStream);
            }

            //設定語言為繁體中文
            _speechConfig.SpeechRecognitionLanguage = "zh-TW";

            //設定語音名稱
            //zh-TW-Yating-Apollo、zh-TW-HanHanRUS、zh-TW-Zhiwei-Apollo
            _speechConfig.SpeechSynthesisVoiceName = "zh-TW-Yating-Apollo";

            //將語音轉為文字
            using (var audioInput = AudioConfig.FromWavFileInput(filePath))
            using (var recognizer = new SpeechRecognizer(_speechConfig, audioInput))
            {
                //語音超過 15 秒需改用 StartContinuousRecognitionAsync 方法
                var result = await recognizer.RecognizeOnceAsync();

                //識別成功
                if (result.Reason == ResultReason.RecognizedSpeech)
                {
                    await _messagingClient.ReplyMessageAsync(ev.ReplyToken,
                        new List<ISendMessage>
                        {
                            new TextMessage(result.Text)
                        });
                }
                //識別失敗
                else
                {
                    await _messagingClient.ReplyMessageAsync(ev.ReplyToken,
                        new List<ISendMessage>
                        {
                            new TextMessage("語音識別失敗!!")
                        });
                }
            }
        }
        break;
    }
}
結果:
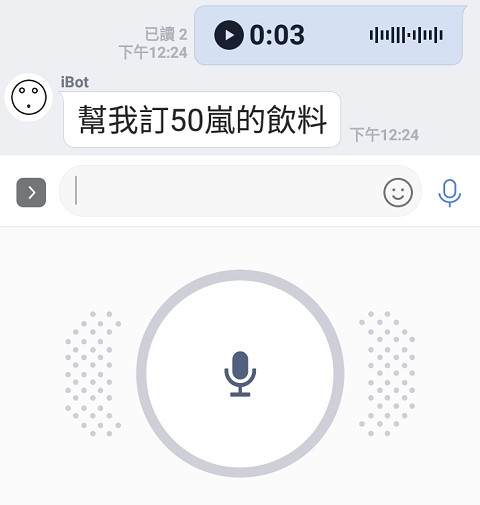
也可以反向將文字訊息轉成語音。
需要另外安裝 (Nuget):
首先設定語言。
//設定語言為繁體中文
_speechConfig.SpeechSynthesisLanguage = "zh-TW";
接著將文字轉成語音。
//將文字轉成語音
var result = null as SpeechSynthesisResult;
using (var fileOutput = AudioConfig.FromWavFileOutput(originalFilePath))
using (var synthesizer = new SpeechSynthesizer(_speechConfig, fileOutput))
{
    result = await synthesizer.SpeakTextAsync(textMessage.Text);
}
詳細用法可以參考文件: Quickstart: Synthesize speech into an audio file
LINE 的 Audio 訊息需要提供時間長度,我使用 TagLib 套件取得檔案的 Duration 屬性。
//讀取語音時間
var tfile = TagLib.File.Create(originalFilePath);
var duration = (int)tfile.Properties.Duration.TotalMilliseconds;
最後將語音回覆給用戶,因為 Line 不支援 wav 所以和上面一樣要先轉檔。
一開始我使用 NAudio 轉檔。
using (var reader = new WaveFileReader(originalFilePath))
{
    MediaFoundationEncoder.EncodeToAac(reader, filePath);
}
結果出現下面錯誤,Google 後發現 NAudio 需要電腦有 AAC 編碼器才能轉檔,但 API 是架在 App Service 上,找很久找不到在雲端安裝編碼器的方法,所以放棄此法。
No suitable AAC encoders available
這邊歡迎有經驗的大大分享,網路上討論這部分的資料很少
山不轉路轉,只好找看看有沒有別的套件可以用,最後我選擇了 MediaToolkit.NetCore,它是 FFmpeg 的 .NET 封裝,還蠻有名的用的人很多,不過底層是呼叫 ffmpeg.exe,實務上不知道會不會遇到一些奇怪的問題就是。
下載 ffmpeg.exe 放在網站根目錄。
連結: https://www.ffmpeg.org/
免費方案的 App Service 只支援 32 位元的程式,下載的時候需要注意一下
//將 WAV 轉成 AAC
var inputFile = new MediaFile (originalFilePath);
var outputFile = new MediaFile(filePath);
using (var engine = new Engine($@"D:\home\site\wwwroot\ffmpeg.exe"))
{
    engine.Convert(inputFile, outputFile);
}

await _messagingClient.ReplyMessageAsync(ev.ReplyToken,
    new List<ISendMessage>
    {
        new AudioMessage(
            $"https://ibottestapi.azurewebsites.net/audio-{guid}.aac",
            duration)
    });
完整程式:
protected override async Task OnMessageAsync(MessageEvent ev)
{
    switch (ev.Message.Fix())
    {
        case TextEventMessage textMessage:
        {
            //設定語言為繁體中文
            _speechConfig.SpeechSynthesisLanguage = "zh-TW";

            //轉換後的語音檔路徑
            var guid = Guid.NewGuid().ToString();
            var filePath = $@"D:\home\site\wwwroot\wwwroot\audio-{guid}.aac";
            var originalFilePath = $@"D:\home\site\wwwroot\wwwroot\audio-{guid}.wav";

            //將文字轉成語音
            var result = null as SpeechSynthesisResult;
            using (var fileOutput = AudioConfig.FromWavFileOutput(originalFilePath))
            using (var synthesizer = new SpeechSynthesizer(_speechConfig, fileOutput))
            {
                result = await synthesizer.SpeakTextAsync(textMessage.Text);
            }

            //轉換成功
            if (result.Reason == ResultReason.SynthesizingAudioCompleted)
            {
                //讀取語音時間
                var tfile = TagLib.File.Create(originalFilePath);
                var duration = (int)tfile.Properties.Duration.TotalMilliseconds;

                //此法需要 aac 編碼器
                //using (var reader = new WaveFileReader(originalFilePath))
                //{
                //    MediaFoundationEncoder.EncodeToAac(reader, filePath);
                //}

                //將 WAV 轉成 AAC
                var inputFile = new MediaFile (originalFilePath);
                var outputFile = new MediaFile(filePath);
                using (var engine = new Engine($@"D:\home\site\wwwroot\ffmpeg.exe"))
                {
                    engine.Convert(inputFile, outputFile);
                }

                await _messagingClient.ReplyMessageAsync(ev.ReplyToken,
                    new List<ISendMessage>
                    {
                        new AudioMessage(
                            $"https://ibottestapi.azurewebsites.net/audio-{guid}.aac",
                            duration)
                    });
            }
            //轉換失敗
            else
            {
                await _messagingClient.ReplyMessageAsync(ev.ReplyToken,
                    new List<ISendMessage>
                    {
                        new TextMessage("語音轉換失敗!!")
                    });
            }
        }
        break;
    }
}
結果:

寫完這篇後發現,原來 Audio 的世界這麼博大精深,平時聽到的 mp3、wav、m4a 這些都是超複雜的東西,加上網路上這方面的資訊真的不多,只能自己摸索亂試,從錯誤中學習,好險最後有試出來,不然這篇就要夭折了。
最後來看看美中不足的地方,轉檔部分我本來想全用 Stream 處理,這樣才不會產生垃圾檔案,但套件好像不支援,所以如果用在實務上,需要另外寫一支程式定時刪除資料夾中過期的檔案。
今天就到這裡,感謝大家觀看。 (´・ω・`)
調用Azure認知服務進行大音頻文件語音識別
體驗 Microsoft Azure 語音服務(C#)
