最近許多的網站都開始強制使用 https,像前陣子碰到的 Facebook JavaScript SDK 也是如此,導致本地端測試很痛苦啊啊啊!爬文後發現有 mkcert 這神奇的東西,這邊就記錄一下該如何使用~
官方這邊有提供 macOS 與 Windows 的安裝方式
這邊官方提供兩種安裝方式,使用 Homebrew 或是 MacPorts
<!-- Homebrew -->
$ brew install mkcert
$ brew install nss # if you use Firefox
<!-- MacPorts -->
$ sudo port selfupdate
$ sudo port install mkcert
$ sudo port install nss # if you use Firefox
首先需要使先使用 PowerShell 安裝 Chocolatey,這邊須使用系統管理員身分執行
$ Set-ExecutionPolicy Bypass -Scope Process -Force; [System.Net.ServicePointManager]::SecurityProtocol = [System.Net.ServicePointManager]::SecurityProtocol -bor 3072; iex ((New-Object System.Net.WebClient).DownloadString('https://chocolatey.org/install.ps1'))
Chocolatey 安裝完成後,一樣使用 PowerShell 系統管理員輸入指令,這樣就完成安裝囉!
$ choco install mkcert
本地端使用 https 總共有幾個步驟
接下來就讓我們一步一步來吧!
因為我們剛剛已經安裝好 mkcert,所以只需要一個指令便可產生憑證並加入信任清單
$ mkcert -install
這邊 mkcert 後面接輸入綁定的網域,因為我們是本地端,所以輸入 localhost
$ mkcert localhost
接下來便可以看到產生了兩個檔案,分別是金鑰與憑證
/localhost.pem
/localhost-key.pem
這邊分別介紹一下 Live Server、Vue CLI 與 Nuxt.js 三種設定方法
官方這邊有寫到如何設定,基本上只要加上幾行 code 就行了
{
  "liveServer.settings.https": {
    "enable": true,
    "cert": "/Users/User/Desktop/map/localhost.pem",
    "key": "/Users/User/Desktop/map/localhost-key.pem",
    "passphrase": "12345"
  }
}
cert 與 key 填上金鑰與憑證的路徑,接下來開啟 localhost 就會看到 https 囉!
Vue CLI 本身就包有 DevServer,可以直接於根目錄新增 vue.config.js 檔案做設定,方法如下
// vue.config.js
const fs = require("fs");
module.exports = {
  devServer: {
    https: {
      key: fs.readFileSync(`${__dirname}/src/assets/https/localhost-key.pem`),
      cert: fs.readFileSync(`${__dirname}/src/assets/https/localhost.pem`)
    }
  }
};
金鑰與憑證的路徑就看自己放在哪邊,這樣就設定完成囉!
因為 Nuxt 有 SSR,所以我們必須寫一個檔案開啟 server(這邊使用 express)
首先資料夾結構如下,localhost 資料夾內有金鑰、憑證與開啟 server 的檔案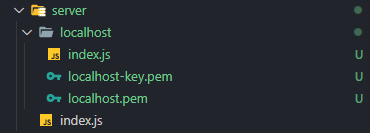
接下來看到 localhost/index.js,其實基本上都跟預設的大同小異
const express = require("express");
const consola = require("consola");
const { Nuxt, Builder } = require("nuxt");
const app = express();

// 多載入了以下兩個 node.js 模組
const https = require("https");
const fs = require("fs");

// 修改對應路徑
const config = require("../../nuxt.config.js");

async function start() {
  const nuxt = new Nuxt(config);

  const { host, port } = nuxt.options.server;

  // 少了 production 模式的判斷
  try {
    const builder = new Builder(nuxt);
    await builder.build();
  } catch (error) {
    console.error(error);
    return false;
  }

  // 新增 https 設定
  const https_options = {
    key: fs.readFileSync(`${__dirname}/localhost-key.pem`),
    cert: fs.readFileSync(`${__dirname}/localhost.pem`)
  };

  app.use(nuxt.render);

  // 開啟 https server
  https.createServer(https_options, app).listen(port, host);
  consola.ready({
    message: `Server listening on https://${host}:${port}`,
    badge: true
  });
}
start();
最後只要將 package.json 內的指令指向 server/localhost/index.js 即可
"scripts": {
  "dev": "cross-env NODE_ENV=development nodemon server/localhost/index.js --watch server",
}
一開始弄這個真的是被搞死啊...理解之後發現,原理還滿簡單的,在這邊留下紀錄給之後採坑的各位
 Ares
Ares
