@Input子元件內的@Input裝飾器定義屬性,父元件再透過屬性繫結(Property Binding)將資料傳遞給子元件。ChildComponent
import { Component, OnInit, Input } from '@angular/core';
@Component({
  selector: 'app-child',
  templateUrl: './child.component.html',
  styleUrls: ['./child.component.scss']
})
export class ChildComponent implements OnInit {
  @Input() bankName: string;
  @Input() accountId: number;
  constructor() { }
  ngOnInit(): void {
  }
}
ChildComponent HTML
<p>{{ bankName }}</p>
<p>{{ accountId }}</p>
ParentComponent
import { Component, OnInit } from '@angular/core';
@Component({
  selector: 'app-parent',
  templateUrl: './parent.component.html',
  styleUrls: ['./parent.component.scss']
})
export class ParentComponent implements OnInit {
  bankName = 'ABC Bank';
  accountId = 123456789;
  constructor() { }
  ngOnInit(): void {
  }
}
ParentComponent HTML
<app-child [bankName]="bankName" [accountId]="accountId"></app-child>
結果: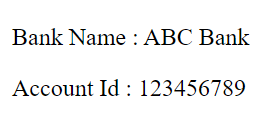
@Output子元件藉由@Output裝飾器定義屬性,該屬性為EventEmitter實體,可以設定要傳送的資料型別,透過事件繫結(Event Binding)通知父元件有事件發生。
ChildComponent
import { Component, OnInit, EventEmitter, Output } from '@angular/core';
@Component({
  selector: 'app-child',
  templateUrl: './child.component.html',
  styleUrls: ['./child.component.scss']
})
export class ChildComponent implements OnInit {
  @Output() counterEvt = new EventEmitter<string>();
  constructor() { }
  ngOnInit(): void { }
  counterChange(cal: string) {
    this.counterEvt.emit(cal);
  }
}
ChildComponent HTML
<button (click)="counterChange('add')">加</button>
<button (click)="counterChange('minus')">減</button>
ParentComponent
import { Component, OnInit } from '@angular/core';
@Component({
  selector: 'app-parent',
  templateUrl: './parent.component.html',
  styleUrls: ['./parent.component.scss']
})
export class ParentComponent implements OnInit {
  counter = 0;
  constructor() { }
  ngOnInit(): void {
  }
  counterCal(cal: string) {
    cal === 'add' ? this.counter++ : this.counter--;
  }
}
ParentComponent HTML
<p>counter : {{ counter }}</p>
<app-child (counterEvt)="counterCal($event)"></app-child>
基於元件的維護性與程式的邏輯性,我們只會在子元件送出事件資料(加或減),當父元件接收到事件資料後,真正的實作應該要在父元件完成,而不是在子元件完成。
結果:
@ViewChild以上的方式可以讓父元件-子元件傳遞資料,但還是有限制:父元件無法存取子元件的屬性與方法。
這時可以使用‵@ViewChild在父元件建立子元件的實體,讓父元件獲得子元件的屬性與方法。
實作一個簡單的timer。
ChildComponent
import { Component, OnInit } from '@angular/core';
@Component({
  selector: 'app-child',
  templateUrl: './child.component.html',
  styleUrls: ['./child.component.scss']
})
export class ChildComponent implements OnInit {

  seconds = 0;
  timer: any;
  constructor() { }
  ngOnInit(): void { }

  start() {
    this.timer = setInterval(() => {
      this.seconds++;
    }, 1000);
  }

  stop() {
    clearInterval(this.timer);
  }
}
所有計時邏輯都在子元件中。
ParentComponent
import { Component, OnInit, ViewChild, AfterViewInit } from '@angular/core';
import { ChildComponent } from '../child/child.component';

@Component({
  selector: 'app-parent',
  templateUrl: './parent.component.html',
  styleUrls: ['./parent.component.scss']
})
export class ParentComponent implements OnInit, AfterViewInit {
  @ViewChild(ChildComponent) childComponent: ChildComponent;
  constructor() { }
  ngOnInit(): void {
  }
  seconds() {
    return 0;
  }

  ngAfterViewInit() {
    setTimeout(() => {
      this.seconds = () => this.childComponent.seconds;
    }, 1000);
  }

  onStart() {
    this.childComponent.start();
  }
  onStop() {
    this.childComponent.stop();
  }
}
父元件顯示秒數。
整個生命週期中,必須在ngAfterViewInit才能取得子元件的實體。
由於我們目前處於Development Mode,為了避免ExpressionChangedAfterItHasBeenCheckedError的問題,所以在ngAfterViewInit使用setTimeout,詳細說明之後會另開文章。
ParentComponent HTML
<button (click)="onStart()">start</button>
<button (click)="onStop()">stop</button>
<p>{{ seconds() }}</p>
<app-child></app-child>
結果:
serviceA元件跟B元件,是兩個不相關的原件,可以藉由service作為他們之間溝通的媒介。
實作在A元件輸入訊息,在B元件同步顯示的功能:DataService
import { Injectable } from '@angular/core';
import { Subject } from 'rxjs';

@Injectable({
  providedIn: 'root'
})
export class DataService {
  msgContent = new Subject<string>();
  constructor() { }

  setMessage(value: string) {
    this.msgContent.next(value);
  }

  getMessage() {
    return this.msgContent.asObservable();
  }
}
AComponent
import { Component, OnInit } from '@angular/core';
import { DataService } from '../data.service';

@Component({
  selector: 'app-a',
  templateUrl: './a.component.html',
  styleUrls: ['./a.component.scss']
})
export class AComponent implements OnInit {

  constructor(private dataSvc: DataService) { }

  ngOnInit(): void {
  }

  onMsgChange(message: string) {
    this.dataSvc.setMessage(message);
  }
}
AComponent HTML
input message : <input (keyup)="onMsgChange($event.target.value)">
BComponent
import { Component, OnInit, OnDestroy } from '@angular/core';
import { DataService } from '../data.service';
import { Subscription } from 'rxjs';

@Component({
  selector: 'app-b',
  templateUrl: './b.component.html',
  styleUrls: ['./b.component.scss']
})
export class BComponent implements OnInit, OnDestroy {
  message: string;
  subscription: Subscription;
  constructor(private dataSvc: DataService) { }

  ngOnInit(): void {
    this.subscription = this.dataSvc.getMessage().subscribe(val => {
      this.message = val;
    });
  }
  ngOnDestroy(): void {
    this.subscription.unsubscribe();
  }
}
BComponent HTML
here is message : <span>{{ message }}</span>
AppComponent HTML
<app-a></app-a>
<p></p>
<app-b></app-b>
結果:
參考來源:
Angular:如何在多個組件之間通信
 WM
WM

 iThome鐵人賽