這一套是專門收集各設備的記錄,並且可以從記錄中去分析這一些記錄有什麼狀況給予警示,讓管理者知道說有設備有異常的訊息
系統更新:
yum update -y

安裝pwgen、perl-Digest-SHA輔助工具,設定Graylog時用來生成密碼
yum install epel-release -y
yum install pwgen perl-Digest-SHA -y
系統更新:
dnf update -y

啟用 PowerTools 儲存庫
dnf install dnf-utils -y
dnf config-manager --set-enabled PowerTools

安裝pwgen、perl-Digest-SHA輔助工具,設定Graylog時用來生成密碼
dnf install epel-release -y
dnf install pwgen perl-Digest-SHA -y
Elasticsearch執行於JVM上,因此需安裝Java 7 update 55或以上版本,並設定有JAVA_HOME環境變數。
早期的Java 7版本存在造成資料毀損與遺失的bug,Elasticsearch在啟動時會檢查過期的Java版本並無法成功啟動。
l建議使用 Java 1.8.0_131 以上,因最近Java的重要update會提升JVM的記憶體使用效能。
(Elasticsearch官方建議不要使用JDK9,請使用 JDK8 )
使用JVM Server mode (x64版本為server mode),將更加有效的利用記憶體
安裝指令如下
CentOS 7
yum install java-1.8.0-openjdk-headless.x86_64
dnf install java-1.8.0-openjdk-headless.x86_64
# vim /etc/yum.repos.d/mongodb-org-4.0.repo 加入以下內容[mongodb-org-4.0]
name=MongoDB Repository
baseurl=https://repo.mongodb.org/yum/redhat/$releasever/mongodb-org/4.0/x86_64/
gpgcheck=1
enabled=1
gpgkey=https://www.mongodb.org/static/pgp/server-4.0.asc
yum install -y mongodb-org
systemctl start mongod
systemctl enable mongod
# vim /etc/yum.repos.d/mongodb-org.repo 加入以下內容[mongodb-org-4.2]
name=MongoDB Repository
baseurl=https://repo.mongodb.org/yum/redhat/$releasever/mongodb-org/4.2/x86_64/
gpgcheck=1
enabled=1
gpgkey=https://www.mongodb.org/static/pgp/server-4.2.asc
dnf install -y mongodb-org
systemctl start mongod
systemctl enable mongod
安裝Elasticsearch GPG密鑰
--import https://artifacts.elastic.co/GPG-KEY-elasticsearch
建立Elasticsearch源
vim /etc/yum.repos.d/elasticsearch.repo
加入以下內容
[elasticsearch-6.x]
name=Elasticsearch repository for 6.x packages
baseurl=https://artifacts.elastic.co/packages/oss-6.x/yum
gpgcheck=1
gpgkey=https://artifacts.elastic.co/GPG-KEY-elasticsearch
enabled=1
autorefresh=1
type=rpm-md
CentOS 7
yum install -y elasticsearch-oss

CentOS8
dnf install -y elasticsearch-oss
sudo tee -a /etc/elasticsearch/elasticsearch.yml > /dev/null <<EOT
cluster.name: graylog
action.auto_create_index: false
EOT
systemctl start elasticsearch
systemctl enable elasticsearch
curl –XGET localhost:9200/_cluster/health?pretty=true
若一切正常,應該會得到以下訊息內容
curl: (3) Failed to convert –XGET to ACE; string contains a disallowed character

{
  "cluster_name" : "graylog",
  "status" : "green",
  "timed_out" : false,
  "number_of_nodes" : 1,
  "number_of_data_nodes" : 1,
  "active_primary_shards" : 0,
  "active_shards" : 0,
  "relocating_shards" : 0,
  "initializing_shards" : 0,
  "unassigned_shards" : 0,
  "delayed_unassigned_shards" : 0,
  "number_of_pending_tasks" : 0,
  "number_of_in_flight_fetch" : 0,
  "task_max_waiting_in_queue_millis" : 0,
  "active_shards_percent_as_number" : 100.0
}
rpm -Uvh https://packages.graylog2.org/repo/packages/graylog-3.3-repository_latest.rpm
CentOS 7
yum install -y graylog-server

CentOS 8
dnf install -y graylog-server
利用pwgen輔助工具產生密碼for server.conf中的password_secret
SECRET=$(pwgen -s 96 1)
sudo -E sed -i -e 's/password_secret =.*/password_secret = '$SECRET'/' /etc/graylog/server/server.conf
/etc/graylog/server/server.conf 內容,password_secret 參數如下
SHA 雜湊演算法,我們需要把明文密碼轉換為 hash 值,然後賦值給 root_password_sha2 參數。例如:以下列命令產生密碼為 test1234 的 hash 值。
echo -n test1234 | sha256sum | awk '{print $1}'

Hash 值,填入到 server.conf 中 root_password_sha2 參數。vim /etc/graylog/server/server.conf

vim /etc/graylog/server/server.conf
http_bind_address = 192.168.x.x:9000 (192.168.x.x為Graylog Server IP)
http_publish_uri = http://192.168.x.x/
elasticsearch_cluster_name = graylog  (需與elasticsearch設定檔的cluster.name參數同)
vim /etc/graylog/server/server.conf
# The email address of the root user.
# Default is empty
#root_email = ""
root_email = "cyp@test.com.tw"

# The time zone setting of the root user. See http://www.joda.org/joda-time/timezones.html for a list of valid time zones.
# Default is UTC
#root_timezone = UTC # 重要,若不設定為ROC,則進來Log的timestamp會變成以UTC時間紀錄,
# 會影響到搜尋結果root_timezone = ROC

# 允許wildcard搜尋語法
# 例如 AND EventID:4771 AND NOT TargetUserName:*?
#新增下列設定allow_leading_wildcard_searches = true
systemctl start graylog-server.service
systemctl enable graylog-server.service

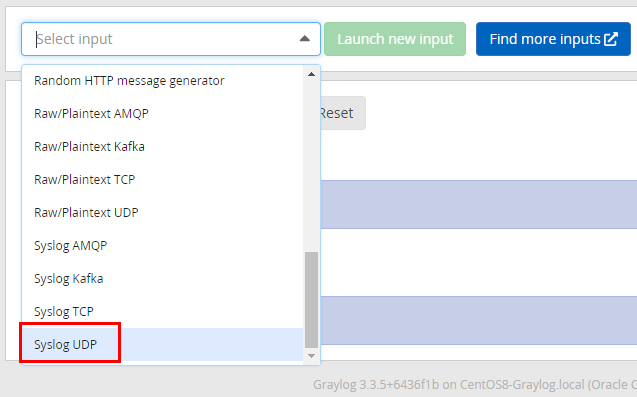
rsyslog設定檔#vim /etc/rsyslog.conf
修改前

# Provides UDP syslog reception
#$ModLoad imudp
#$UDPServerRun 514

# Provides TCP syslog reception
#$ModLoad imtcp
#$InputTCPServerRun 514

修改後

# Provides UDP syslog reception
$ModLoad imudp
$UDPServerRun 514

# Provides TCP syslog reception
$ModLoad imtcp
$InputTCPServerRun 514

移到最下面增加一行
#*.* @@remote-host:514
#*.* @127.0.0.1:10514 Prot號要跟Graylog裡面設定的要一樣而且不能設定成514不然會無法收到記錄
*.* @127.0.0.1:10514;RSYSLOG_SyslogProtocol23Format


然後重改rsyslog服務
systemctl restart rsyslog

CentOS 7
yum install yum-utils

CentOS 8
dnf install yum-utils
yum 存儲庫,在此目錄下新增一個 /etc/yum.repos.d/nginx.repo 屬於 官方提供載點
[nginx-stable]
name=nginx stable repo
baseurl=http://nginx.org/packages/centos/$releasever/$basearch/
gpgcheck=1
enabled=1
gpgkey=https://nginx.org/keys/nginx_signing.key
module_hotfixes=true

[nginx-mainline]
name=nginx mainline repo
baseurl=http://nginx.org/packages/mainline/centos/$releasever/$basearch/
gpgcheck=1
enabled=0
gpgkey=https://nginx.org/keys/nginx_signing.key
module_hotfixes=true
stable 穩定版本,如果想使用比較最新的版本請使用 nginx-mailine 會以當時官方釋出的版本為主yum-config-manager --enable nginx-mainline
nginx 服務CentOS 7
yum install nginx
CentOS 8
dnf install nginx
Graylog 服務設定檔 vim /etc/nginx/conf.d/log.conf
server {
    listen 80;
    server_name 你的ip或網址;

    access_log /var/log/nginx/graylog_access.log;
    error_log /var/log/nginx/graylog_error.log;
    #
    location / {
        proxy_set_header Host $http_host;
        proxy_set_header X-Forwarded-Host $host;
        proxy_set_header X-Forwarded-Server $host;
        proxy_set_header X-Forwarded-For $proxy_add_x_forwarded_for;
        proxy_set_header X-Graylog-Server-URL https://$server_name/;
        proxy_pass http://127.0.0.1:9000;
    }
    #
    location /graylog/ {
        proxy_set_header Host $http_host;
        proxy_set_header X-Forwarded-Host $host;
        proxy_set_header X-Forwarded-Server $host;
        proxy_set_header X-Forwarded-For $proxy_add_x_forwarded_for;
        proxy_set_header X-Graylog-Server-URL http://$server_name/graylog/;
        rewrite ^/graylog/(.*)$ /$1 break;
        proxy_pass http://127.0.0.1:9000;
    }
    #
    location ~* \.(?:ogg|ogv|svg|svgz|eot|otf|woff|mp4|ttf|css|rss|atom|js|jpg|jpeg|gif|png|ico|zip|tgz|gz|rar|bz2|doc|xls|exe|ppt|tar|mid|midi|wav|bmp|rtf)$ {
        proxy_set_header Host $http_host;
        proxy_set_header X-Forwarded-Host $host;
        proxy_set_header X-Forwarded-Server $host;
        proxy_set_header X-Forwarded-For $proxy_add_x_forwarded_for;
        proxy_set_header X-Graylog-Server-URL https://$server_name/;
        proxy_pass http://127.0.0.1:9000;
    }
}
systemctl start nginx ; systemctl enable nginx
vim /etc/graylog/server/server.conf 設定http_publish_uri = http://192.168.x.x/
systemctl restart graylog-server


 iThome鐵人賽