
大家好我是 EP,這次的系列主要會收集一些 Angular 在開發上會使用到的技巧(或稱 Tip),並從這些技巧作為切入點,然後直接開始爬 Angular 的原始碼!
所以文章的組成會是先介紹 Tip,再來就是爬完原始碼的分析結果。
本系列文章會以 Angular 10 作為主要的作業環境,並使用 Ivy + AOT 來編譯應用程式。
今天要分享的 Tip 是:
在 child component 內透過 DI 的方式與 parent component 互動!
@Component({
  selector: 'app-parent',
  styleUrls: ['./parent.component.scss'],
  template:`
<p>parent works!</p>
<app-child></app-child>
`
})
export class ParentComponent {
}

@Component({
  selector: 'app-child',
  templateUrl: './child.component.html',
  styleUrls: ['./child.component.scss']
})
export class ChildComponent implements OnInit {

  constructor(private parent: ParentComponent) {
    console.log(`⚡: ChildComponent -> constructor -> parent`, this.parent);
   }

  ngOnInit(): void {
  }

}
在 Angular CDK 的 Tree 以及 Stepper 其實就有用到這樣在 child component 內注入 parent component 的設計方式,一方面可以確保開發上不會誤用需要有 parent component 的元件,另一方面也可以確保所有 children 都可以取得相同的 parent。
我們一般認為要提供 DI 服務都需要選擇在 module 提供 Providers 屬性、或是在 @Injectable() decorator 內提供 ProvideIn 屬性,才能讓 Angular 的 DI Framework 幫你注入到其他元件內,但今天所分享的這個 Tip 的卻不需要做任何額外的設定,Angular 就幫我們注入了對的物件。
如果你曾經仔細看過 Angular - Navigate the component tree with DI 這份文件的話,會發現這份文件有著輕描淡寫的一句話:
There is no public API for acquiring a parent reference. However, because
every component instance is added to an injector's container, you can use Angular dependency injection to reach a parent component.
翻譯就是「我大 Angular 會幫你把每個 Component 都放進 Injector 內!你只要用就對了!」
不行,這我沒辦法接受。所以就來爬 code 囉!
先來看一下 Angular 建立 AppComponent 的順序:

圖一↑
接著來看一下 createRootComponentView 這個方法:
export function createRootComponentView(
  // ...略

  if (tView.firstCreatePass) {
    diPublicInInjector(getOrCreateNodeInjectorForNode(tNode, rootView), tView, def.type);
    markAsComponentHost(tView, tNode);
    initTNodeFlags(tNode, rootView.length, 1);
  }

  addToViewTree(rootView, componentView);

  // Store component view at node index, with node as the HOST
  return rootView[HEADER_OFFSET] = componentView;
}
其實重點也只有呼叫 diPublicInInjector 的第 199 行而已,透過這個方法,Angular 就會將 component 實體加到 injector,而 child component 就能透過 DI 的方式取得 parent comopnent。
值得注意的是,在這個範例中只有 AppComponent 會透過 createRootComponentView 方法來呼叫 diPublicInInjector,其餘的 ParentComopnent 或是 ChildComponent 都是透過 elementStartFirstCreatePass → resolveDirectives 這樣的流程來呼叫 diPublicInInjector,至於為什麼會有這樣的差異我們可以看一下編譯過後的 main.js:
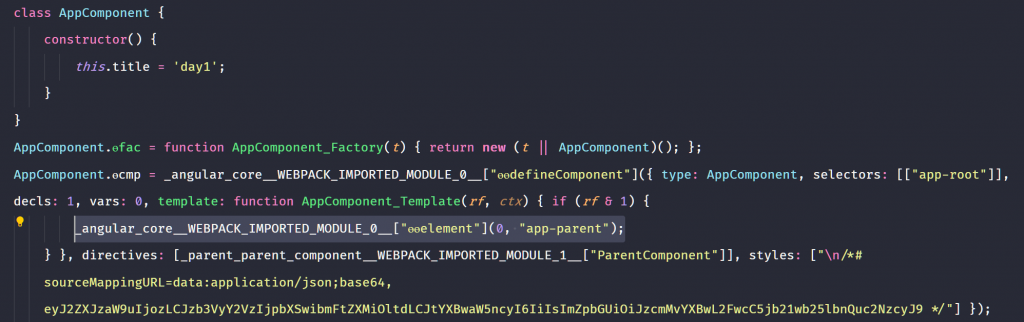
↑圖二
只看反白的重點就好,因為 ParentComponent 是被嵌在 AppComponent 內的,所以 Angular 會改用 ɵɵelement 方法來建立 DOM element 以及其他 Angular 所需要的物件,而不是採用與建立 AppComponent 相同的方式來產生 ParentComopnent。
而 ChildComponent 也是用一樣的方式被 ParentComponent 建立的:

↑圖三
以上就是如何透過 DI 的方式讓 children 與 parent component 互動的方式以及 Angular 如何將 component 加入 Injector 的實作細節,而接下來的幾天,我會繼續延伸下去,分析 children 是怎樣在茫茫人海中找出 parent。
這次是我第一次參加鐵人賽,也抱著不想當拖油瓶的心情加入了「全端開發人員天梯」團隊跟著一起爬天梯,以下按照入團順序列出我們團隊夥伴的系列文章!
