昨天成功找到 Angular 是在什麼時間點將每個 component 放入 Injector 的 container 內,一解長久以來在我心頭的困惑。
今天不分享新的 tip,而是繼續爬一下原始碼,了解 Angular 實際上是如何儲存這些 component 的 token,然後再下一篇才會進入解析 token 取得實體的過程。
首先,在 Angular 的官方文件內有提到:
Together, a component's class and template form a view of your application data.
對於一個單純的 view,是由 component 的 class 與 html 的 template 所組成。
而 Angular 在設計 Ivy 的時候,為了讓 render 的速度快還要更快,引進了 LView (L 代表 Logical)用來儲存所有與操作有關資訊,以及 TView.data(T 代表 Template)用來儲存與 LView 有關的靜態資料,就設計的角度來看,LView 與 TView.data 是兩個擁有相同長度的陣列,且兩者要一起看才能得到完整的描述。
而今天會提到的 DI Token 也會被放在 LView 與 TView.data。
這邊推薦 Miško Hevery 在 AngularConnect 2019 分享 How we make Angular fast 的影片,前面大部分在講相關機制的原理,而 31 分左右開始會提到 Ivy 與 LView。
來看一下底下的 HelloComponent 會拿到什麼 LView 與 TView.data:
// html
<p>hello works!</p>
<app-world></app-world>

// ts
@Component({
  selector: 'app-hello',
  templateUrl: './hello.component.html',
  styleUrls: ['./hello.component.scss']
})
export class HelloComponent implements OnInit {

  constructor() { }

  ngOnInit(): void {
  }

}
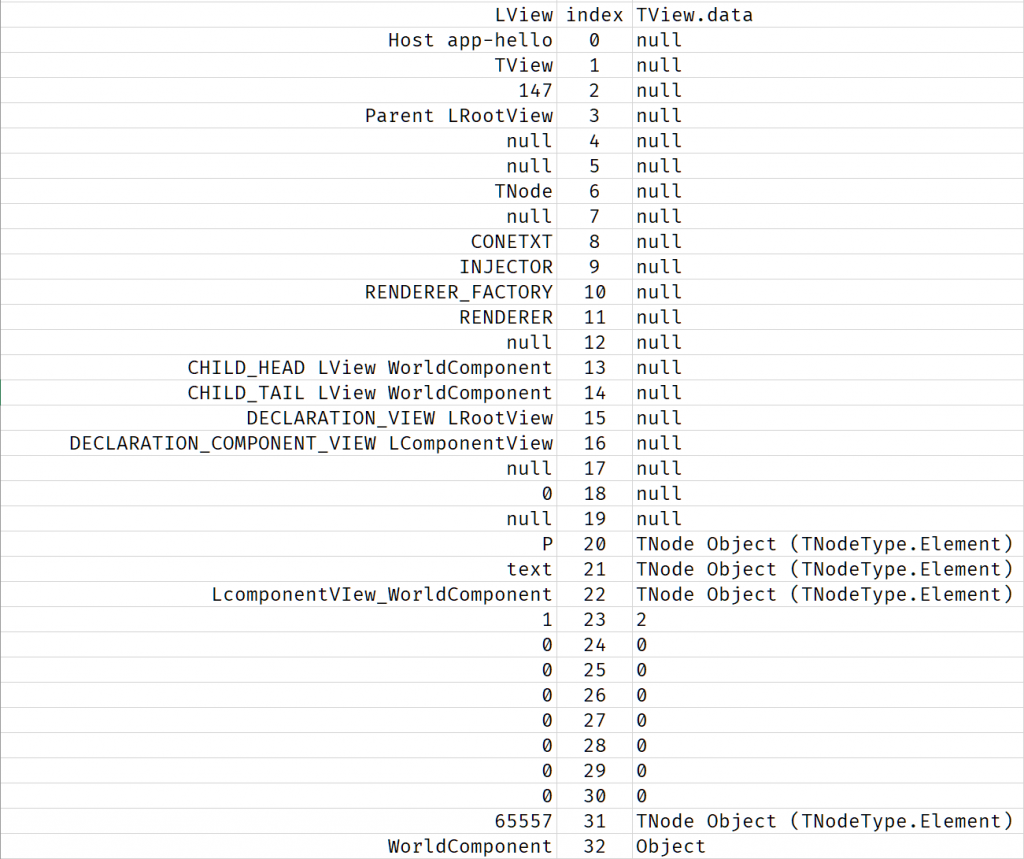
HelloComponent 所產生的 LView 與 TView.data 的對應關係可以簡化成下圖:

↑圖一
LView array 0 ~ 19 欄,是保留給固定資訊的,像是 LView 的 host、TView、Renderer、Injector 等物件,詳細資訊可以參考原始碼,第 20 格開始則會開始放入 component 的動態資料,像是元素、屬性等。而 TView.data 則包含與 LView 對應欄位相關的資訊。
像圖一的 LView 第 20 格是一個 p 元素,對應的 TView.data 第 20 格就是這個 p 元素的 TNode。
了解 LView 之後,再開始爬 Bloom filter 相關操作的原始碼就會稍微更簡單一些。
還記得昨天那篇文章提到的 diPublicInInjector 函式嗎?
實際上這個函式並非用來將物件實體放進 injector,而是將 token 經過計算後產生的值,放進 TView.data 內,讓 DI 的機制可以快速的判斷所要求的物件是否存在在 injector 內。
實際來看一下 diPublicInInjector 的實作內容:
export function diPublicInInjector(
    injectorIndex: number, tView: TView, token: InjectionToken<any>|Type<any>): void {
  bloomAdd(injectorIndex, tView, token);
}
它呼叫了一個名為 bloomAdd 的函式,相信聰明的你一定猜出來它是在做什麼的了讓我們來看一下它的實作內容:
export function bloomAdd(
    injectorIndex: number, tView: TView, type: Type<any>|InjectionToken<any>|string): void {
  ngDevMode && assertEqual(tView.firstCreatePass, true, 'expected firstCreatePass to be true');
  let id: number|undefined =
      typeof type !== 'string' ? (type as any)[NG_ELEMENT_ID] : type.charCodeAt(0) || 0;

  // Set a unique ID on the directive type, so if something tries to inject the directive,
  // we can easily retrieve the ID and hash it into the bloom bit that should be checked.
  if (id == null) {
    id = (type as any)[NG_ELEMENT_ID] = nextNgElementId++;
  }

  // We only have BLOOM_SIZE (256) slots in our bloom filter (8 buckets * 32 bits each),
  // so all unique IDs must be modulo-ed into a number from 0 - 255 to fit into the filter.
  const bloomBit = id & BLOOM_MASK;

  // Create a mask that targets the specific bit associated with the directive.
  // JS bit operations are 32 bits, so this will be a number between 2^0 and 2^31, corresponding
  // to bit positions 0 - 31 in a 32 bit integer.
  const mask = 1 << bloomBit;

  // Use the raw bloomBit number to determine which bloom filter bucket we should check
  // e.g: bf0 = [0 - 31], bf1 = [32 - 63], bf2 = [64 - 95], bf3 = [96 - 127], etc
  const b7 = bloomBit & 0x80;
  const b6 = bloomBit & 0x40;
  const b5 = bloomBit & 0x20;
  const tData = tView.data as number[];

  if (b7) {
    b6 ? (b5 ? (tData[injectorIndex + 7] |= mask) : (tData[injectorIndex + 6] |= mask)) :
         (b5 ? (tData[injectorIndex + 5] |= mask) : (tData[injectorIndex + 4] |= mask));
  } else {
    b6 ? (b5 ? (tData[injectorIndex + 3] |= mask) : (tData[injectorIndex + 2] |= mask)) :
         (b5 ? (tData[injectorIndex + 1] |= mask) : (tData[injectorIndex] |= mask));
  }
}
這段程式碼做了這些事情(目前只考慮 type 是 Component):
__NG_ELEMENT_ID__ 屬性作為 id。這個屬性是 Angular 會自動補上的屬性,會從 0 開始累加。關於 diPublicInInjector 與 bloomAdd 兩個函式都有用到的 injectorIndex 參數,其實是從 render3/di.ts 的 getOrCreateNodeInjectorForNode 與 getInjectorIndex 這兩個函式取得。
原本打算寫完昨天的文章後直接說明 Children component 怎麼解析出 Parent component,但在爬原始碼的過程中發現如果沒有先介紹 LView、TView.data 與 Bloom filter 的話,滿高的機率會直接看不懂,所以還是在中間插了一篇文章。
我想今天就先到這,明天再繼續把最終如何解析出實體的流程講完。
以下按照入團順序列出我們團隊夥伴的系列文章!

原本打算寫完昨天的文章後直接說明 Children component 怎麼解析出 Parent component,但在爬原始碼的過程中發現如果沒有先介紹 LView、TView.data 與 Bloom filter 的話,滿高的機率會直接看不懂,所以還是在中間插了一篇文章。
滿高的機率,不! 已經看不懂了。
沒想到 EP 已經走這麼遠了... 所以我說那車尾燈呢!
沒辣,我覺得我有遺漏很多東西沒寫,或是寫的不太清楚,所以看不懂滿有可能是因為這樣的 xDDD
礙於自己文章沒囤好,加上鐵人賽每日一篇的時間壓力就只好先上了,完賽後會出一個完整版 xD