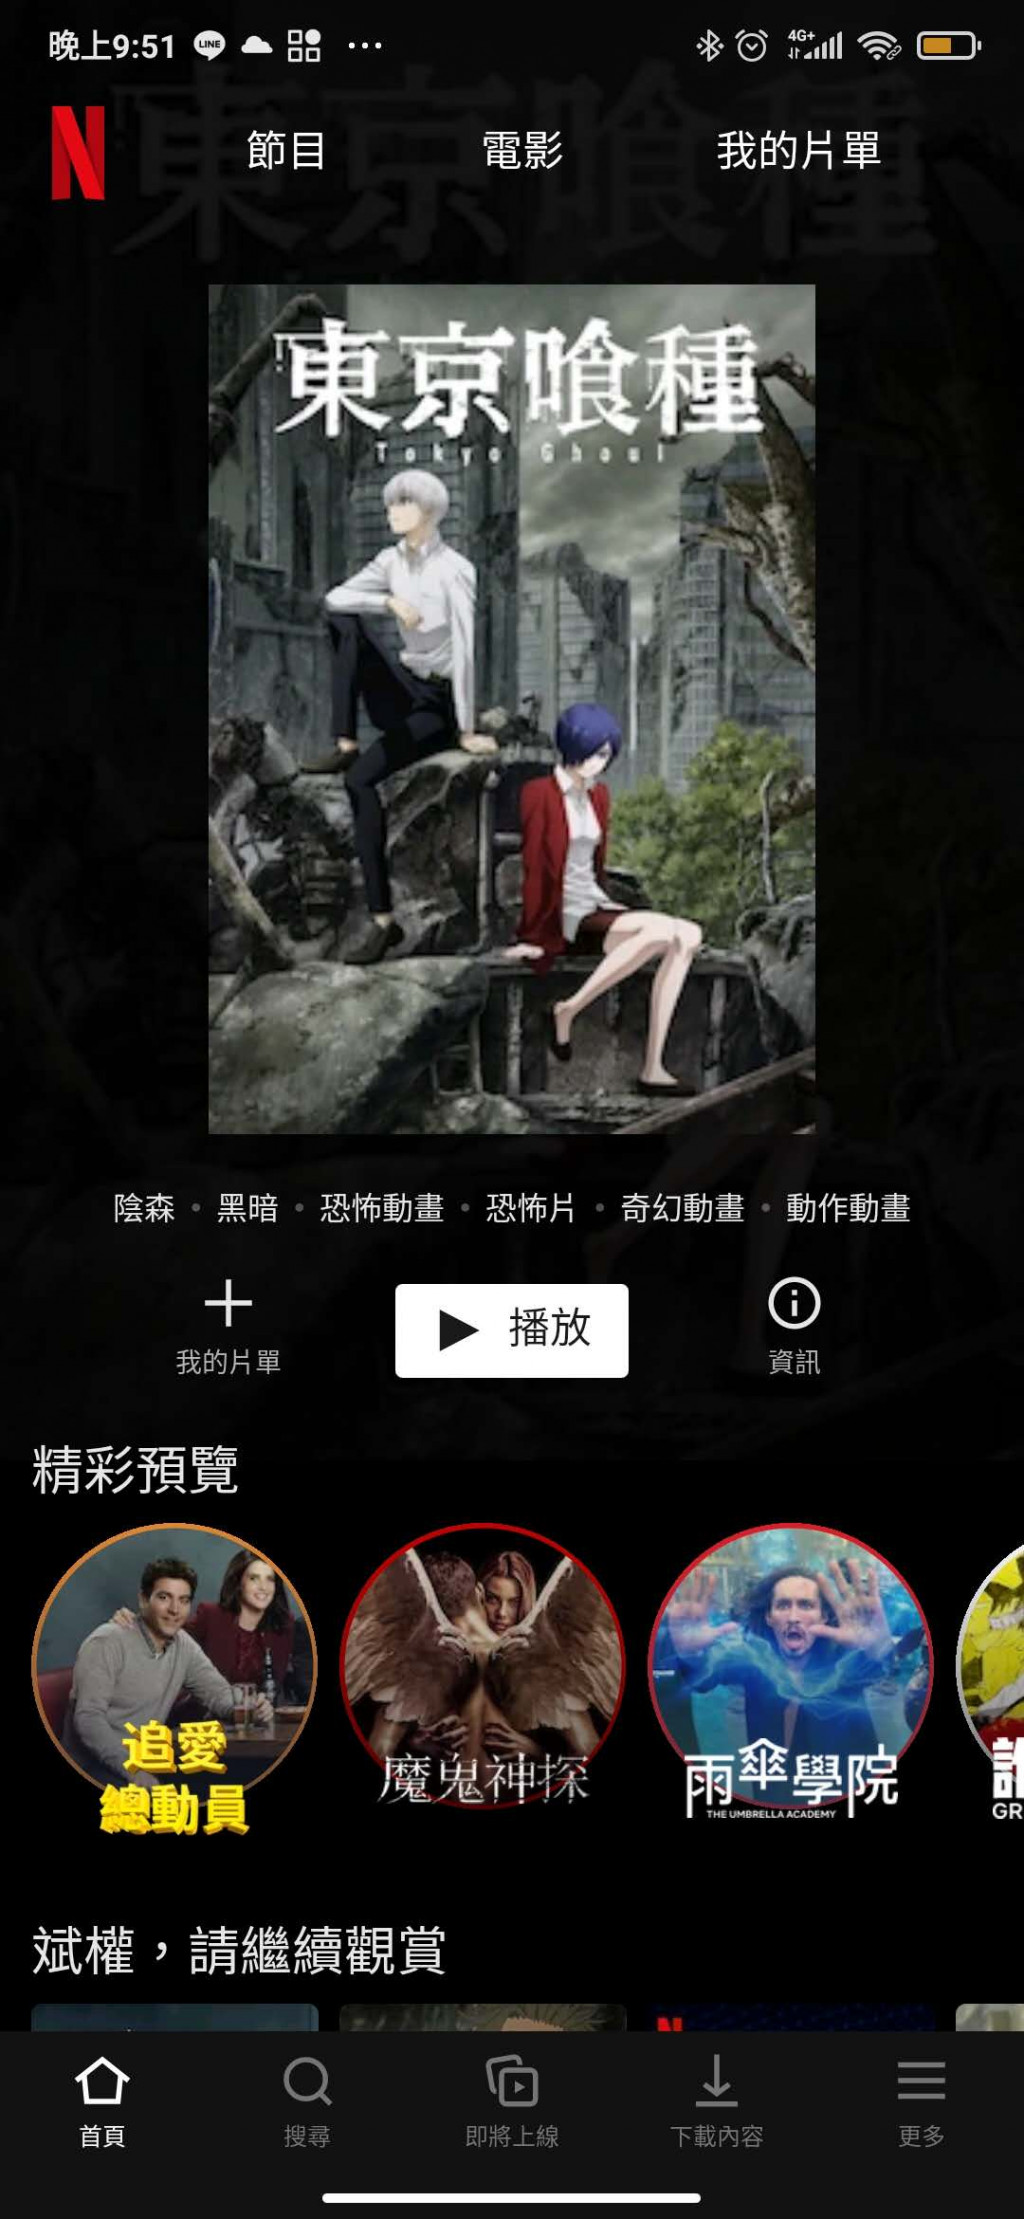
承續前一文,我們已經經過啟動頁要進入主頁面了(登入頁面也許之後有空再做)!先來看看我們要做到什麼樣的效果吧!根據我的使用體驗,我把主頁面分成以下幾個區塊:上下TabBar、主打影集、各系列推薦影片。今天主要做主打影集的部分。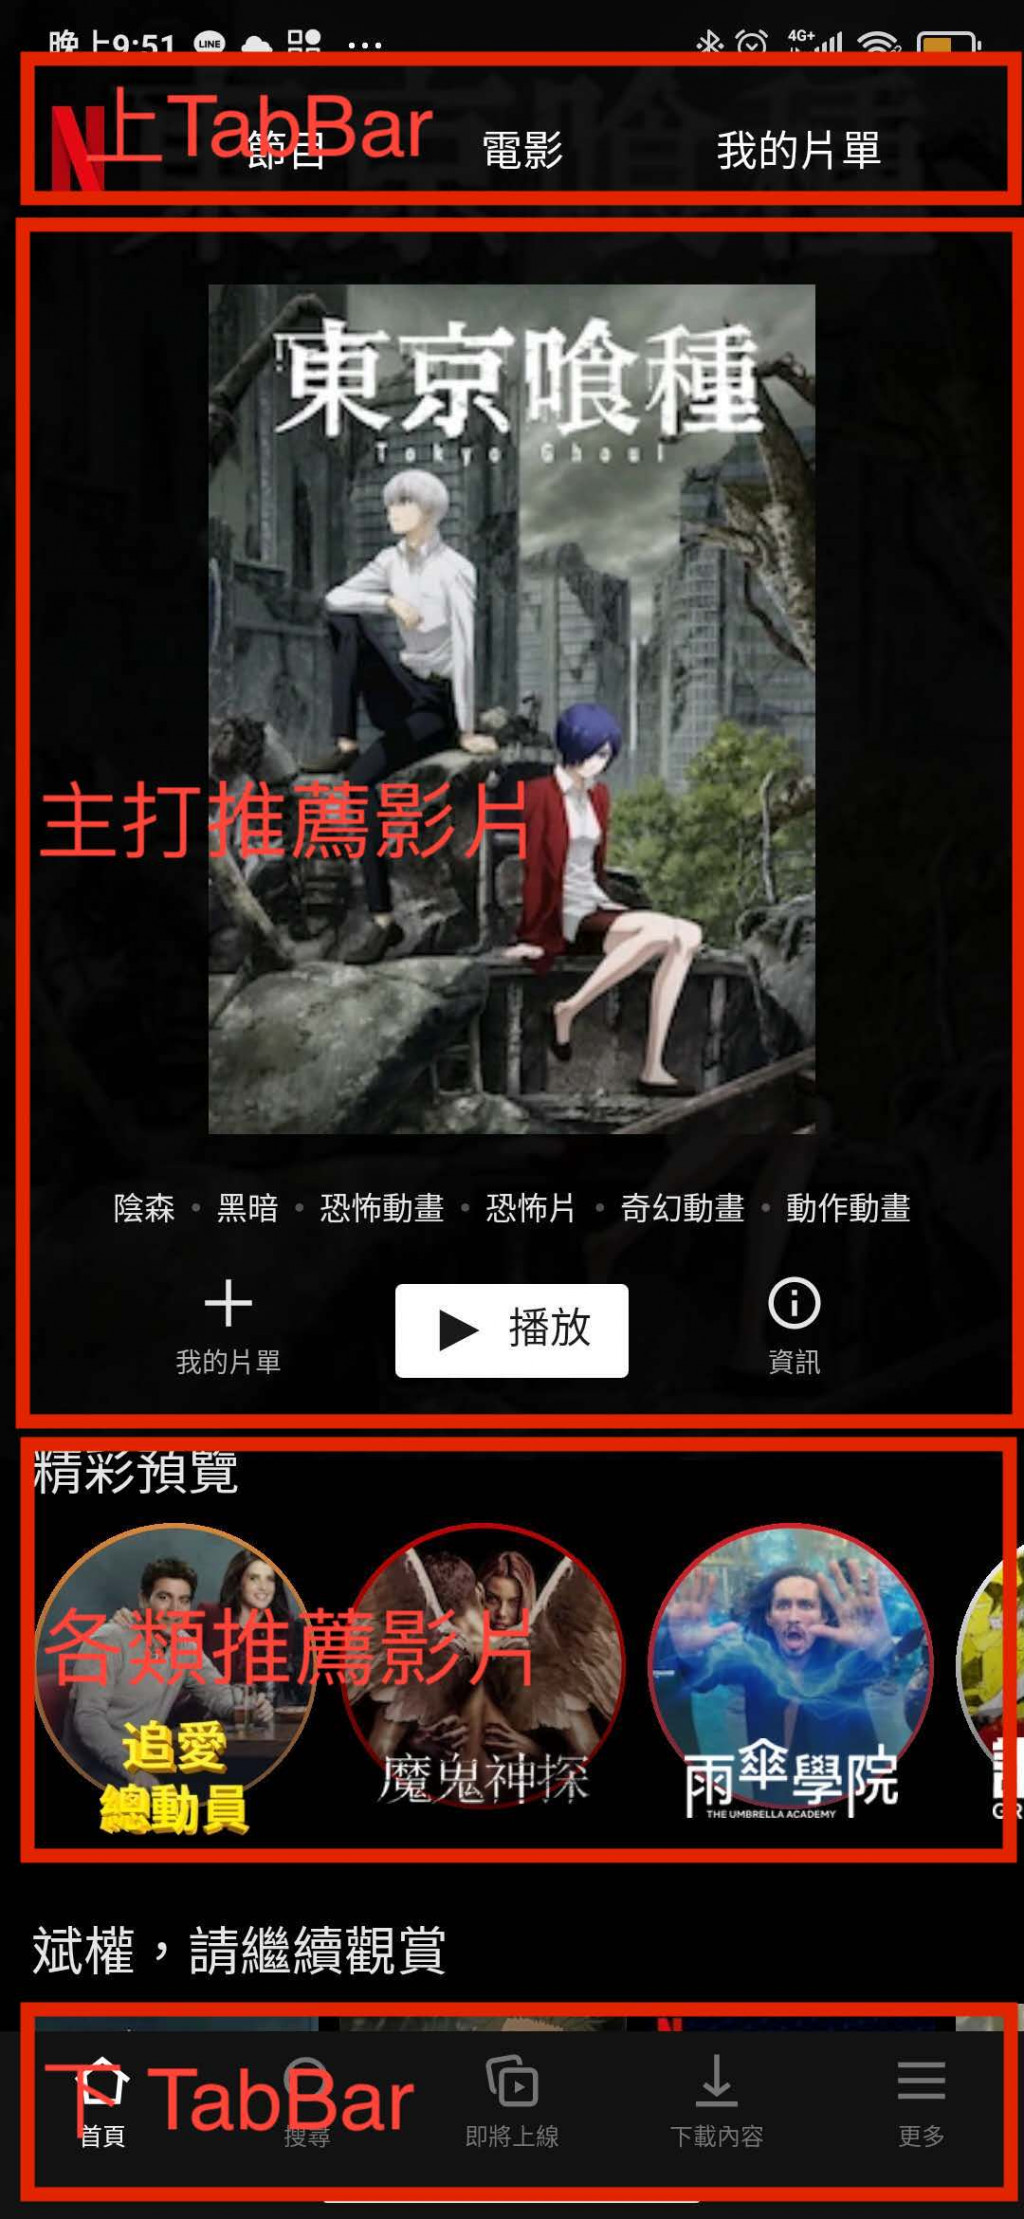
首先,繼上一篇做完啟動動畫後,建一個HomePage,然後我們還需要進行跳轉畫面,簡單地使用Navigator.of(context).push()即可做到,詳細參考官網或30天Flutter手滑系列 - 導航與路由(Navigation & Routing)。
@override
  Widget build(BuildContext context) {
    return Scaffold(
      backgroundColor: Colors.black,
      body: Center(
        child: AnimatedOpacity(
            opacity: startAnimation ? 0.0 : 1.0,
            duration: Duration(milliseconds: 2000),
            child: AnimatedContainer(
                duration: Duration(milliseconds: 2000),
                width: startAnimation ? 150.0 : 250.0,
                child: Image.asset("assets/netflix_logo.png"),
               onEnd: (){
               //該動畫結束的時候跳轉到HomePage
                  Navigator.of(context).push(MaterialPageRoute(builder: (BuildContext context)=>HomePage()));
               },)),
      ),
    );
  }
先來介紹Column以及Row這兩個Layout佈局,其實它們主要負責直線排列。大概有點像LinearLayout的感覺。children們會直線排列並且可以指定他們對齊的方式,特別注意這個兩個排版適合用在Children比較少的情境。
最常用有三個要控制參數的是mainAxisSize、mainAxisAlignment以及crossAxisAlignment
很早以前看的這部影片很幫助了解這些Layout佈局以及他們的參數Flutter Layouts Walkthrough: Row, Column, Stack, Expanded, Padding或官網
class _HomePageState extends State<HomePage> {
  @override
  Widget build(BuildContext context) {
    return Scaffold(
      body: Column(
      mainAxisSize: MainAxisSize.max,
      children: [
        Container(
          height: MediaQuery.of(context).size.height * .7, //屏幕高度的0.7
          child: Stack(
              children:[
              //背景圖案
              //一個Column包含該劇類別標籤,加入片單鍵,播放鍵,資訊鍵
              ]),
        )
      ]),
    );
  }
}
推薦區塊佔屏幕約70%,這邊可以用MediaQuery讀取裝置的數據,我常用的是取得width和height。並且背景圖案上面疊著文字以及播放按鍵等等,所以我們還需要用到Stack,這是一種可以堆疊的排版方式,Stack的排版方式可以在child外套一層Align或Positioned定義位置。
紅色代表Column,綠色代表Row,黃色區我是Wrap的方式做的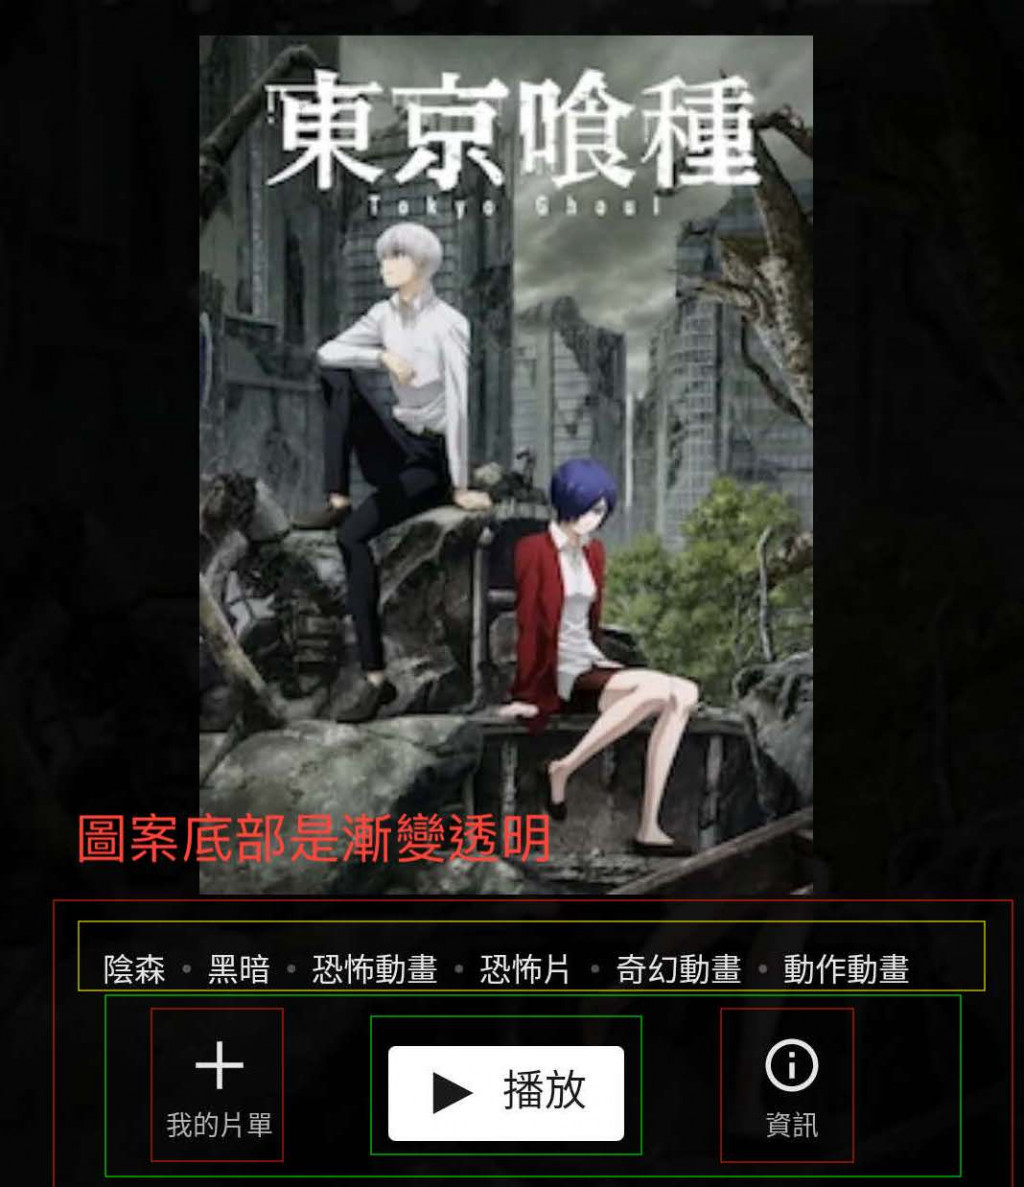
我們先來處理圖片漸漸變透明的問題,原本想使用Container裡面decoration,但Container的DecorationImage會在gradient的上面,所以沒辦法直接使用。
解決方案是給圖片弄一個遮罩ShaderMask參考ShaderMask (Flutter Widget of the Week)
要注意給的colors數量跟stops數量要一樣。
 ShaderMask(
                shaderCallback: (Rect bounds) {
                  return LinearGradient(colors: [
                    Colors.white,
                    Colors.white,
                    Colors.transparent
                  ], stops: [
                    0.0,
                    0.7,
                    1.0
                  ], begin: Alignment.topCenter, end: Alignment.bottomCenter)
                      .createShader(bounds);
                },
                child: Image.asset(
                  "assets/video_photo2.jpg",
                  fit: BoxFit.fitHeight,
                ),
              ),
接下來就是套一層又一層的Column以及Row把我們要的Icon或Text包起來,可以適時用SizedBox讓兩個Widget隔開,類似Padding的效果。以下就是這段的程式
class _HomePageState extends State<HomePage> {
  @override
  Widget build(BuildContext context) {
    return Scaffold(
      body: Column(mainAxisSize: MainAxisSize.max, children: [
        Container(
          height: MediaQuery.of(context).size.height * .7,
          child: Stack(
            fit: StackFit.expand,
            children: [
              ShaderMask(
                shaderCallback: (Rect bounds) {
                  return LinearGradient(colors: [
                    Colors.white,
                    Colors.white,
                    Colors.transparent
                  ], stops: [
                    0.0,
                    0.7,
                    1.0
                  ], begin: Alignment.topCenter, end: Alignment.bottomCenter)
                      .createShader(bounds);
                },
                child: Image.asset(
                  "assets/videophoto2.jpg",
                  fit: BoxFit.fitHeight,
                ),
              ),
              Align(
                alignment: Alignment.bottomCenter,
                child: Column(
                  mainAxisSize: MainAxisSize.min,
                  crossAxisAlignment: CrossAxisAlignment.center,
                  children: [
                    Wrap(
                      alignment: WrapAlignment.center,
                      children: [
                        Text("黑暗  "),
                        Text("刺激  "),
                        Text("奇幻動畫  "),
                        Text("動作動畫  "),
                        Text("神話與傳說  "),
                        Text("報復  "),
                      ],
                    ),
                    SizedBox(
                      height: 24.0,
                    ),
                    Row(
                      mainAxisAlignment: MainAxisAlignment.spaceEvenly,
                      children: [
                        Column(
                          mainAxisSize: MainAxisSize.min,
                          children: [
                            Icon(Icons.add),
                            Text('我的片單'),
                            SizedBox(
                              width: 80,
                            )
                          ],
                        ),
                        Container(
                          width: 90.0,
                          padding: EdgeInsets.all(4.0),
                          color: Colors.white,
                          child: Row(
                            mainAxisAlignment: MainAxisAlignment.spaceEvenly,
                            children: [
                              Icon(
                                Icons.play_arrow,
                                size: 30,
                                color: Colors.black,
                              ),
                              Text(
                                "播放",
                                style: TextStyle(
                                    color: Colors.black, fontSize: 18),
                              )
                            ],
                          ),
                        ),
                        Column(
                          mainAxisSize: MainAxisSize.min,
                          children: [
                            Icon(Icons.info_outline),
                            Text("資訊"),
                            SizedBox(
                              width: 80.0,
                            )
                          ],
                        ),
                      ],
                    )
                  ],
                ),
              )
            ],
          ),
        )
      ]),
    );
  }
}
效果如下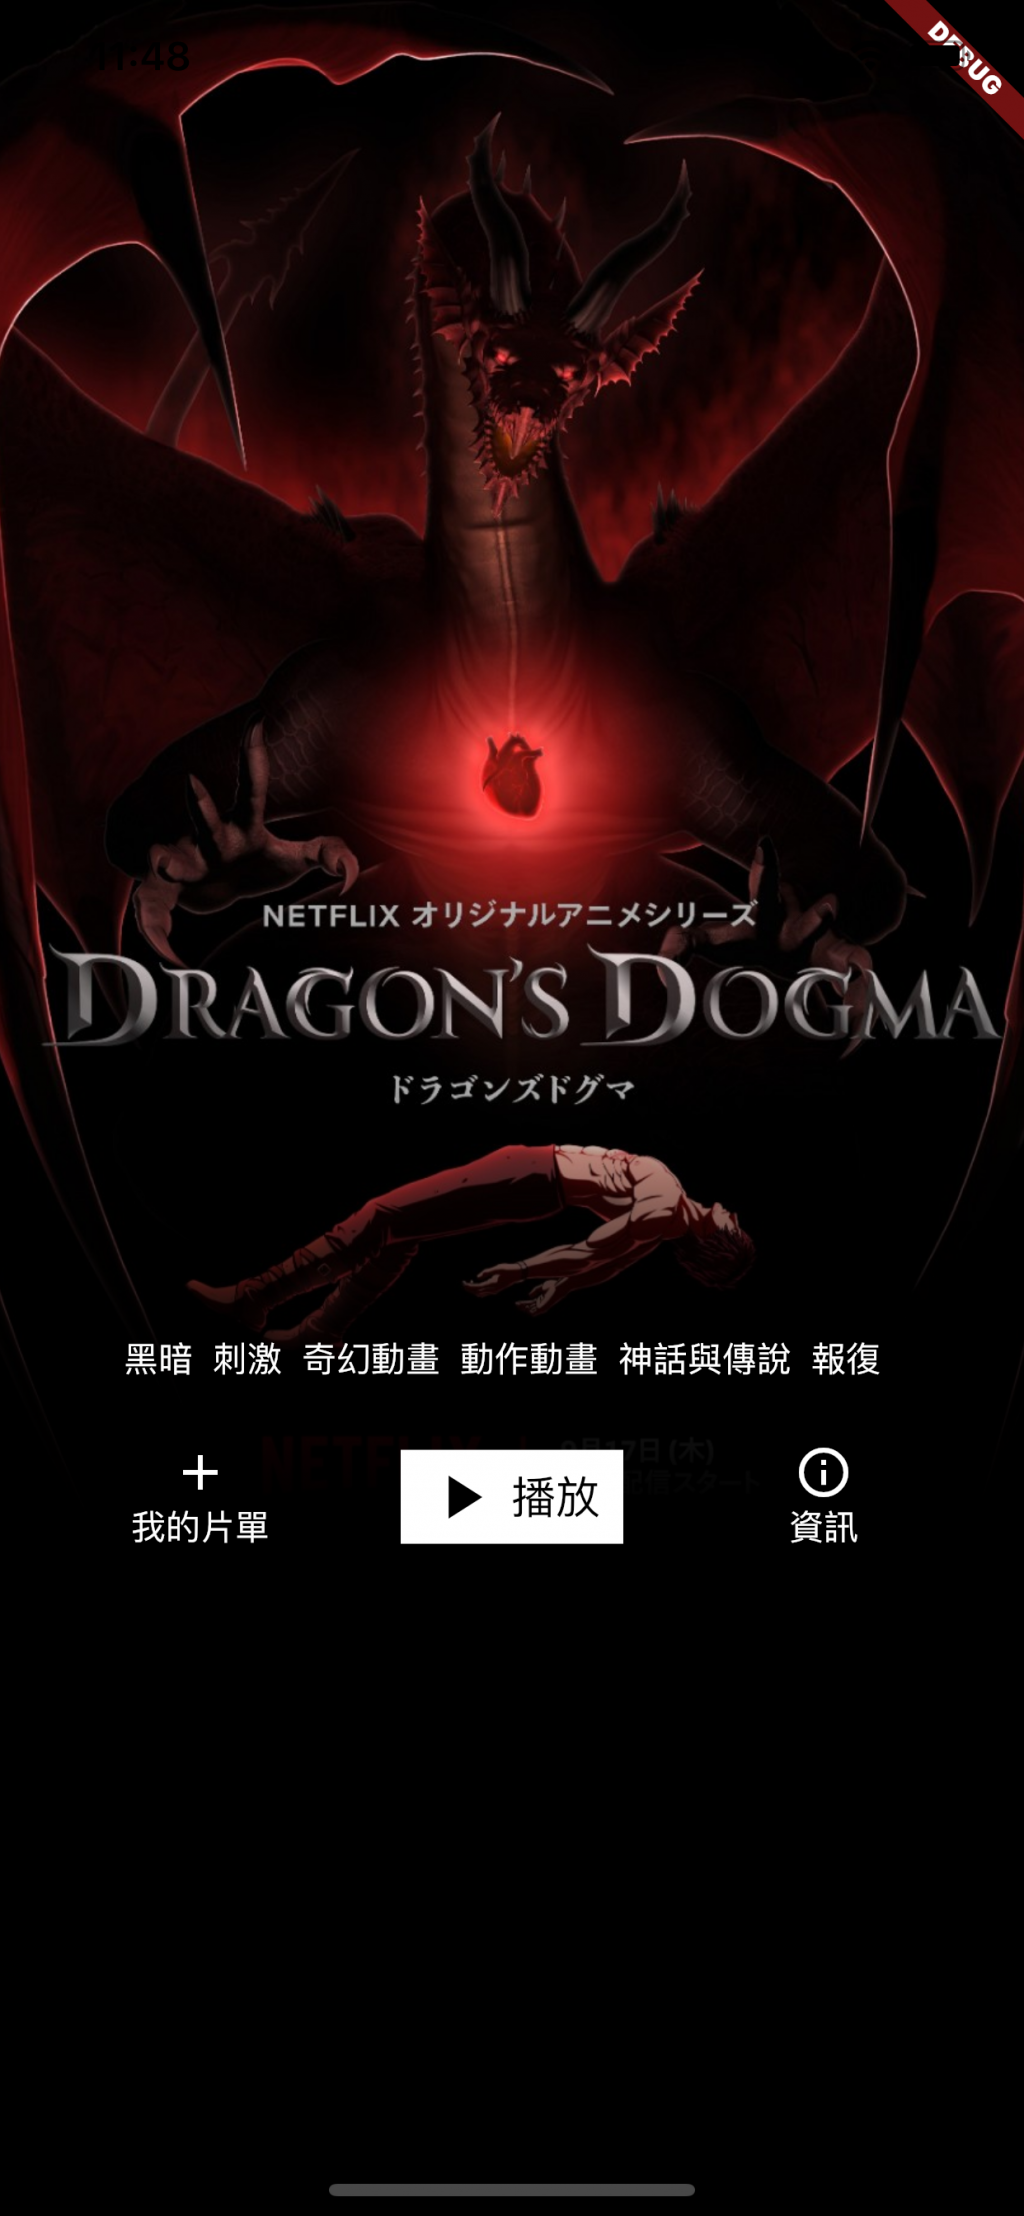
耶~!完成一個區塊了,雖然這還是靜態的,下一篇,我們來使用ListView做繼續做其他各類別推薦的UI,明天見
GitHub連結: flutter-netflix-clone


 iThome鐵人賽