在前面我們知道上傳資料的方法了,接下來我們要來處理編輯文章的介面。
重新整理一下目前幾個 .vue 檔。
App.vue:
<template>
  <div id="app">
    <b-container fluid class="hero" v-if="$router.history.current.fullPath.search('backend') === -1">
      <b-row>
        <b-col cols="12">
          <div class="hero--chooseHero">
            <div class="hero--chooseHero__content">
              <h1 @click="showLoginClick">IT幫幫忙 - 鐵人賽 30 天</h1>
              <p @click="showUser">自討苦吃</p>
            </div>
          </div>
        </b-col>
      </b-row>
    </b-container>

    <b-navbar type="dark" variant="dark" v-if="$router.history.current.fullPath.search('backend') === -1">

      <!-- 這邊使用 BV 支援 <router-link to=...>的元件 -->
      <b-navbar-nav>
        <b-nav-item to="/">Home</b-nav-item>
        <b-nav-item to="/about">About Me</b-nav-item>
        <b-nav-item to="/login" v-if="loginShow">登入</b-nav-item>
      </b-navbar-nav>
      <!-- 這邊使用 BV navbar 的搜尋框元件,後面用以搜尋文章 -->
      <b-navbar-nav class="ml-auto">
        <b-nav-form>
          <b-form-input size="sm" class="mr-sm-2" placeholder="Search"></b-form-input>
          <b-button size="sm" class="my-2 my-sm-0" type="submit">Search</b-button>
        </b-nav-form>
      </b-navbar-nav>
    </b-navbar>

    <!-- 負責顯示所有內容 -->
    <router-view/>

  </div>
</template>

<script>
export default {
  name: 'App',
  data () {
    return {
      loginShow: false,
      loginClick: 0
    }
  },
  created () {
    this.stateWatcher()
  },
  methods: {
    showLoginClick () {
      this.loginClick++
      if (this.loginClick > 2) {
        this.loginShow = true
        setTimeout(() => {
          this.loginClick = 0
          this.loginShow = false
        }, 3000)
      }
    }
  }
}

</script>

<style lang="scss" scope>
* {
  font-family: 微軟正黑體;
  box-sizing: border-box;
}

#app {
  h1,h2,h3,h4,h5,h6,p {
    margin: 0px;
  }

  font-family: Avenir, Helvetica, Arial, sans-serif;
  -webkit-font-smoothing: antialiased;
  -moz-osx-font-smoothing: grayscale;
  color: #2c3e50;
}

.container-fluid.hero {
  background-color: #024e82;
  .hero--chooseHero {
    position: relative;
    padding: 1rem;
    height: 300px;
    color: #ddd;

    & > .hero--chooseHero__content {
      position: absolute;
      left: 50%;
      top: 50%;
      transform: translate(-50%, -50%);
      padding: 3rem;
      border: solid 2px #ddd;
      border-radius: 5px;
      text-align: center;

      & > h1,p {
        user-select: none;
      }
    }
  }
}

nav {
  &.navbar { padding: 1rem; }
  .nav-item {
    a {
      font-weight: bold;
      color: #ccc;
      user-select: none;
    }
    a.router-link-exact-active {
      color: #42b983 !important;
    }
  }
}

</style>
backend 的組件中, 先拉一個 sidebar 出來和一個觸發 sidebar 的 button 之後有時間再來想想怎麼版面優化。我們把之後會用到的功能通通先塞到 sidebar裡面,下面多加入一個 router-view 讓他負責來顯示文章編輯器組件、或者之後新增的功能。
Backend.vue 內
<template>
  <b-container class="pageBackend">
    <b-sidebar id="sidebar-1" title="Sidebar" shadow backdrop>
      <div class="px-3 py-2">
        <div><router-link to="/backend/article_editor">新增文章</router-link></div>
        <div @click="signOut"><router-link to="/" >登出</router-link></div>
      </div>
    </b-sidebar>

    <b-row>
      <b-col cols="12 ">
        <h1>30天鐵人賽,後台</h1>
        <b-button v-b-toggle.sidebar-1>Toggle Sidebar</b-button>
      </b-col>
    </b-row>
    <b-row>
      <router-view></router-view>
    </b-row>
  </b-container>
</template>

<script>
// import '../plugins/markdown.js'
import { firebase } from '../Model/FirebaseModel.js'
export default {
  name: 'Backend',
  data () {
    return {}
  },
  methods: {
    signOut () {
      firebase.auth().signOut().then(function () {
        // Sign-out successful.
      // eslint-disable-next-line handle-callback-err
        console.log('登出成功')
      })
    }
  }
}
</script>

<style language="scss">
.pageBackend {
  padding: 1rem;
}
</style>
加完一個 router-view 後,來 router 內的 index.js 設定一下路由,這次這個路由是嵌套的,路徑為
/backend/article_editor,所以必須在 backend 下加入 children,可參考文件。後面等部落格功能比較齊全了如果有時間的話我們再來補充 router 的用法。
router/index.js內

...

const routes = [
  {
    path: '/',
    name: 'Home',
    component: Home
  },
  {
    path: '/about',
    name: 'About',
    // route level code-splitting
    // this generates a separate chunk (about.[hash].js) for this route
    // which is lazy-loaded when the route is visited.
    component: () => import(/* webpackChunkName: "about" */ '../views/About.vue')
  },
  {
    path: '/login',
    name: 'Login',
    component: () => import('../views/Login.vue')
  },
  {
    path: '/backend',
    name: 'Backend',
    component: () => import('../views/Backend.vue'),
    children: [
      {
        path: 'article_editor',
        name: 'ArticleEditor',
        component: () => import('../components/ArticleEditor.vue')
      }
    ]
  }
]
接者來準備 /components/ArticleEditor.vue 組件檔,這邊使用到這個套件,是大陸人開發的,覺得介面做得很好就拿來用了:
https://github.com/zhaoxuhui1122/vue-markdown
是一個使用在 Vue 上的 Markdown 編譯器組件,請自行在專案目錄 npm 他一下。
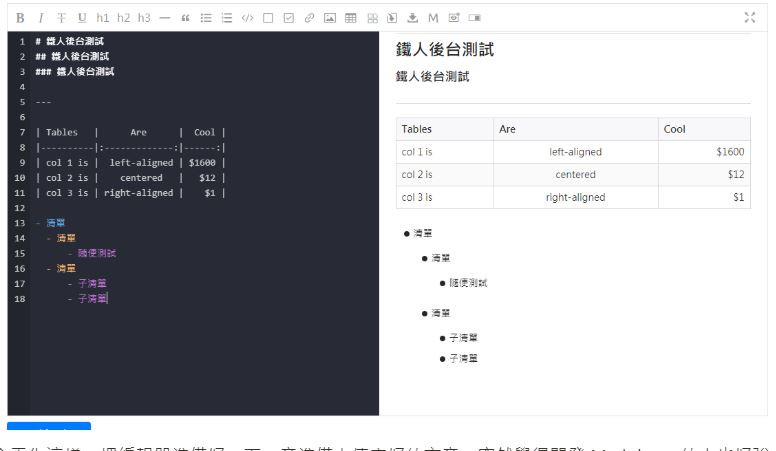
接著是 ArticleEditor.vue 組件檔內容, 把 Markdown 組件 import 進來使用:
<template>
  <b-container class="pageArticleEditor">
    <b-row>
      <b-col cols="12">
        <label for="input-large">文章標題:</label>
        <b-form-input id="input-large" size="lg" placeholder="請輸入文章標題" v-model="title"></b-form-input>
      </b-col>
      <b-col cols="12">
        <MarkdownPro
          @on-save="updateData"
        ></MarkdownPro>
      </b-col>
      <b-col class="mt-2"><b-button v-b-modal.modal-1 variant="primary">點擊新增文章</b-button></b-col>
    </b-row>
  </b-container>
</template>

<script>
import { MarkdownPro } from 'vue-meditor'
import { db } from '../Model/FirebaseModel.js'
console.log(db)
export default {
  name: 'ArticleEditor',
  data () {
    return {
      title: '',
      articleData: {}
    }
  },
  components: {
    MarkdownPro
  },
  methods: {

  }
}
</script>

<style lang="scss" scope>
.pageArticleEditor {
  padding: 1rem;

  & > .row {
    & > div {
      margin: 1rem;;
    }
  }
}

.markdown-body {
  border: #aaa 2px solid;
  border-radius: 5px;
  height: 100%;
  padding: 1rem;
}
</style>
長這樣,打完內容按 Ctrl + S 會進行存檔並觸發事件,裡面會返回文章內容和 html,請先自行接 methods 試試看,這部分明日繼續。
今天先這樣,把編輯器準備好,下一章準備上傳寫好的文章,突然覺得開發 Markdown 的人也好強阿,真是學海無涯...。
沒事也可以逛逛我們其他團隊成員的文章啦 ~~
eien_zheng: 前端小嘍嘍的Golang學習旅程_The journey of learning Golang 系列
PollyPO技術: 前端設計轉前端工程師-JS踩坑雜記 30 天 系列
阿電: 忍住不打牌位,只要30天VueJS帶你上A牌 系列
喬依司: 實作經典 JavaScript 30 系列


 iThome鐵人賽