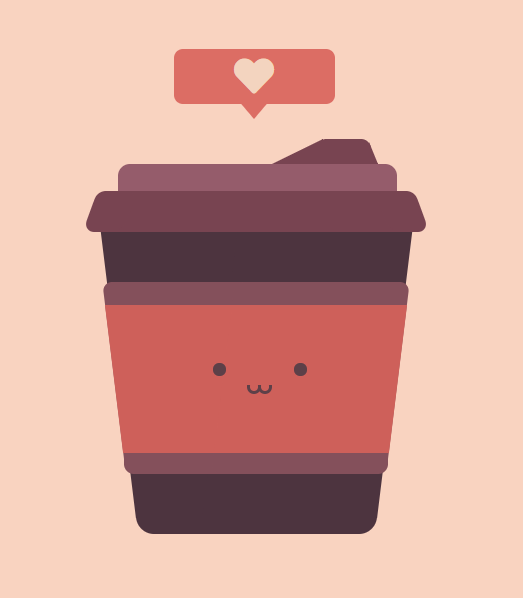
先刻基本狀態,明天再加動畫和陰影。
練習範例:Pure CSS Cute Cup
目前練習進度:
先畫出基本架構
<div class="wrap">
        <div class="coffee">
            <!-- 愛心 -->
            <div class="like"><i class="fas fa-heart"></i></div>
            <!-- 杯蓋 -->
            <div class="cup-lid-top">
                <div class="cup-lid-top-shadow"></div>
            </div>
            <div class="cup-lid-middle"></div>
            <div class="cup-lid-bottom">
                <div class="cup-lid-bottom-shadow"></div>
            </div>
            <!-- 杯身 -->
            <div class="cup-body"></div>
            <div class="cup-body-shadow"></div>
            <div class="cup-body-shadow-bottom"></div>
            <!-- 隔熱 -->
            <div class="cup-label"></div>
            <div class="cup-label-red">
                <div class="cup-label-red-shadow"></div>
            </div>
            <!-- 表情 -->
            <div class="face ">
                <div class="face-eyes"></div>
                <div class="face-mouth"></div>
                <div class="face-blush"></div>
            </div>
            <!-- 地板 -->
            <div class="floor"></div>
        </div>
    </div>
做出基本設定
html,
body {
    height: 100%;
    background-color: #f9d3c0;
}

.wrap {
    height: 100%;
    margin: 0 auto;
    display: flex;
    justify-content: center;
    align-items: center;
    .coffee{
        border: 1px solid green;
        width: 600px;
        height: 600px;
        position: relative;
    }
}
開始刻杯子
.cup{
    &-body{
        width: 241px;
        height: 324px;
        background-color: $cup-bgc;
        position: absolute;
        left: 30%;
        top: 20%;
    }
}
加上偽元素,先用白色看得比較清楚
&::before{
            content: '';
            width: 175px;
            height: 308px;
            background-color: #fff;
            position: absolute;
            left: -19px;
            top: 0;
            //  background: inherit;//繼承
            transform: skew(7deg,0deg);
        }
把 after 也加上
				&::before,
        &::after {
            content: '';
            width: 175px;
            height: 308px;
            background-color: $cup-bgc;
            position: absolute;
            //  background: inherit;//繼承
        }
        &::before {
            left: -19px;
            top: 0;
            transform: skew(7deg);//傾斜(左右,上下),只有一個就是左右
        }
        &::after{
            right: -19px;
            top: 0;
            transform: skew(-7deg);
        }
做出中段的隔熱紙環
.cup {
    &-label {
        width: 264px;
        height: 192px;
        border-radius: 10px;
        background-color: $label-bgc;
        position: absolute;
        // left: 28%;
        // top: 30%;
        left: 193px;
        top: 251px;
    }
}
使用偽元素
.cup {
    &-label {
        width: 264px;
        height: 192px;
        border-radius: 10px;
        background-color: $label-bgc;
        position: absolute;
        // left: 28%;
        // top: 30%;
        left: 193px;
        top: 251px;
        &::before,&::after{
            content: '';
            width: 175px;
            height: 191px;
            border-radius: 10px;
            background-color: #fff;
            position: absolute;
        }
        &::before{
            left: -19px;
            top: 0;
            transform: skew(7deg);
        }
    }
}
調整
				&::before,&::after{
            content: '';
            width: 175px;
            height: 191px;
            border-radius: 10px;
            background-color: $label-bgc;
            position: absolute;
        }
        &::before{
            left: -10px;
            top: 0;
            transform: skew(7deg);
        }
        &::after{
            right: -10px;
            top: 0;
            transform: skew(-7deg);
        }
畫出隔熱墊中段
		&-label-red {
        width: 264px;
        height: 145px;
        background-color: $label-red-bgc;
        position: absolute;
        left: 193px;
        top: 274px;
    }
加上偽元素
				&::before,&::after{
            content: '';
            width: 175px;
            height: 148px;
            background-color: $label-red-bgc;
            position: absolute;
        }
        &::before{
            left: -10px;
            top: 0;
            transform: skew(7deg);
        }
        &::after{
            right: -10px;
            top: 0;
            transform: skew(-7deg);
        }
先做最下層
&-lid-bottom{
        width: 324px;
        height: 41px;
        background-color: $lid-bgc;
        border-radius: 12px;
        position: absolute;
        top: 160px;
        left: 163px;
    }
加上偽元素
&::before,
        &::after {
            content: '';
            width: 40px;
            height: 41px;
            border-radius: 12px;
            background-color: $lid-bgc;
            position: absolute;
        }
        &::before {
            left: -4px;
            bottom: 0;
            transform: skew(-20deg);
        }
        &::after {
            right: -4px;
            bottom: 0;
            transform: skew(20deg);
        }
製作杯蓋中間部分
		&-lid-middle {
        width: 279px;
        height: 27px;
        border-radius: 12px 12px 0 0; //上左 上右 下右 下左
        background-color: $lid-middle-bgc;
        position: absolute;
        top: 133px;
        left: 187px;
    }
製作杯蓋上方部分
&-lid-top {
        width: 52px;
        height: 25px;
        background-color: $lid-bgc;
        border-radius: 7px 10px 0 0;
        position: absolute;
        top: 108px;
        left: 388px;
    }
加入偽元素,可以先用不同顏色觀察變化
&::before{
            content: '';
            border-bottom: 22px solid #ffffff;
            border-right: 9px solid #000000;
            position: absolute;
            right: -7px;
            top: 3px;
        }
調整顏色
			&::before{
            content: '';
            border-bottom: 22px solid $lid-bgc;
            border-right: 9px solid transparent;//transparent = 透明
            position: absolute;
            right: -7px;
            top: 3px;
        }
加上另一個偽元素
			&::after{
            content: '';
            border-bottom: 25px solid #ffffff;
            border-left: 51px solid #000;
            position: absolute;
            left: -47px;
            top: 0;
        }
調整顏色
		&::after{
            content: '';
            border-bottom: 25px solid $lid-bgc;
            border-left: 51px solid  transparent;
            position: absolute;
            left: -47px;
            top: 0;
        }
製作上方的愛心
.like{
    width: 161px;
    height: 55px;
    border-radius: 9px;
    background-color: $like-bgc;
    color: $like-color;
    font-size: 40px;
    display: flex;
    justify-content: center;
    align-items: center;
    position: absolute;
    left: 243px;
    top: 18px;
}
加上偽元素
		&::before {
        content: '';
        height: 50px;
        position: absolute;
        left: 63px;
        top: 50px;
        border-top: 20px solid #000;
        border-right: 17px solid #ffffff;
        border-left: 17px solid red;
    }
調整顏色
&::before {
        content: '';
        height: 50px;
        position: absolute;
        left: 63px;
        top: 50px;
        border-top: 20px solid $like-bgc;
        border-right: 17px solid transparent;
        border-left: 17px solid transparent;
    }
加上表情,先畫出定位
.face{
    width: 172px;
    height: 96px;
    position: absolute;
    left: 241px;
    top: 300px;
    border: 1px solid green;
}
加上眼睛
&-eyes{
        width: 13px;
        height: 13px;
        border-radius: 100%;
        background-color: $eyes-bgc;
        position: absolute;
        left: 41px;
        top: 32px;
    }
另一顆眼睛
&::before {
            content: '';
            width: 13px;
            height: 13px;
            border-radius: 100%;
            background-color: $face-bgc;
            position: absolute;
            left: 81px;
            top: 0;
        }
加上嘴巴
&-mouth{
        width: 8px;
        height: 9px;
        border-radius: 100%;
        border: 3px solid  $face-bgc;
        position: absolute;
        left: 75px;
        top: 48px;
    }
&::before {
            content: '';
            width: 8px;
            height: 9px;
            border-radius: 100%;
            border: 3px solid $face-bgc;
            position: absolute;
            position: absolute;
            left: 8px;
            top: -3px;
        }
&::after{
            content: '';
            width: 27px;
            height: 9px;
            background-color: $label-red-bgc;
            position: absolute;
            left: -4px;
            top: -6px;
        }
(未完待續......)
