承接昨天要跟大家交代的rails g channel 到底長出這些檔案有什麼功能。
首先是:
app/javascript/channels/consumer.js// Action Cable provides the framework to deal with WebSockets in Rails.
// You can generate new channels where WebSocket features live using the `rails generate channel` command.
import { createConsumer } from "@rails/actioncable"
export default createConsumer()
檔案中的註解告訴我們
rails g channel 指令可以建立新的頻道。這邊從外部引入一個類似像套件的東西到專案中,之後就可以用來實作即時通訊的功能。
得到剛剛引入的魔法包,再來輸出 createConsumer 方法到整個專案,讓專案中的所有 JS 都可以使用這個方法!
( ps.WebSocket 連接的客戶端稱之為 consumer ,也就是你我。 )
app/javascript/channels/index.js這邊是 channels 的命名方式 oooxxx_channel.js
// Load all the channels within this directory and all subdirectories.
// Channel files must be named *_channel.js.

const channels = require.context('.', true, /_channel\.js$/)
channels.keys().forEach(channels)
app/channels/room_channel.rbclass RoomChannel < ApplicationCable::Channel
def subscribed
# 登入或上線瞬間就開始訂閱
stream_from room_channel
end
def unsubscribed
# Any cleanup needed when channel is unsubscribed
# 登出或離線就結束訂閱
end
end
所有開設的 channel 都繼承自 ApplicationCable::Channel,該頻道就擁有訂閱和取消訂閱的功能。你想在哪個區塊有即時更新的功能就開設一個頻道給那個區塊。
特別注意的是第4行取消註解後,stream_from 後面的頻道名稱和檔名有個慣例,會命名為一樣的名稱。如果取為特別的名稱要記得把js的檔名改成一樣的。
app/javascript/channels/room_channel.jsimport consumer from "./consumer"
consumer.subscriptions.create("RoomChannel", {
connected() {
// Called when the subscription is ready for use on the server
console.log("Congratulations ! Connected the channel !")
},
disconnected() {
// Called when the subscription has been terminated by the server
console.log('See you !')
},
received(data) {
// Called when there's incoming data on the websocket for this channel
console.log(data)
}
});
第 1 行先從剛剛把魔法包帶來的 consumer.js 中引入consumer,這樣在這個檔案中就可以使用這個方法。
consumer 連線或登入後,就立即訂閱聊天室,若訂閱成功,則建立雙向溝通的狀態。
第 3 行後方接的頻道名稱以大駝峰表示,剛剛我們建立的是名為 room 的頻道,所以這邊就寫 RoomChannel。
接下來成功連結的話,就在 console 中印出提示字!(如果有印出來的話,非常恭喜你,成功的把通道打開,達到雙向溝通的狀態。)
如果離開、登出這個頁面,或者重新整理(意即離開畫面再重新請求),就會跟你說再見的提示訊息。
# routes.rb
Rails.application.routes.draw do
  get 'page/show'
end
# page_controller.rb
def show
  ActionCable.server.broadcast("room_channel", {message: "hello"})
end
客戶端一旦進到這個頁面,就觸發了廣播方法,通道為 room_channel,並且發送了message: 'hello'
*這邊為了方便解說,所以把訊息寫成固定的,正常是使用者發送訊息後,抓下訊息內容,然後一起帶到通道中,發送給所有訂閱這個頻道(意即聊天室)的人
# page/show.html.erb
<h1>page show</h1>
<p>請開 console 看</p>

如果把使用者的訊息一起抓下來帶入通道中,在前端畫面上要渲染出來,就得透過 js 來幫忙
就是找 room_channel.js 做事情
// 略...

received(data) {
  console.log(data)
  // 設計一個想要的版型,innerHtml 的方式(或其他方法)插入在想要出現的地方
}
rails 傳過來的 data(使用者發送的訊息),經過包裝之後,(判斷這個訂閱者是不是當前使用者,如果是current_user,顏色變成藍色的背景,如果不是就直接白底黑字顯示)
統整一下,這是我理解的流程,如果有錯請再指教,改謝!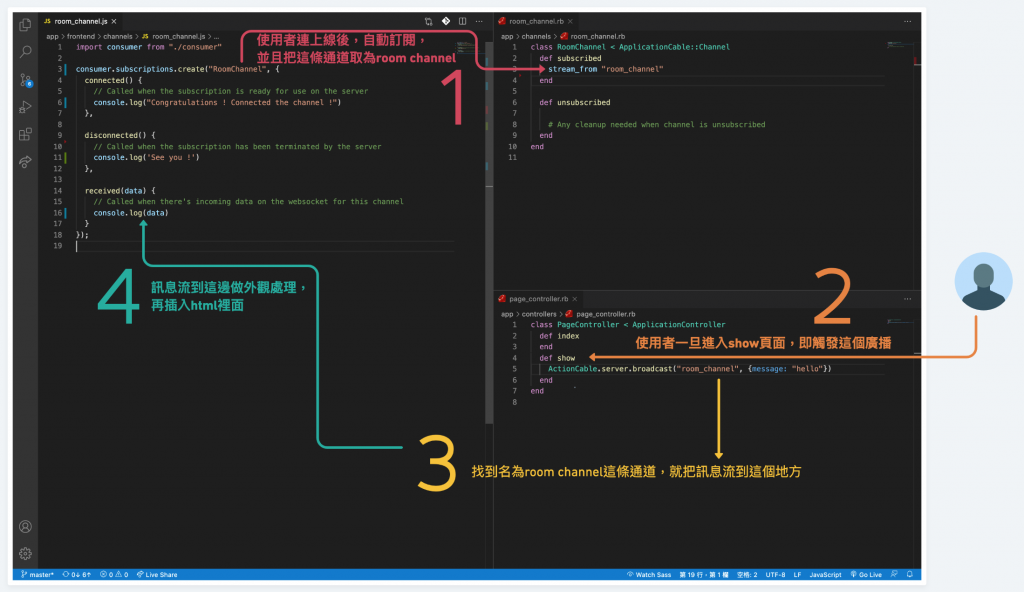
參考資料:我強大的同學們和助教大大!
學無止盡,每天都要進步一點點!