
component 作用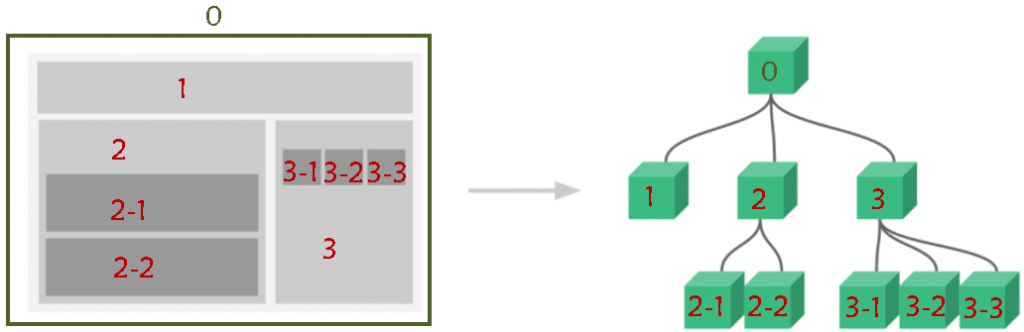
Vue 的模組 component 是可以重複使用的 Vue 實例,所以也擁有 data、computed、watch、methods 以及生命周期鉤子等,目的是可以將網頁分割成不同區塊以便管理。
這邊介紹的是全域註冊的模組,區域俟深入 component 時再行介紹。
Vue.component('註冊名稱',{模組內容})
component 內的 data 必須是函式如果 component 內的 data 使用物件,就會出錯。
component 內的 data 使用物件,會出現錯誤提示 data 須使用 function。
並且會找不到錯誤的 data 裡的值。
component 內的 data 須使用函式取得一個獨立的位址(重新賦值),不受其他物件的影響。
template 只能有一個根元素如果在 component 的 template 裡有多個元素的話,就必須利用一個根元素將所有元素包裹起來,否則就會出錯。

錯誤寫法(沒有根元素或 data使用物件):
//template
<button type="button" @click="counter++">增加</button>
<p>counter:{{counter}}</p>

//data
data:{...}
應改成
//template
<div>
  <button type="button" @click="counter++">增加</button>
  <p>counter:{{counter}}</p>
</div>

//data
data(){return{}}
component 範例// 單個元素
Vue.component("button-counter", {
template: `
<button type="button" @click="counter++">counter:{{counter}}</button>`,
data(){
return {
counter: 0
}
}
})
// 多個元素
Vue.component("button-counter2", {
template: `
<div>
<button type="button" @click="counter++">增加</button>
<p>counter:{{counter}}</p>
</div>`,
data() {
return {
counter: 0
};
}
});
每個被使用的模組都是一個新的 Vue 實例,也都擁有自己的 data、computed、watch、methods 以及生命周期鉤子等,不會互相干擾彼此的資料。
<div id="vm">
  <button-counter></button-counter>
  <button-counter></button-counter>
  <button-counter></button-counter>
</div>
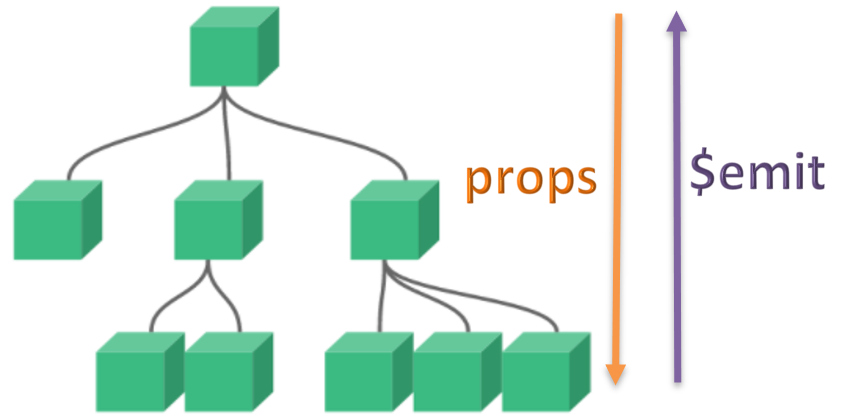
只要記得上到下(外到內)用 props ,下到上(內到外)用 $emit 就可以了。
props 向內層模組傳送資料資料不是 component 本身自己擁有的,而是透過外層給予的時,就必須使用 props 來取得資料。
props 就是自定義的 HTML Attribute ,代表著必須要先定義(註冊)才能使用。
props:定義props
將自定義的 HTML Attribute 註冊在 component 內的 props 中,例如下方的 plan 就是我定義的一個 HTML Attribute ,記得利用陣列註冊 HTML Attribute 的話,要使用字串註冊。
//定義
Vue.component("my-plan", {
  props:['plan']
});
設定 props 的值
在 component 內的 props 中註冊好自定義的 HTML 屬性後,就可以在 HTML 中使用該 component 的地方加入這個屬性並給予值,如下,加入 plan 屬性並給予值 go to market 。
<my-plan plan="go to market"></my-plan>
使用 props 的值
使用 props 的值跟使用 data 的方法相同,只不過 props 的值是從外面傳入的(就是在 HTML 中設定的值),如上在 HTML 中,給予 plan 的值就是 go to market ,所以可以把 props 當成另一類的 data 來使用。
Vue.component("my-plan", {
  props:['plan'],
  template: `
    <div>
      <p>{{counter}}</p>
      <p>{{plan}}</p>
    </div>`,
  data(){
    return {
      counter: 0
    }
  }
});
透過 v-bind 來傳遞 props 的值
如果 props 的值是從外層的 data 中產生的就必須使用 v-bind ,就如同之前所說把 props 當成一般的 HTML Attribute 看待,因此當該 Attribute 需要使用到 Vue 實例裡的資料時就必須使用 v-bind ,讓 Vue 知道這邊使用的資料不是單純的字串,而是 Vue 實例裡的 data 。
<my-plan v-for="plan of plans" :plan="plan" :key="plan"></my-plan>

<script>
Vue.component("my-plan", {
  props:['plan'],
  template: `
    <div>
      <p>{{plan}}</p>
    </div>`,
});

const vm = new Vue({
  el: "#vm",
  data:{
    plans:['go swimming','see a movie','study']
  }
});
</script>
$emit 向外層模組傳送資料在模組內觸發了某個事件,再透過 $emit 傳送自定義的事件名稱到外層,最後透過這個自定義的事件去觸發外層的函式。
<p :style={fontSize:`${emitFontSize}em`}>使用 `$emit`</p>
<my-emit @large-text="emitFontSize+=0.1"></my-emit>

<script>
Vue.component("my-emit", {
  template: `
    <div>
      <button type="button" @click.prevent="$emit('large-text')">加大文字</button>
    </div>`
});
const vm = new Vue({
  el: "#vm",
  data:{
    emitFontSize:0.8
  }
});
</script>
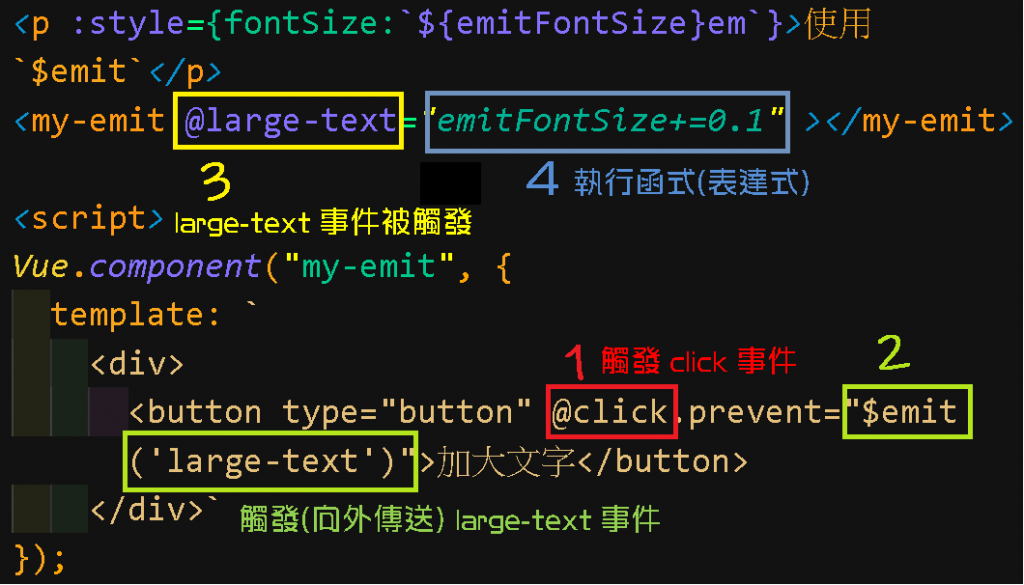
$emit 資料傳遞分為幾個階段:
component 內利用 v-on 監聽鍵盤、滑鼠或其他事件。$emit('自定義事件名稱') 事件到外層。v-on 監聽並觸發自定義事件名稱事件。$emit 參數傳遞$event 取得參數值<my-emit @large-text="emitFontSize+=$event"></my-emit>
<script>
Vue.component("my-emit", {
template: `
<div>
<button type="button" @click.prevent="$emit('large-text', 0.2)">加大文字</button>
</div>`
});
const vm = new Vue({
el: "#vm",
data:{
emitFontSize:0.8
}
});
</script>
外層使用 $event 即可取得 $emit 的第2個參數值。
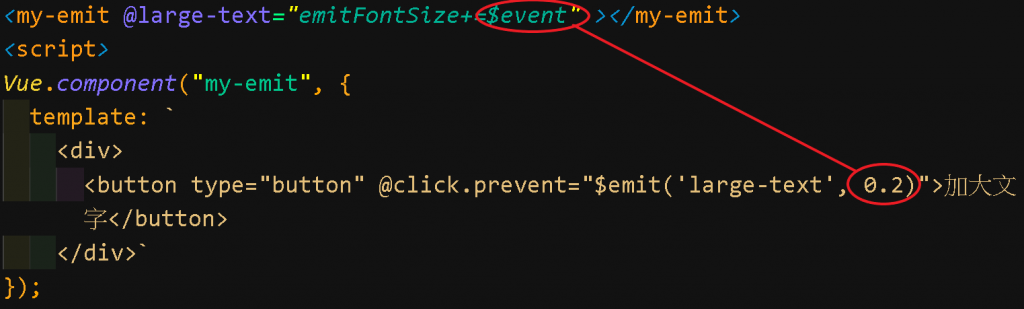
自定義事件被觸發後,$emit('自定義事件', 參數2) 的第2個參數即會被當成引數帶入被執行的函式的參數。
<my-emit @large-text="enlargeText"></my-emit>
<script>
Vue.component("my-emit", {
  template: `
    <div>
      <button type="button" @click.prevent="$emit('large-text', 0.2)">加大文字</button>
    </div>`
});
const vm = new Vue({
  el: "#vm",
  data:{
    emitFontSize:0.8
  },
  methods:{
    enlargeText(amount){
      console.log(amount)
      this.emitFontSize += amount
    }
  }
});
</script>
如上,當自定義事件 large-text 被觸發後,就會執行函式 enlargeText ,而 $emit('large-text', 0.2) 中的 0.2 就會被代入到函式 enlargeText 的參數 amount 中。
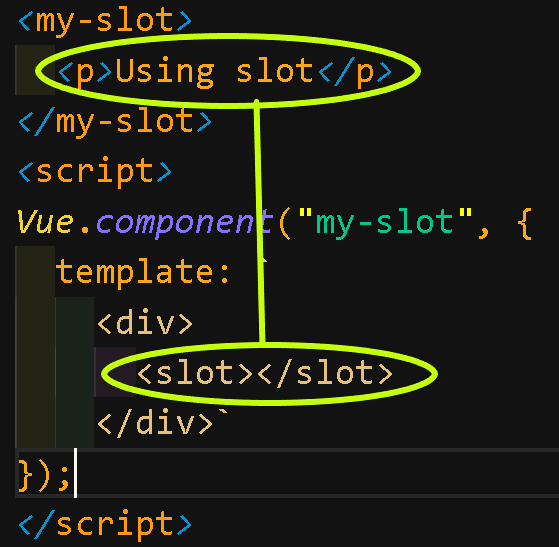
slot 傳送內容在 component 中透過 <slot></slot> 把 HTML 中該 component 所包裹的值代入。
<my-slot>
  <p>Using slot</p>
</my-slot>
<script>
Vue.component("my-slot", {
  template: `
    <div>
      <slot></slot>
    </div>`
});
</script>
Demo:[DAY10]跟 Vue.js 認識的30天 - Vue 的模組
參考文件:
Vue.js Components Fundamentals



 iThome鐵人賽
 看影片追技術