工欲善其事,必先利其器。
此節會先準備現代開發中不可或缺的一些工具,
卡比將會使用 Vite, 作為打包工具喔。
首先 建立新的專案
yarn create @vitejs/app [專案名稱] --template vanilla-ts
例如.
yarn create @vitejs/app space-invaders --template vanilla-ts
進入那個專案,並開啟 Dev Server
yarn 會下載這個專案有用到的所有第三方套件
cd space-invaders
yarn
接著 yarn dev 會開啟 dev server
yarn dev
打開瀏覽器 localhost:3000,此時畫面應為
打開你的 Editor,開始出發拉!
首先要先在頁面上生成 <canvas /> 以方便卡比繪圖,
卡比將採用 pixi.js 作為繪圖引擎,
yarn add pixi.js
note. 請注意卡比此時的版本為 "pixi.js": "^6.0.4"
接著在 src/main.ts 導入,
import { Application } from "pixi.js";
接著卡比將底下預設的程式碼換成
const app = new Application();

document.querySelector("#app")?.append(app.view);
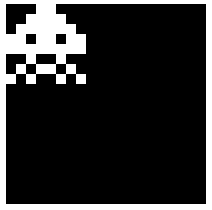
此時畫面應該如下,

程式碼如下,
-- src/main.ts
import { Application } from "pixi.js";

const app = new Application();

document.querySelector("#app")?.append(app.view);
那個年代並沒有繪圖軟體,圖片都是由工程師透過程式繪成,
所以卡比首先要思考如何用程式繪製點陣圖形。
卡比試著畫出,這個遊戲的代表外星人 Crab。
可以簡單看出 Crab 由高度 8 pixels 跟寬度 11 pixels 的點陣圖構成,且只有一個顏色。
像這樣的圖形可以透過 2維陣列 來記錄整張圖片點陣資料,
簡單的方式來記錄每個格子裡面有沒有顏色即可,
例如 1 - 有顏色, 0 - 沒有顏色。
故可以用以下表示這張圖片,
const image = [
  [0, 0, 1, 0, 0, 0, 0, 0, 1, 0, 0],
  [0, 0, 0, 1, 0, 0, 0, 1, 0, 0, 0],
  [0, 0, 1, 1, 1, 1, 1, 1, 1, 0, 0],
  [0, 1, 1, 0, 1, 1, 1, 0, 1, 1, 0],
  [1, 1, 1, 1, 1, 1, 1, 1, 1, 1, 1],
  [1, 0, 1, 1, 1, 1, 1, 1, 1, 0, 1],
  [1, 0, 1, 0, 0, 0, 0, 0, 1, 0, 1],
  [0, 0, 0, 1, 1, 0, 1, 1, 0, 0, 0],
];
然後試著用上面的資料繪製點陣圖。
接者卡比要用 pixi.js 中的 Graphics API 進行點陣圖繪製,
- import { Application } from "pixi.js";
+ import { Application, Graphics } from "pixi.js";
生成物件
const graphics = new Graphics();
遍歷 image 陣列,透過資料來繪製圖形,
if (image[y][x] === 0) continue; 0 的話就不畫顏色,直接跳過。
beginFill(0xffffff) 是指先選好要上的顏色,0xffffff 就是白色的 16 進位色碼。
drawRect(x, y, w, h) 是指在某個位置畫一個特定寬高的矩形。
endFill() 畫完形狀並塗上顏色。
for (let y = 0; y < image.length; y++) {
  for (let x = 0; x < image[y].length; x++) {
    if (image[y][x] === 0) continue;

    graphics.beginFill(0xffffff);

    graphics.drawRect(x, y, 1, 1);

    graphics.endFill();
  }
}
最後將這個圖形放到畫面上即可
app.stage.addChild(graphics);
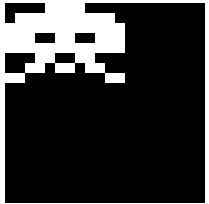
此時畫面應該如下

似乎有點小,將畫面的比例調整一下,
寬度 11 px, 高度 8 px, 放大 10 倍 來看看
- const app = new Application();
+ const app = new Application({
+   width: 11,
+   height: 8,
+   resolution: 10,
+ });
就這樣卡比畫出 Crab 了。

程式碼如下,
-- src/main.ts
import { Application, Graphics } from "pixi.js";

const app = new Application({
  width: 11,
  height: 8,
  resolution: 10,
});

document.querySelector("#app")?.append(app.view);

const image = [
  [0, 0, 1, 0, 0, 0, 0, 0, 1, 0, 0],
  [0, 0, 0, 1, 0, 0, 0, 1, 0, 0, 0],
  [0, 0, 1, 1, 1, 1, 1, 1, 1, 0, 0],
  [0, 1, 1, 0, 1, 1, 1, 0, 1, 1, 0],
  [1, 1, 1, 1, 1, 1, 1, 1, 1, 1, 1],
  [1, 0, 1, 1, 1, 1, 1, 1, 1, 0, 1],
  [1, 0, 1, 0, 0, 0, 0, 0, 1, 0, 1],
  [0, 0, 0, 1, 1, 0, 1, 1, 0, 0, 0],
];

const graphics = new Graphics();

for (let y = 0; y < image.length; y++) {
  for (let x = 0; x < image[y].length; x++) {
    if (image[y][x] === 0) continue;

    graphics.beginFill(0xffffff);

    graphics.drawRect(x, y, 1, 1);

    graphics.endFill();
  }
}

app.stage.addChild(graphics);
接下來卡比要將這段Crab的程式碼整理到一個地方放,
方便以後卡比要再畫出Crab時可以直接使用,而不需要重新走過上面的思考流程。
首先,卡比在 src 底下建立 characters 的資料夾,並建立一隻新的檔案叫 Crab.ts。
並把畫出 Crab 的相關程式碼搬到那個地方。
-- src/characters/Crab.ts
import { Graphics } from "pixi.js";

const image = [
  [0, 0, 1, 0, 0, 0, 0, 0, 1, 0, 0],
  [0, 0, 0, 1, 0, 0, 0, 1, 0, 0, 0],
  [0, 0, 1, 1, 1, 1, 1, 1, 1, 0, 0],
  [0, 1, 1, 0, 1, 1, 1, 0, 1, 1, 0],
  [1, 1, 1, 1, 1, 1, 1, 1, 1, 1, 1],
  [1, 0, 1, 1, 1, 1, 1, 1, 1, 0, 1],
  [1, 0, 1, 0, 0, 0, 0, 0, 1, 0, 1],
  [0, 0, 0, 1, 1, 0, 1, 1, 0, 0, 0],
];

export default function Crab() {
  const graphics = new Graphics();

  for (let y = 0; y < image.length; y++) {
    for (let x = 0; x < image[y].length; x++) {
      if (image[y][x] === 0) continue;

      graphics.beginFill(0xffffff);

      graphics.drawRect(x, y, 1, 1);

      graphics.endFill();
    }
  }

  return graphics;
}
之後來測試一下 Crab 函式。
-- src/main.ts
import "./style.css";
import { Application } from "pixi.js";
import Crab from "./characters/Crab";

const app = new Application({
  width: 11,
  height: 8,
  resolution: 10,
});

document.querySelector("#app")?.append(app.view);

app.stage.addChild(Crab());
這樣卡比成功重構了Crab。
因為接下來的角色作法跟上面的 Crab 差不多,
卡比直接提供其他角色的資料以供大家做練習。
以下練習可以自行調整 Application 的畫布大小喔。
const laserCannon = [
  [0, 0, 0, 0, 0, 1, 0, 0, 0, 0, 0],
  [0, 0, 0, 0, 1, 1, 1, 0, 0, 0, 0],
  [0, 0, 0, 0, 1, 1, 1, 0, 0, 0, 0],
  [0, 1, 1, 1, 1, 1, 1, 1, 1, 1, 0],
  [1, 1, 1, 1, 1, 1, 1, 1, 1, 1, 1],
  [1, 1, 1, 1, 1, 1, 1, 1, 1, 1, 1],
  [1, 1, 1, 1, 1, 1, 1, 1, 1, 1, 1],
  [1, 1, 1, 1, 1, 1, 1, 1, 1, 1, 1],
];

const octopus = [
  [0, 0, 0, 0, 1, 1, 1, 1, 0, 0, 0, 0],
  [0, 1, 1, 1, 1, 1, 1, 1, 1, 1, 1, 0],
  [1, 1, 1, 1, 1, 1, 1, 1, 1, 1, 1, 1],
  [1, 1, 1, 0, 0, 1, 1, 0, 0, 1, 1, 1],
  [1, 1, 1, 1, 1, 1, 1, 1, 1, 1, 1, 1],
  [0, 0, 0, 1, 1, 0, 0, 1, 1, 0, 0, 0],
  [0, 0, 1, 1, 0, 1, 1, 0, 1, 1, 0, 0],
  [1, 1, 0, 0, 0, 0, 0, 0, 0, 0, 1, 1],
];
const squid = [
  [0, 0, 0, 1, 1, 0, 0, 0],
  [0, 0, 1, 1, 1, 1, 0, 0],
  [0, 1, 1, 1, 1, 1, 1, 0],
  [1, 1, 0, 1, 1, 0, 1, 1],
  [1, 1, 1, 1, 1, 1, 1, 1],
  [0, 0, 1, 0, 0, 1, 0, 0],
  [0, 1, 0, 1, 1, 0, 1, 0],
  [1, 0, 1, 0, 0, 1, 0, 1],
];
Crab,LaserCannon,Octopus,Squid,要怎麼做呢?
這個小考題有點難><(沒用過pixi.js),不過同時放上指的應該是彼此不重疊吧?那只要改變在畫布上的相對位置(猜測是提示的position)就可以把四個不同的怪獸排開了。
另外想請教,我有觀察到檔名都是取作.ts,不過沒有特別解釋的樣子,是否表示若想使用pixi.js,就必須建立.ts檔並且使用typescript呢?
還是說,單純只是環境的建置需要將pixi這個繪圖引擎從ts編譯成js呢?
(對typescript的認識很淺,請鞭小力一點XD)