在上一章中介紹了 attribute directive 的用法,接著要來介紹另一種 Angular 中內建的 directive 那就是 sturctural directive。
它的用途主要是用來改變 DOM 的結構,他會塑造或重構 DOM 的結構,通常是添加、刪除和操作他所附加的 element,本章中將會介紹介紹最常見的三種 structural directive :

可以利用 NgIf directive 為宿主 element 添加或刪除 element,簡單來說當 NgIf 為 false 時從 DOM 中移除一個 element 與他的所有子層並且將它所使用到的所有 component 從內存中釋放,反之會新增一個的 element,來舉一個簡單的例子,當我們點擊畫面中的按鈕時會將 child component 顯示出來。
在 app.component.ts 中新增一個 boolean 的 property 用於決定是否顯示 child.component,與一個 method 用來改變這個 property 的狀態
import { Component } from '@angular/core';

@Component({
  selector: 'app-root',
  templateUrl: './app.component.html',
})
export class AppComponent {
  isActive = false;

  onClick() {
    this.isActive = !this.isActive;
  }
}
在 app.component.html 中引用 child.component 的 selector 並使用 *ngIf來控制是否顯示他
<!-- app.component.html -->

<app-child *ngIf="isActive"></app-child>

<button (click)="onClick()">{{ isActive ? 'not display' : 'display' }}</button>

在畫面中可以看到當我們點擊了畫面中的按鈕時,會更改 isActive 的狀態,如果 *ngIf 為 true 的話則會將 child.component 顯示出來,反之會在 DOM 中將他移除掉。
而要注意如果要使用 structural directive 需要在前面都加上米字號(*)作為前綴字喔!
既然提到了 if 不免俗的也要介紹 else 畢竟他們通常是一組出現的,他與 javascript 的規則一樣,當 不滿足 if 中的表達式時就會進到 else 中,舉個例子吧
保持上一個例子的 app.component.ts 內容
import { Component } from '@angular/core';

@Component({
  selector: 'app-root',
  templateUrl: './app.component.html',
})
export class AppComponent {
  isActive = false;

  onClick() {
    this.isActive = !this.isActive;
  }
}
要把 app.component.ts 中的內容稍微改一下
<!-- app.component.html -->

<app-child-1 *ngIf="isActive; else otherTemplate"></app-child-1>

<ng-template #otherTemplate>
    <app-child-2></app-child-2>
</ng-template>

<button (click)="onClick()">{{ isActive ? 'not display' : 'display' }}</button>
在畫面中可以看到,當我們更改了 isActive 的狀態時,在畫面中所呈現的 component 也會不一樣,還記得在 template variable 中提到的 哈希符號 # 嗎,這邊可以把它看成當 *ngIf 為 true 時會顯示 <app-child-1> 這個 component,而當為 false 時就會顯示 <ng-template> 所包住的 <app-child-2>,記得當要使用 NgIfElse 時需要在綁定的 property 或表達式後面加上分號(;)喔!
在前幾天我們介紹 Text interpolation 時就有使用到 NgFor 的技巧,他就是利用迭代的方式將 component 中 arr 型態的 property 的內容一一呈現在畫面中。
<div *ngFor="let item of items">{{item.name}}</div>
在 *ngFor 後面的字串表達式 let item of items, Angular 會對他做以下的處理:
本地項目循環的變量(使用 let 宣告個變量)中let item of items 轉換成圍繞宿主 element 的 了解了 *ngFor 與用法後,這邊要介紹一些在使用 *ngFor 時特別好用的技巧,其實在使用 *ngFor 時他不只會將陣列中的值存在本地變量中,你還可以儲存別的東西到別的變量中:
可能你會想說,啊這些有什麼用? 這可是非常好用的啊!
當你在開發專案時,一個列表中可能會需要在他的最後一行加上一個 + 的符號用於新增內容,或對偶數的 item 顯示不同顏色等等,這邊來搭配著前幾天講的內容做一個小小的例子:
在 app.component.ts 中新增一個 Heros 裡面裝著所有英雄的名稱,與兩個 method
import { Component } from '@angular/core';

@Component({
  selector: 'app-root',
  templateUrl: './app.component.html',
  styleUrls: ['./app.component.css']
})
export class AppComponent {
  isShowAddHero!: boolean;                    // (1)

  Heros = [                                   // (2)
    { id: 11, name: 'Dr Nice' },
    { id: 12, name: 'Narco' },
    { id: 13, name: 'Bombasto' },
    { id: 14, name: 'Celeritas' },
    { id: 15, name: 'Magneta' },
    { id: 16, name: 'RubberMan' },
    { id: 17, name: 'Dynama' },
    { id: 18, name: 'Dr IQ' },
    { id: 19, name: 'Magma' },
    { id: 20, name: 'Tornado' },
  ];

  onOpenAddHero() {                          // (3)
    this.isShowAddHero = true;
  }

  onAddHero(heroName: string) {              // (4)
    this.Heros.push({ id: Math.random(), name: heroName })
    this.isShowAddHero = false;
  }
}
在 app.component.html 中新增內容
<!-- app.component.html -->

<h2 class="title">Hero List</h2>

<div class="heroList" *ngFor="let hero of Heros; last as isLast; odd as isOdd">
    <div class="heroItem" [ngClass]="isOdd ? 'oddClass' : ''">
        {{hero.name}}
        <span *ngIf="isLast">
            <button (click)="onOpenAddHero()" class="openBtn">+</button>
        </span>
    </div>
</div>

<div *ngIf="isShowAddHero" class="addContent">
    <input type="text" #hero>
    <button (click)="onAddHero(hero.value)">Add hero</button>
</div>
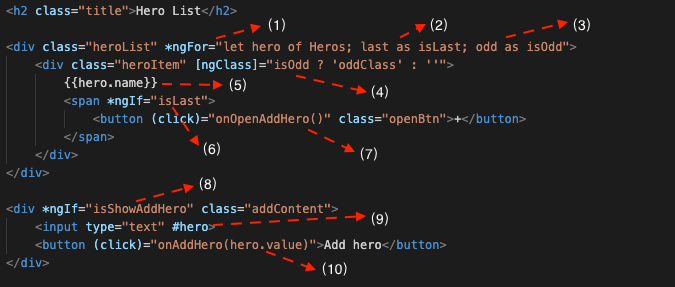
這邊我們詳細的介紹一下,你會看到很多以前都介紹過的內容:
last as isLast 來獲得最後一項odd as isOdd 來獲得偶數項isOdd 決定是否要多綁定一個 CSS class*ngIf 判斷是否為最後一項,用於決定是否顯示新增英雄的按鈕<button>+</button> 中使用 event binding 綁定 component 中的 method<div> 利用 *ngIf 決定是否要顯示在畫面上<input> 中設置為 template variable 讓其他地方的 element 獲得他的數據<button>Add hero</button> 中使用 event binding 綁定 component 中的 method 並從 <input> 中透過 template variable 拿到數據做為參數
在畫面中可以看到,列表中的偶數部分因為符合 [ngClass]="isOdd ? 'oddClass' : ''" 所以多添加了一個變成藍色的 CSS class,而最下面的 item 因為符合 *ngIf="isLast" 所以只有他有 + 的按鈕,而當點擊了+後符合 *ngIf="isShowAddHero" 所以會打開新增 hero 的介面,當按下新增 hero 的介面的按鈕後將輸入在 <input> 的內容 push 近英雄表單中,而+會一直保持出現在最後一個 item 的右邊。
這個例子用了很多之前介紹的技巧,如果有看不懂的建議回去複習一下,真的有問題的話有歡迎在下方留言喔!
在 Angular 中有一個特別的 HTML element,他就是 <ng-container>,之所以會說他特別是因為他是一個不會干擾樣式或佈局的分組元素,因為 Angular 不會將他放進 DOM 裏面,所以當沒有單個 element 可以乘載 directive 時,就可以使用這個特別的 <ng-container>,通常都會將它搭配 structural directive 使用,舉個例子吧
<p>
  I turned the corner
  <ng-container *ngIf="hero">
    and saw {{hero.name}}. I waved
  </ng-container>
  and continued on my way.
</p>
上面例子中可以看到,我們希望在 <p> 的段落中透過使用 *ngIf 決定是否要顯示英雄名稱,如果這時候我們使用其他的 HTML element 來乘載 *ngIf 的話,會造成畫面樣式跟佈局的錯誤,所以就可以使用 <ng-container>,因為他不會被放進 DOM 裏面,作為乘載 structural directive 再好不過。
提到了 <ng-container> 不免俗的要來介紹一下他跟 <ng-template> 的差別:
<ng-template> : 是用於呈現 HTML 的 Angular element,他不會直接顯示在畫面上,需要透過 structural directive 控制它是否要顯示在畫面中,如果沒有被顯示在畫面中時會以註釋的形式呈現在 DOM 中,比較常會用在寫結構性變化的時候,比如
<div *ngIf="show; else notshow">
   當 show = true 時,顯示這些內容
</div>
<ng-template #notshow>
   當 show = false 時,顯示這些內容
</ng-template>
<ng-container> : 他是 Angular 解析器識別的語法 element,他不是 directive, component, class 或 interface,他更像是 javascript 的花括號,常被用在不想要多寫不必要的 HTML element 時但又想將一個區塊的 HTML 包起來處理,就會使用到 <ng-container> 常用來做 structural directive 的載體。
<p>
  I turned the corner
  <ng-container *ngIf="hero">
    and saw {{hero.name}}. I waved
  </ng-container>
  and continued on my way.
</p>
最後要來介紹最後一種常見的 structural directive 那就是 NgSwitch,他其實與 Javascript 的 switch case 一樣,NgSwitch 會根據 switch 跳健從幾個可能的元素中顯示其中一個,Angular 只會將符合條件的元素放進 DOM 中,而 NgSwitch 是由三種 directive 組成的:
一樣舉個例子
首先先在 app.component.ts 中新增一個 property 與 method,用於改變 property 狀態與接收 event
import { Component } from '@angular/core';

@Component({
  selector: 'app-root',
  templateUrl: './app.component.html',
})
export class AppComponent {
  showArea = 0;

  onClick(number: number) {
    switch (number) {
      case 1:
        this.showArea = 1;
        break;
      case 2:
        this.showArea = 2;
        break;
      case 3:
        this.showArea = 3;
        break;
      default:
        this.showArea = 0;
        break;
    }
  }
}
在 app.component.html 中新增三個 <button> 用來讓使用者點擊要顯示哪一個內容,並在下方使用 NgSwitch 來判斷使用者的選項
<!-- app.component.html -->

<ul>
    <li>
        <label>Display number-1 area: </label>
        <button (click)="onClick(1)">Area 1</button>
    </li>
    <li>
        <label>Display number-2 area: </label>
        <button (click)="onClick(2)">Area 2</button>
    </li>
    <li>
        <label>Display number-3 area: </label>
        <button (click)="onClick(3)">Area 3</button>
    </li>
    <li>
        <label>Display default area: </label>
        <button (click)="onClick(99)">default</button>
    </li>
</ul>

<div [ngSwitch]="showArea">
    <div *ngSwitchCase="1">
        <h2>This is area 1</h2>
        <p>Hello world</p>
    </div>
    <div *ngSwitchCase="2">
        <h2>This is area 2</h2>
        <p>Learning Angular</p>
    </div>
    <div *ngSwitchCase="3">
        <h2>This is area 3</h2>
        <p>Know how to use ngSwitch</p>
    </div>
    <div *ngSwitchDefault>
        <h2>This is default area</h2>
        <p>Please select a checkbox</p>
    </div>
</div>

在畫面中可以看到當我們點擊畫面中的不同按鈕時,會改變 showArea 的值,進而改變下方顯示的區域內容,我特意在 html 與 ts 檔中都有使用 switch case 的語法,可以互相比對一下他們的用法,基本上都是差不多的,所以等於說只要會 javascript 的 switch case 語法就同時也學會了 ngSwitch!
本章中介紹了常見的 structural directive 與他們各自的用法,其實 structural directive 的使用方法基本上都跟 Javascript 類似,所以等於說之前知道 Javascript 的 if else, for loop, switch case 的用法的話這一章會學得非常快,不過要注意的是 <ng-container> 與 <ng-template> 的差別與使用場景,除此之外其他的應該都相對簡單。
雖然本章介紹了常見的內建 structural directive,不過再開發專案時一定會遇到內建 structural directive 無法處理的問題,這時候就跟 pipe 一樣需要客製化了,下一章將會介紹如何客製化自己的 attribute directive 用於處理內建 attribute directive 無法處理的問題,那我們就明天見吧