使用OpenCV DNNs方式來偵測人臉,雖然這個方式會使用到深度學習神經網路(框架為SSD (Single Shot Detector) + 基礎CNN網路使用ResNet),但實際使用上不但簡單,偵測人臉的速度也很快。
相關的框架與CNN網路架構說明不在這個系列的範圍內 (怕講不完...),有求知慾的邦友可以自行搜尋相關關鍵字。
前面提到過,使用OpenCV & Dlib來做人臉偵測,大概可以分為四種方式:
今天說這個
今天要介紹第二種方式。
習慣上我喜歡稱呼這個方法叫OpenCV神經網路檢測,
在辨識速度不差、辨識準確度高於哈爾特徵檢測外,也不用太多的參數調整需要介入。
如果是要做人臉偵測應用,一開始先使用這個方式來做,結果一定不會讓你失望的。
開始實作吧!
face_detection目錄下新增一個Python檔案opencv_dnns.py
# 匯入必要套件
import argparse
import time
from os.path import exists
from urllib.request import urlretrieve

import cv2
import numpy as np
from imutils.video import WebcamVideoStream

prototxt = "deploy.prototxt"
caffemodel = "res10_300x300_ssd_iter_140000.caffemodel"


# 下載模型相關檔案
if not exists(prototxt) or not exists(caffemodel):
    urlretrieve(f"https://raw.githubusercontent.com/opencv/opencv/master/samples/dnn/face_detector/{prototxt}",
                prototxt)
    urlretrieve(
        f"https://raw.githubusercontent.com/opencv/opencv_3rdparty/dnn_samples_face_detector_20170830/{caffemodel}",
        caffemodel)
# 初始化模型 (模型使用的Input Size為 (300, 300))
net = cv2.dnn.readNetFromCaffe(prototxt=prototxt, caffeModel=caffemodel)


# 定義人臉偵測函數方便重複使用
def detect(img, min_confidence=0.5):
    # 取得img的大小(高,寬)
    (h, w) = img.shape[:2]

    # 建立模型使用的Input資料blob (比例變更為300 x 300)
    blob = cv2.dnn.blobFromImage(cv2.resize(img, (300, 300)), 1.0, (300, 300), (104.0, 177.0, 123.0))

    # 設定Input資料與取得模型預測結果
    net.setInput(blob)
    detectors = net.forward()

    # 初始化結果
    rects = []
    # loop所有預測結果
    for i in range(0, detectors.shape[2]):
        # 取得預測準確度
        confidence = detectors[0, 0, i, 2]

        # 篩選準確度低於argument設定的值
        if confidence < min_confidence:
            continue

        # 計算bounding box(邊界框)與準確率 - 取得(左上X,左上Y,右下X,右下Y)的值 (記得轉換回原始image的大小)
        box = detectors[0, 0, i, 3:7] * np.array([w, h, w, h])
        # 將邊界框轉成正整數,方便畫圖
        (x0, y0, x1, y1) = box.astype("int")
        rects.append({"box": (x0, y0, x1 - x0, y1 - y0), "confidence": confidence})

    return rects


def main():
    # 初始化arguments
    ap = argparse.ArgumentParser()
    ap.add_argument("-c", "--confidence", type=float, default=0.5, help="minimum probability to filter detecteions")
    args = vars(ap.parse_args())

    # 啟動WebCam
    vs = WebcamVideoStream().start()
    time.sleep(2.0)
    start = time.time()
    fps = vs.stream.get(cv2.CAP_PROP_FPS)
    print("Frames per second using cv2.CAP_PROP_FPS : {0}".format(fps))

    while True:
        # 取得當前的frame
        frame = vs.read()

        rects = detect(frame, args["confidence"])

        # loop所有預測結果
        for rect in rects:
            (x, y, w, h) = rect["box"]
            confidence = rect["confidence"]

            # 畫出邊界框
            cv2.rectangle(frame, (x, y), (x + w, y + h), (0, 255, 0), 2)

            # 畫出準確率
            text = f"{round(confidence * 100, 2)}%"
            y = y - 10 if y - 10 > 10 else y + 10
            cv2.putText(frame, text, (x, y), cv2.FONT_HERSHEY_SIMPLEX, 0.45, (0, 0, 255), 2)

        # 標示FPS
        end = time.time()
        cv2.putText(frame, f"FPS: {str(int(1 / (end - start)))}", (10, 30), cv2.FONT_HERSHEY_SIMPLEX, 0.7,
                    (0, 0, 255), 2)
        start = end

        # 顯示影像
        cv2.imshow("Frame", frame)

        # 判斷是否案下"q";跳離迴圈
        key = cv2.waitKey(1) & 0xff
        if key == ord('q'):
            break


if __name__ == '__main__':
    main()
python face_detection/opencv_dnns.py,執行後的範例結果: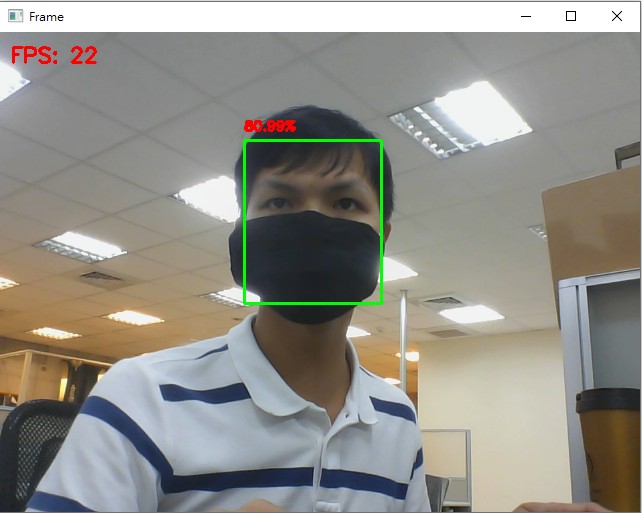
dnn深度學習模型,基本上都要將Input轉為blob:
blobFromImage(image, scaleFactor, size, mean)的各個參數:
參考程式碼在這
明天見!
不好意思,
請問您有遇過
box = detectors[0, 0, i, 3:7] * np.array([w, h, w, h])
(x0, y0, x1, y1) = box.astype("int")
這個邊界框完全超出圖片範圍嗎
我的圖片640*480
x0就大於640了= =
box = detectors[0, 0, i, 3:7] * np.array([w, h, w, h])
detectors[0, 0, i, 3:7]取得的結果範圍是 [0, 1],所以乘上原本的長寬後不會超過你原始圖片的大小喔~
可能要請你先確認程式碼是否與我的相同,再來你可以在
box = detectors[0, 0, i, 3:7] * np.array([w, h, w, h])
的上方加上:
print("detectors: ", detectors[0, 0, i, 3:7])
來確認一下偵測的結果是否的確在 [0, 1]區間
有任何疑問歡迎再詢問~
我看了很多篇文章
這部分程式碼甚至變數名稱幾乎一模一樣
我也就貼進我程式裡,但我使用webcam + opencv + 這個人臉偵測模型
在快速晃動 + confidence設定較低的情況下就會出現這狀況!
我使用這張圖片,得到的人臉座標為 (1968, 564, 2429, 939)
而且confidence還有0.838= =
https://www.pyimagesearch.com/2018/02/26/face-detection-with-opencv-and-deep-learning/
這網站下面討論區也有人提出同樣問題~
https://drive.google.com/file/d/1exRfgRp49a7yWJTvfr2B7Dc5f6IgtCFK/view?usp=sharing
這是我的程式
謝謝您~

不確定在你的環境發生什麼事,但你可以:
deploy.prototxt與res10_300x300_ssd_iter_140000.caffemodel檔案內容與本文相同errorImg1.jpg這張圖片的原始大小1.迴圈要遞迴的是第三個維度的值這我有發現,只是忘記改回來。
2.改成你給的模型架構跟權重之後真的完全沒超出範圍ㄟ!
你有興趣可以去我參考的那網站載他們的模型然後跑我這張圖
真的會出現那種現象!
感謝您的回覆與幫忙!!
想請問一下我把程式碼複製貼上後跳出以下是甚麼意思?
程式碼前段下載模型相關檔案時,他不會下載到我目前的資料夾中,是否有關?
File "c:\Users\WH\Desktop\VScode\face_detection\opencv_dnns.py", line 130, in
main()
File "c:\Users\WH\Desktop\VScode\face_detection\opencv_dnns.py", line 99, in main
rects = detect(frame, args["confidence"])
^^^^^^^^^^^^^^^^^^^^^^^^^^^^^^^^^
File "c:\Users\WH\Desktop\VScode\face_detection\opencv_dnns.py", line 28, in detect
(h, w) = img.shape[:2]
^^^^^^^^^
AttributeError: 'NoneType' object has no attribute 'shape'