前幾天在談到人臉識別有提到:大部分使用神經網路的模型都可以偵測與識別口罩下的人臉。
納今天如果我們只是想要知道有沒有戴口罩呢?
其實,我們只需要有一些訓練資料,
跟簡單的幾個步驟,
就可以完成這個需求。
就讓我們來實際訓練一個簡單的口罩辨識模型吧!
這裡我們切成幾個部分來看:
observations/experiements/data整個目錄複製到你的電腦上,裡面應該包含
隨意瀏覽with_mask圖片你可以發現,實際上這些戴口罩的照片是"人工"合成的,但並不影響我們訓練模型 (實際辨識效果也不差)
但要特別注意的是,with_mask與without_mask裡面的照片不可以用同一個人,不然你的模型很難用在其他不在訓練資料集的圖片上,辨識的效果會很差。
- application
   - mask_detector
      - train.py
      - detect_webcam.py
- dataset
   - mask_person
      - with_mask
      - without_mask
目錄結構與檔案應該很好懂,我們繼續下一部份
train.py檔案,撰寫以下程式碼 (說明在程式碼內註解):
import argparse
import ntpath
import os

import matplotlib.pyplot as plt
import numpy as np
from imutils import paths
from sklearn.metrics import classification_report
from sklearn.model_selection import train_test_split
from sklearn.preprocessing import LabelBinarizer
from tensorflow.keras.applications import MobileNetV2
from tensorflow.keras.applications.mobilenet_v2 import preprocess_input
from tensorflow.keras.layers import AveragePooling2D
from tensorflow.keras.layers import Dense
from tensorflow.keras.layers import Dropout
from tensorflow.keras.layers import Flatten
from tensorflow.keras.layers import Input
from tensorflow.keras.models import Model
from tensorflow.keras.optimizers import Adam
from tensorflow.keras.preprocessing.image import ImageDataGenerator
from tensorflow.keras.preprocessing.image import img_to_array
from tensorflow.keras.preprocessing.image import load_img
from tensorflow.keras.utils import to_categorical


def main():
    # 初始化Arguments
    ap = argparse.ArgumentParser()
    ap.add_argument("-d", "--dataset", required=True, help="path to input dataset")
    ap.add_argument("-p", "--plot", type=str, default="plot.png", help="path to output loss/accuracy plot")
    ap.add_argument("-m", "--model", type=str, default="mask_detector.model",
                    help="path to output face mask detector model")
    args = vars(ap.parse_args())

    # 初始化訓練用參數與Batch Size
    INIT_LR = 1e-4
    EPOCHS = 20
    BS = 32

    # 載入圖片
    print("[INFO] loading images...")
    imagePaths = list(paths.list_images(args["dataset"]))
    data = []
    labels = []

    # 將訓練圖片進行前處理與建立訓練data
    for imagePath in imagePaths:
        label = ntpath.normpath(imagePath).split(os.path.sep)[-2]

        # 注意這裡將圖片轉成224 x 224,與MobileNetV2模型需要的Input一樣大小
        image = load_img(imagePath, target_size=(224, 224))
        image = img_to_array(image)
        image = preprocess_input(image)

        data.append(image)
        labels.append(label)

    data = np.array(data, dtype="float32")
    labels = np.array(labels)

    # 將類別encoding成數值方便訓練
    lb = LabelBinarizer()
    labels = lb.fit_transform(labels)
    labels = to_categorical(labels)

    # 切分訓練資料與測試資料
    (trainX, testX, trainY, testY) = train_test_split(data, labels, test_size=0.20, stratify=labels, random_state=9527)

    # 做Data Argumentation,強化模型的辨識能力
    aug = ImageDataGenerator(
        rotation_range=20,
        zoom_range=0.15,
        width_shift_range=0.2,
        height_shift_range=0.2,
        shear_range=0.15,
        horizontal_flip=True,
        fill_mode="nearest")

    # 載入模型,去除模型最後一層 (等等要改為我們要辨識的"兩種類別")
    baseModel = MobileNetV2(weights="imagenet", include_top=False, input_tensor=Input(shape=(224, 224, 3)))

    # 組合自定義的最後層
    headModel = baseModel.output
    headModel = AveragePooling2D(pool_size=(7, 7))(headModel)
    headModel = Flatten(name="flatten")(headModel)
    headModel = Dense(128, activation="relu")(headModel)
    headModel = Dropout(0.5)(headModel)
    headModel = Dense(2, activation="softmax")(headModel)

    # 建立模型
    model = Model(inputs=baseModel.input, outputs=headModel)

    # 確認模型只有我們新增的最後層可以訓練 (transfer learning)
    for layer in baseModel.layers:
        layer.trainable = False

    # 編譯模型
    print("[INFO] compiling model...")
    opt = Adam(lr=INIT_LR, decay=INIT_LR / EPOCHS)
    model.compile(loss="binary_crossentropy", optimizer=opt, metrics=["accuracy"])

    # 開始訓練
    print("[INFO] training head...")
    H = model.fit(
        aug.flow(trainX, trainY, batch_size=BS),
        steps_per_epoch=len(trainX) // BS,
        validation_data=(testX, testY),
        validation_steps=len(testX) // BS,
        epochs=EPOCHS)

    # 使用測試資料驗證模型準確率
    print("[INFO] evaluating network...")
    predIdxs = model.predict(testX, batch_size=BS)
    predIdxs = np.argmax(predIdxs, axis=1)

    # 印出測試結果
    print(classification_report(testY.argmax(axis=1), predIdxs, target_names=lb.classes_))

    # 儲存模型
    print("[INFO] saving mask detector model...")
    model.save(args["model"], save_format="h5")

    # 劃出訓練結果
    N = EPOCHS
    plt.style.use("ggplot")
    plt.figure()
    plt.plot(np.arange(0, N), H.history["loss"], label="train_loss")
    plt.plot(np.arange(0, N), H.history["val_loss"], label="val_loss")
    plt.plot(np.arange(0, N), H.history["accuracy"], label="train_acc")
    plt.plot(np.arange(0, N), H.history["val_accuracy"], label="val_acc")
    plt.title("Training Loss and Accuracy")
    plt.xlabel("Epoch #")
    plt.ylabel("Loss/Accuracy")
    plt.legend(loc="lower left")
    plt.savefig(args["plot"])


if __name__ == '__main__':
    main()
train.py檔案的目錄下,執行python train.py -d {你的mask_person資料集目錄}
模型的準確率,有99%
[INFO] evaluating network...
              precision    recall  f1-score   support

   with_mask       0.99      0.99      0.99       138
without_mask       0.99      0.99      0.99       138

    accuracy                           0.99       276
   macro avg       0.99      0.99      0.99       276
weighted avg       0.99      0.99      0.99       276
訓練模型的accuracy與loss的趨勢,可以看出模型真的有學習到東西,並且沒有過度訓練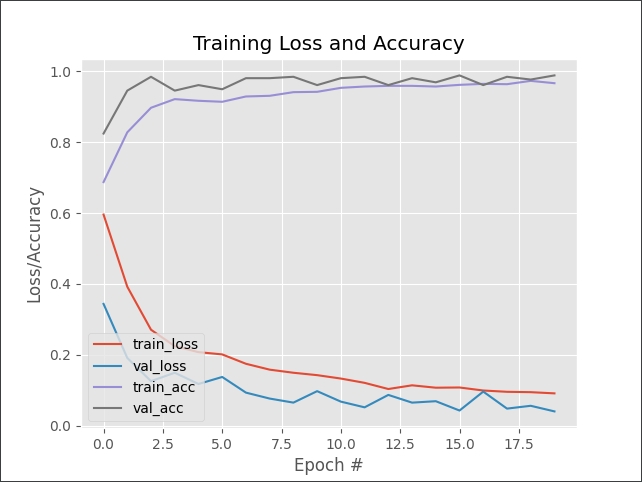
最後在你當前的目錄下會產生一個mask_detector.model的檔案,訓練完成!
detect_webcam.py,撰寫以下程式碼 (說明在程式碼內註解):
import argparse
import time

import cv2
import imutils
import mtcnn
import numpy as np
from imutils.video import WebcamVideoStream
from tensorflow.keras.applications.mobilenet_v2 import preprocess_input
from tensorflow.keras.models import load_model
from tensorflow.keras.preprocessing.image import img_to_array

# 初始化臉部偵測模型
detector = mtcnn.MTCNN()


# 辨識人臉與偵測是否有戴口罩
def detect_and_predict_mask(frame, mask_net):
    faces = []
    locs = []
    preds = []

    rgb = cv2.cvtColor(frame, cv2.COLOR_BGR2RGB)
    img_h, img_w = rgb.shape[:2]
    bboxes = detector.detect_faces(rgb)
    for bbox in bboxes:
        (x, y, w, h) = bbox['box']
        padding = 35
        (crop_x0, crop_x1) = (x - padding if x > padding else 0, x + w + padding if x + w + padding < img_w else img_w)
        (crop_y0, crop_y1) = (y - padding if y > padding else 0, y + h + padding if y + h + padding < img_h else img_h)
        face = rgb[crop_y0:crop_y1, crop_x0:crop_x1]
        face = cv2.resize(face, (224, 224))

        face = img_to_array(face)
        face = preprocess_input(face)

        faces.append(face)
        locs.append((x, y, x + w, y + h))

    if len(faces) > 0:
        faces = np.array(faces, dtype="float32")
        preds = mask_net.predict(faces, batch_size=32)

    return (locs, preds)


def main():
    # 初始化Arguments
    ap = argparse.ArgumentParser()
    ap.add_argument("-m", "--model", default="mask_detector.model", help="path to the trained mask model")
    args = vars(ap.parse_args())

    maskNet = load_model(args["model"])

    # 啟動WebCam
    vs = WebcamVideoStream().start()
    time.sleep(2.0)

    while True:
        frame = vs.read()
        frame = imutils.resize(frame, width=400)

        (locs, preds) = detect_and_predict_mask(frame, maskNet)

        for (box, pred) in zip(locs, preds):
            (startX, startY, endX, endY) = box
            (mask, withoutMask) = pred

            (label, color) = ("Mask", (0, 255, 0)) if mask > withoutMask else ("No Mask", (0, 0, 255))
            label = "{}: {:.2f}%".format(label, max(mask, withoutMask) * 100)

            cv2.putText(frame, label, (startX, startY - 10), cv2.FONT_HERSHEY_SIMPLEX, 0.45, color, 2)
            cv2.rectangle(frame, (startX, startY), (endX, endY), color, 2)

        cv2.imshow("Frame", frame)
        key = cv2.waitKey(1) & 0xFF

        if key == ord("q"):
            break

    cv2.destroyAllWindows()
    vs.stop()


if __name__ == '__main__':
    main()
這個程式碼如果理解前面系列文章,大部分的內容大同小異,幾個重點說明一下:
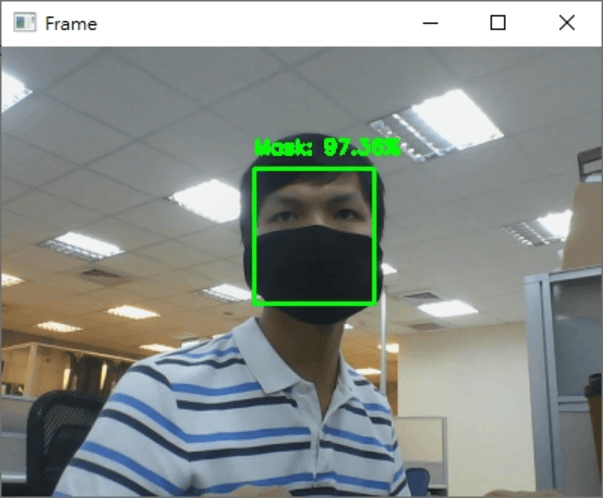
最後執行的結果如下
希望你還喜歡今天的應用,明天見!
今日傳送門
問題:train.py
Q1:
請問那三個ap.add_argument要怎麼連接到directory
雖然說你help是寫path to input dataset,但我實際去跑
args = vars(ap.parse_args())
print(args)
然後回傳長這樣
{'dataset': None, 'plot': 'plot.png', 'model': 'mask_detector.model'}
這些東西的回傳放在imagePaths = list(paths.list_images(args["dataset"]))裡面只會跑error而已,因為args["dataset"]回傳了None
Q2:
ap.add_argument("-d", "--dataset", required=True, help="path to input dataset")
這裡面的required=True,會導致args = vars(ap.parse_args())無法執行
執行的方式在前面的篇章有說明,可以使用Terminal執行指令或是按執行Icon
但如果你是按綠色啟動Icon的方式執行,argparse這個函式庫沒辦法知道你的參數是什麼 (因為他需要透過-- args的方式來帶入參數)
解法兩個:
python train.py --dataset {你的目錄位置}
default=,這樣使用綠色啟動Icon的方式執行就會使用預設值不好意思這麼晚回覆您
謝謝,我知道問題出在哪了