今天大概會聊到的範圍
- Constraint Layout in Compose
上一篇提到,有 Row / Column 和 Box,配合各種 alignment 的方式,就可以排出各種畫面。事實上,原先的 Android 畫面也是如此,透過 horizontal 和 vertical 的 LinearLayout 就可以排出各種畫面。
但沒多久,大家就發現問題了。畫面的設計越來越複雜,越來越多層的 Layout 需要被互相嵌套,進而導致了效能問題。最後,為了攤平 view 的層數,RelativeLayout 和 ConstraintLayout 產生並被推薦變成畫畫面時的固定班底。
在 Compose 中,因為運算 layout 大小的路線不同,嵌套多層 Composable 並不會造成過多的運算壓力,因此大家可以更放心的透過 Row / Column 這類基本的 Layout 進行佈局。
但 ConstraintLayout 還是很有幫助的。透過描述 item 與 item 之間的關聯,讓這個 View 可以自適應各種內容與大小,有時是非常方便的。
所以,要如何在 Compose 中使用 ConstraintLayout 呢?
implementation "androidx.constraintlayout:constraintlayout-compose:$constraint_version"
ConstraintLayout 並不在 Compose 的 library 中,版本也是跟著 constraint layout 的版本。在使用之前要另外導入。
和 XML 不同,在 Compose 中每個 component 必沒有 id 。因此,在形容 component 間的關係之前,必須得先替每個 component "命名"。
ConstraintLayout() {
    // 建立用來做關聯的 "id/ref"
    val (titleRef, coverArtRef, blockSpaceRef) = createRefs()
}
透過 createRefs() 這個 funciton, 可以產出多個 "ref",功能和 XML 中的 id 類似。透過 destructuring 的方式可以一次定義出多個 ref。
接下來,在 ConstraintLayout 中的 Composable 的會多一個 constraintAs 的 Modifier 用來描述 constraint。用 constraintAs 時需要提供一個稍早產生出來的 ref,並且提供一個 Lambda,在 lambda 中描述這個 component 與其他 component 的關係。
Text(
    text = "Text",
    modifier = Modifier.constrainAs(titleRef) {  // 使用 Modifier.constrainAs 定義每個元件的 id
        // 在這裡定義這個元件與其他元件的關聯 (constraint)
        // parent 是內建的
        top.linkTo(parent.top, margin = 8.dp)
        start.linkTo(parent.start, margin = 8.dp)
    }
)
在描述時,可以透過 <top|bottom|start|end>.linkTo(<ref>.<top|bottom|start|end>) 的語法描述物件與物間之間的關係。
另外,也可以直接使用 linkTo 這個 function 一次描述垂直、水平或四周的 constraint
Spacer(modifier = Modifier
    .constrainAs(blockSpaceRef) {
        // linkTo function 可以一次定義多個 constraint
        linkTo(top = parent.top, bottom = parent.bottom)
    })
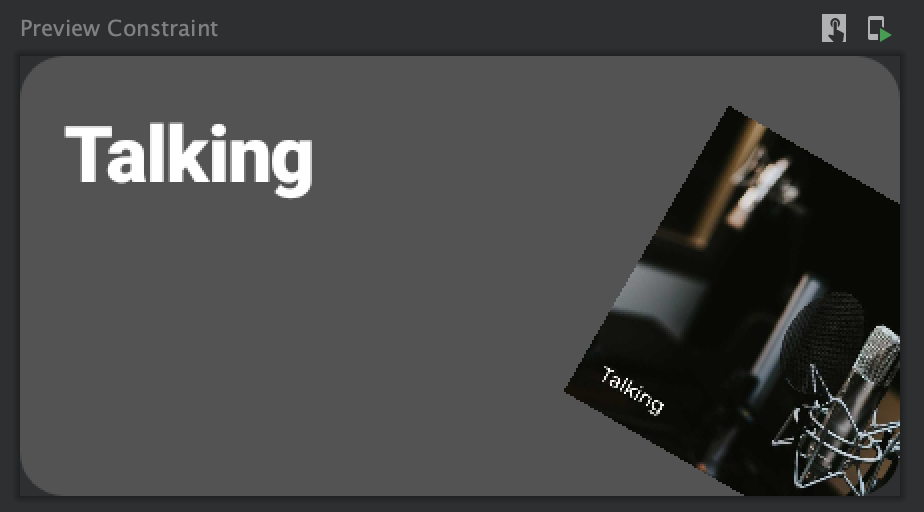
如此,就可以和使用熟悉的 ConstraintLayout 邏輯,來建構畫面了
@Preview(
    heightDp = 80,
    widthDp = 160
)
@Composable
fun `Preview Constraint`(){
    ConstraintLayout(
        modifier = Modifier
            .clip(RoundedCornerShape(8.dp))
            .background(color = backgroundColor)
    ) {
        // 建立用來做關聯的 "id"
        val (titleRef, coverArtRef, blockSpaceRef) = createRefs()


        Text(
            text = "Talking",
            // 使用 Modifier.constrainAs 定義每個元件的 id
            modifier = Modifier.constrainAs(titleRef) {
                // 在這裡定義這個元件與其他元件的關聯 (constraint)
                // parent 是內建的
                top.linkTo(parent.top, margin = 8.dp)
                start.linkTo(parent.start, margin = 8.dp)
            },
            color = Color.White, fontWeight = FontWeight.Black
        )

        Spacer(modifier = Modifier
            .constrainAs(blockSpaceRef) {
                // linkTo function 可以一次定義多個 constraint
                linkTo(top = parent.top, bottom = parent.bottom)
            }
            .defaultMinSize(minHeight = 100.dp))

        Image(
            painter = painterResource(id = image),
            contentDescription = null,
            modifier = Modifier
                .constrainAs(coverArtRef) {
                    bottom.linkTo(parent.bottom)
                    end.linkTo(parent.end, margin = (-10).dp)
                }
                .height(60.dp)
                .width(60.dp)
                .rotate(30f)
        )

    }

}

實際使用起來,發現 ConstraintLayout 在 Compose 的結構下依然簡單易懂。很適合在畫面關係複雜時使用。但仍要再次提醒,在 Compose 的結構下,ConstraintLayout 不再是因為效能的選擇。在其他平台使用 Compose 時也不支援。但當畫面關係複雜,不適合用簡易的 Row / Column 描述時,ConstraintLayout 會是個增加程式可讀性的好幫手。
Reference:
