
Livewire 大致上功能都已經介紹完了,接下來就是一些常用的實作時間啦!!今天要來做最常會遇到的 表單驗證 功能!!以往這個功能在使用者輸入了格式錯誤的資料,要提醒使用者時
若要做到像Google表單的話實在是非常麻煩,光是用 jQuery 在調整顯示錯誤的 DOM 就要花上好多時間。不過有了 Livewire 做這些事就像喝水一樣快!!
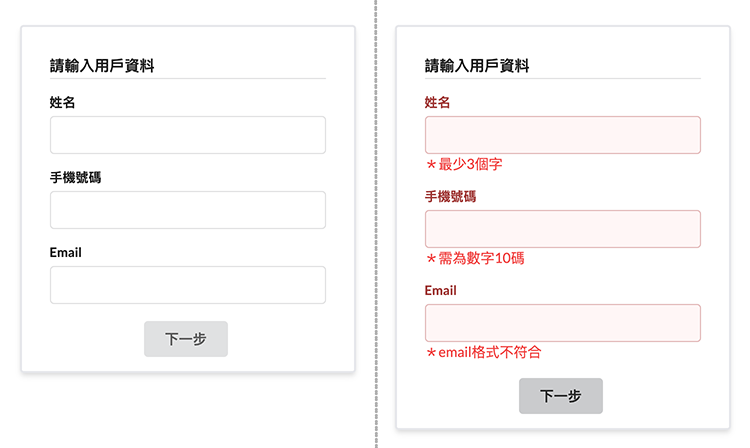
今天就來做簡單的使用者基本資料表單好了!! 我這邊是用 tailwindcss 加上 semantic-ui ,大家可以用自己習慣的。首先先刻好一個簡單的前端頁面。
註:不推 semantic-ui,會用他只是 UI 上看起來比較 light 加上 tailwindcss 沒有
<input>、<button>之類現成的 class。要使用 UI 框架還是推薦 boostrap 。
<div class="text-center p-5">
    <h2 class="mb-10">Day17 常用範例:前後端共用的表單輸入驗證</h2>

    <div class="flex justify-center mt-5">
        <div class="rounded shadow-md bg-grey-50 border-2 w-96 p-4 px-8 text-left">
            <div class="ui form my-5">
                <h4 class="ui dividing header mb-2">請輸入用戶資料</h4>
                <div class="field">
                    <label>姓名</label>
                    <input type="text">
                </div>
                <div class="field">
                    <label>手機號碼</label>
                    <input type="text">
                </div>
                <div class="field">
                    <label>Email</label>
                    <input type="text">
                </div>
            </div>
            <div class="text-center">
                <button class="ui button">下一步</button>
            </div>
        </div>
    </div>

</div>
後端的部分很單純,先宣告一下 <input> 要填的變數,之後再宣告一個 $rules 並分別設定要驗證的內容。
$rules功能來自 Larave Validation ,使用起來非常簡單好用,如要找更多的驗證條件可以詳見這邊
| 欄位 | 驗證 |
|---|---|
| name | 必填,最少三字 |
| phone | 必填,數字十位 |
| 必填,email格式 |
透過 $this->validate() ,可以直接驗證所有 $rules 的內容。由於範例沒有真的要寫入資料庫,因此下一行就先註解掉!
<?php

namespace App\Http\Livewire\Example;

use Livewire\Component;

class Day17 extends Component
{
    public $name;
    public $phone;
    public $email;

    public $rules = [
        'name' => 'required|min:3',
        'phone' => 'required|digits:10',
        'email' => 'required|email'
    ];

    public function render()
    {
        return view('livewire.example.day17');
    }

    public function save()
    {
        $validatedData = $this->validate();

        // User::create($validatedData);
    }
}
這邊希望按下按鈕後才會觸發更新,所以所有的 <input> 中都使用 wire:model.defer 。
 <div class="ui form my-5">
    <h4 class="ui dividing header mb-2">請輸入用戶資料</h4>
    <div class="field">
        <label>姓名</label>
        <input type="text" wire:model.defer="name">
    </div>
    <div class="field">
        <label>手機號碼</label>
        <input type="text" wire:model.defer="phone">
    </div>
    <div class="field">
        <label>Email</label>
        <input type="text" wire:model.defer="email">
    </div>
</div>
<div class="text-center">
    <button class="ui button" wire:click="save">下一步</button>
</div>
前端要顯示錯誤主要有兩種方法,一種是透過 @error 另一種則是 $error->has。
這裡分別應用了這兩種,分別是添加 ClassName:
class="{{ $errors->has('name') ? 'error' : '' }}"
以及顯示錯誤訊息:
@error('name')
    <span>*最少3個字</span>
@enderror
完整的前端頁面如下:
<div class="field {{ $errors->has('name') ? 'error' : '' }}">
    <label>姓名</label>
    <input type="text" wire:model.defer="name">
    @error('name')<span class="text-red-500">*最少3個字</span>@enderror
</div>
<div class="field {{ $errors->has('phone') ? 'error' : '' }}">
    <label>手機號碼</label>
    <input type="text" wire:model.defer="phone">
    @error('phone')<span class="text-red-500">*需為數字10碼</span>@enderror
</div>
<div class="field {{ $errors->has('email') ? 'error' : '' }}">
    <label>Email</label>
    <input type="text" wire:model.defer="email">
    @error('email')<span class="text-red-500">*email格式不符合</span>@enderror
</div>
</div>
<div class="text-center">
	<button class="ui button" wire:click="save">下一步</button>
</div>
如果覺得送出時才做錯誤驗證還不夠,那可以使用這個方法!
當 model 觸發更新時會透過 $this->validateOnly($propertyName) 來該對象驗證更新後的內容。
註:生命週期勾中的 update 只會對 model 所做的修改進行觸發。
public function updated($propertyName)
{
    $this->validateOnly($propertyName);
}
之後把 <input> 的 wire:model.defer 改成 wire:model.lazy 這樣在滑鼠離開輸入匡的時候就會驗證囉!!當然如果打一個字就驗證一次的話可以單純使用 wire:model 就好囉!
