中秋節快樂!!! 這幾天烤肉烤到有點忘記打Code的感覺了,那提到忘記這個詞,我們就想到我們平常密碼也有可能會忘記,那怎麼辦呢!? Firebase Auth提供我們透過寄到我們註冊的email帳戶,讓我們更改密碼!
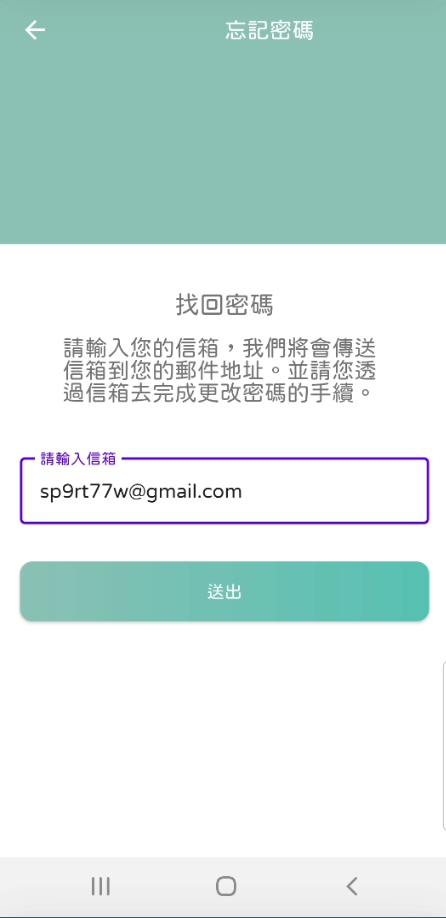
頁面長相會是這樣,簡單明瞭又不失小小偷懶

這個部分就是要記得設定databinding,以及繼承BaseFragment
由於這次我們要做的layout,有幾個尺寸是非常客製化,很難達到複用,所以我有許多layout的尺寸都是寫死的。如果覺得有必要的話,可以自己斟酌是否要寫入dimen
string 如下
<string name="toolbar_title_forgot_account">忘記密碼</string>
<string name="forgotAccount_find_your_account">找回密碼</string>
<string name="forgotAccount_description">請輸入您的信箱,我們將會傳送信箱到您的郵件地址。並請您透過信箱去完成更改密碼的手續。 </string>
<string name="submit">送出</string>
<string name="forgotAccount_already_send_email">我們已經寄送更改密碼的信件到您信箱囉!</string>
<?xml version="1.0" encoding="utf-8"?>

<layout xmlns:android="http://schemas.android.com/apk/res/android"
    xmlns:tools="http://schemas.android.com/tools"
    xmlns:app="http://schemas.android.com/apk/res-auto">

    <androidx.constraintlayout.widget.ConstraintLayout
        android:layout_width="match_parent"
        android:layout_height="match_parent"
        tools:context=".ui.fragment.ForgotAccountFragment">

        <FrameLayout
            android:id="@+id/fl_forgot_fragment"
            android:layout_width="match_parent"
            android:layout_height="@dimen/login_banner_height"
            android:background="@color/light_pewter_blue"
            app:layout_constraintTop_toTopOf="parent">

            <androidx.appcompat.widget.Toolbar
                android:id="@+id/toolbar_forgot_fragment"
                android:layout_width="match_parent"
                android:layout_height="?attr/actionBarSize"
                android:layout_gravity="top">


                <com.example.petsmatchingapp.utils.JFTextView
                    android:layout_width="match_parent"
                    android:layout_height="match_parent"
                    android:text="@string/toolbar_title_forgot_account"
                    android:gravity="center"
                    android:textColor="@color/white"
                    android:textSize="@dimen/toolbar_textSize"/>


            </androidx.appcompat.widget.Toolbar>

        </FrameLayout>

        <com.example.petsmatchingapp.utils.JFTextView
            android:id="@+id/tv_forgot_fragment_forgot_password"
            android:layout_width="wrap_content"
            android:layout_height="wrap_content"
            app:layout_constraintTop_toBottomOf="@id/fl_forgot_fragment"
            app:layout_constraintStart_toStartOf="parent"
            app:layout_constraintEnd_toEndOf="parent"
            android:text="@string/forgotAccount_find_your_account"
            android:layout_marginTop="35dp"
            android:textSize="20sp" />

        <com.example.petsmatchingapp.utils.JFTextView
            android:id="@+id/tv_forgot_fragment_description"
            android:layout_width="0dp"
            android:layout_height="wrap_content"
            app:layout_constraintTop_toBottomOf="@id/tv_forgot_fragment_forgot_password"
            app:layout_constraintStart_toStartOf="parent"
            app:layout_constraintEnd_toEndOf="parent"
            android:text="@string/forgotAccount_description"
            android:layout_marginTop="10dp"
            android:layout_marginStart="50dp"
            android:layout_marginEnd="50dp"
            android:textSize="18sp" />

        <com.google.android.material.textfield.TextInputLayout
            android:id="@+id/tip_forgot_enter_email"
            android:layout_width="match_parent"
            android:layout_height="wrap_content"
            app:layout_constraintTop_toBottomOf="@id/tv_forgot_fragment_description"
            app:layout_constraintStart_toStartOf="parent"
            app:layout_constraintEnd_toEndOf="parent"
            style="@style/Widget.MaterialComponents.TextInputLayout.OutlinedBox"
            android:layout_marginTop="@dimen/tip_margin_top_bottom"
            android:layout_marginStart="@dimen/tip_margin_start_end"
            android:layout_marginEnd="@dimen/tip_margin_start_end">

            <com.example.petsmatchingapp.utils.JFEditText
                android:id="@+id/ed_forgot_email"
                android:layout_width="match_parent"
                android:layout_height="wrap_content"
                android:hint="@string/hint_enter_your_email"
                android:padding="@dimen/edText_padding"
                android:textSize="@dimen/edText_textSize">

            </com.example.petsmatchingapp.utils.JFEditText>


        </com.google.android.material.textfield.TextInputLayout>


        <com.example.petsmatchingapp.utils.JFButton
            android:id="@+id/btn_forgot_submit"
            android:layout_width="match_parent"
            android:layout_height="wrap_content"
            app:layout_constraintTop_toBottomOf="@id/tip_forgot_enter_email"
            app:layout_constraintStart_toStartOf="parent"
            app:layout_constraintEnd_toEndOf="parent"
            android:layout_marginStart="16dp"
            android:layout_marginEnd="16dp"
            android:layout_marginTop="30dp"
            android:foreground="?attr/selectableItemBackground"
            android:background="@drawable/button_background"
            android:textColor="@color/white"
            android:text="@string/submit"/>

    </androidx.constraintlayout.widget.ConstraintLayout>

</layout>
private fun validDataForm(): Boolean{

       return when{
           TextUtils.isEmpty(binding.edForgotEmail.text.toString().trim()) -> {
               showSnackBar(resources.getString(R.string.hint_enter_your_email),true)
               false
           }
           else -> true
       }
    }
private val accountViewModel: AccountViewModel by sharedViewModel()
由於我們這次這個Fragment沒有特別多的onClick需要我們去設定,所以就直接用以下方法,這樣就不用在Fragment後面要去設定繼承
binding.btnForgotSubmit.setOnClickListener{
						//確認email欄位是否為空
            if (validDataForm()){
                showDialog(resources.getString(R.string.please_wait))
								//拿到user輸入的edText資料
                val email = binding.edForgotEmail.text.toString().trim()
                accountViewModel.sendEmailToResetPassword(this,email)
            }
        }
★這時候會發現我們的 sendEmailToResetPassword 這邊是紅的,但沒關係,我們等等來做!
我們的所有的與Firebase溝通的,都會透過viewModel。
fun sendEmailToResetPassword(fragment: ForgotAccountFragment,email: String){

				//直接拿到Auth的 Instance,就可以叫出 sendPasswordResetEmail了!
                FirebaseAuth.getInstance().sendPasswordResetEmail(email)
                    .addOnSuccessListener {
                    fragment.sendEmailSuccessful()
                    }
                    .addOnFailureListener {
                    fragment.sendEmailFail(it.toString())
                    }

        }
非常鼓勵有看過昨天/前天文章的夥伴們,可以自己嘗試做,或是設定不同的funtion,這樣會比較有趣,也比較會有印象!
fun sendEmailSuccessful(){
        hideDialog()
        showSnackBar(resources.getString(R.string.forgotAccount_already_send_email),false)
    }

    fun sendEmailFail(e: String){
        hideDialog()
        showSnackBar(e,true)
    }
binding.toolbarForgotFragment.setNavigationIcon(R.drawable.ic_baseline_arrow_back_24)
binding.toolbarForgotFragment.setNavigationOnClickListener {
            requireActivity().onBackPressed()
        }
binding.tvForgotPassword -> {
                nav.navigate(R.id.action_loginFragment_to_forgotAccountFragment)
            }
★別忘了在onCreateView也要新增
binding.tvForgotPassword.setOnClickListener(this)
就好囉,你可以去當初註冊的email帳號,去察看信件,就可以Reset你的密碼啦!!
