不知道今年大家中秋節有沒有見到許久沒見到的親戚朋友呢!? 筆者發現年齡越長,大家都會越來越有自己的生活圈,但是,儘管不是很常見面/聯絡~ 但是偶爾一見面,又可以聊的沒有隔閡,我特別喜歡這種氛圍,也希望明年中秋節,大概可以更無憂無慮的一起烤肉,喝喝小米酒。 那麼,抒發情感的話不多說,今天我們主要是要來做下方導航的BottomNavigation,以及讓我們顯示我們目前的登入帳號資訊的ProfileFragment。
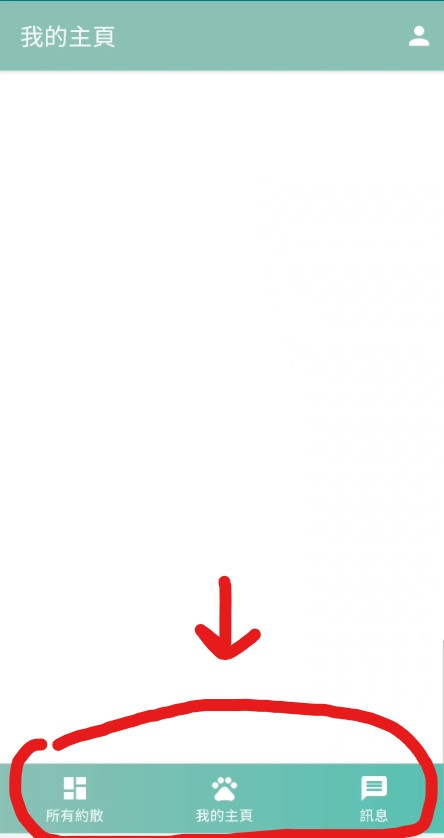
先上圖! BottomNavigation長以下
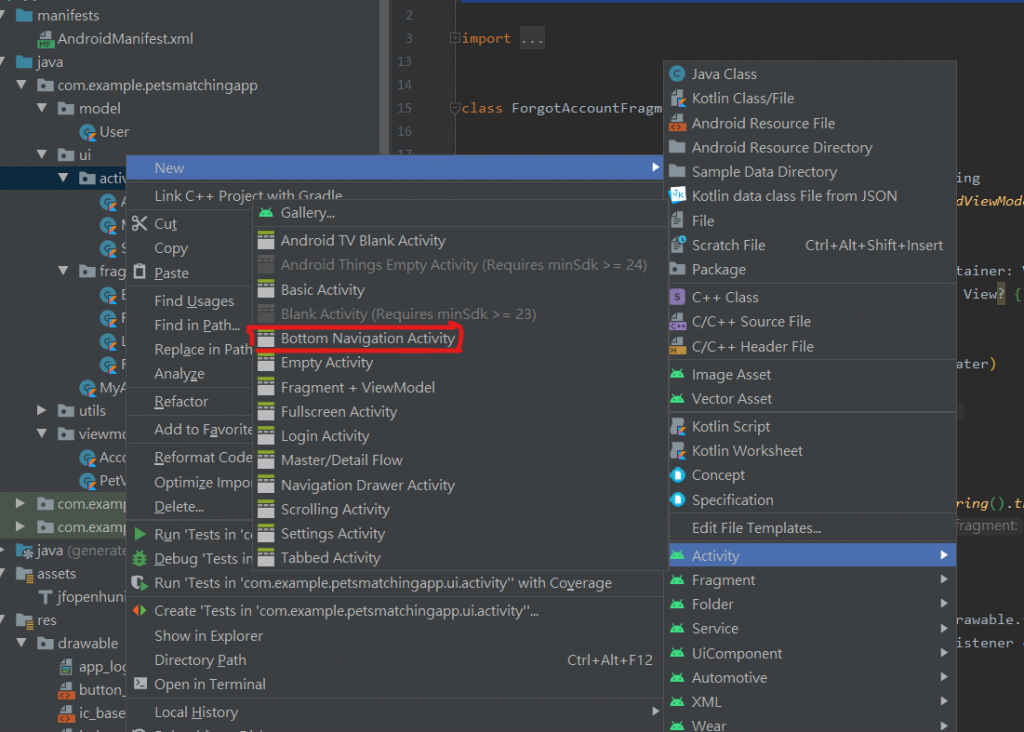
有很多時候,我們在新增的時候可以看一下我們需要新增什麼樣的Activity,就可以省下許多時間呦!
★ 注意,因為之前的文章那時候建立 MatchingActivity的時候,是直接建立空白的,所以我們要先把之前的MatchingActivity刪掉
建立好完,會有
建立好後,如果依照我們之前在LoginFragment的邏輯,當登入成功後,就會到MatchingActivity,你如果登入帳號後,就可以轉到有BottomNavigation的Activity。

那接下來我們會有幾個步驟
因為我們會用sharedViewModel,讓整個MatchingActivity都可以share一樣的資料,所以就不單用某Fragment的viewModel了
★刪掉後也要記得要把Fragment有用到viewModel的一併刪掉喔!
我們先看到MatchingActivity裡面的內容會是
//我們bottomNavigation的view
val navView: BottomNavigationView = findViewById(R.id.nav_view)

//navController,讓我們控制Fragment之間的跳轉
val navController =findNavController(R.id.nav_host_fragment)

//navigationUI使用AppBarConfiguration來控制導航按鈕,而因為BottomNavigation的Fragment彼此沒有層級關係,所以我們這邊傳入id。
val appBarConfiguration =AppBarConfiguration(
setOf(
R.id.navigation_home, R.id.navigation_dashboard, R.id.navigation_notifications
    )
)
setupActionBarWithNavController(navController, appBarConfiguration)
navView.setupWithNavController(navController)
★ AppBarConfiguration裡面的 setOf順序,不會影響bottomNavigation的排序,如果需要更改的話,就要去menu來修改item的排序。
新增並替換bottomNavigation的icon
直接去drawable→new→vector asset → clip art,
搜尋 pets跟message跟一個白色的dashboard給我們的bottom Navigation。
修改bottomNavigation的順序+替換icon
因為我們希望使用者滑到最左邊時,可以看到其他使用者新增的資料,會比較符合使用情境?? 吧! 我想..
<?xml version="1.0" encoding="utf-8"?>
<menu xmlns:android="http://schemas.android.com/apk/res/android">


    <item
		//id是我們剛剛在activity指定的id
        android:id="@+id/navigation_dashboard"
		//更換我們的icon
        android:icon="@drawable/ic_baseline_dashboard_24"
	    //title是顯示在左上方的ActionBar顯示的title
		android:title="@string/title_dashboard" />

    <item
        android:id="@+id/navigation_home"
        android:icon="@drawable/ic_baseline_pets_24"
        android:title="@string/title_home" />

    <item
        android:id="@+id/navigation_notifications"
        android:icon="@drawable/ic_baseline_message_24"
        android:title="@string/title_notifications" />

</menu>
看似一切都美好,都可以正常切換頁面後,我們發現! 預設的藍色非常不符合我們的App的主色調,所以我們要進到 activity_matching.xml來修改
我們需要修改的有,背景+字顏色+icon顏色
所以我們要先去新增 drawable,就跟我們之前做button的background一樣!
我們就做個漸層就好,而有些人可能會疑惑,這怎麼感覺跟之前button的內容很像,那就直接用它就好啦? 其實不然,因為button的我們有加上圓角 ><
<?xml version="1.0" encoding="utf-8"?>
<shape xmlns:android="http://schemas.android.com/apk/res/android">

    <gradient
        android:startColor="@color/light_pewter_blue"
        android:endColor="@color/pewter_blue"
        android:angle="360"
        android:type="linear">
    </gradient>

</shape>
再來回到activity的xml的BottomNavigation的View裡面,我們新增以下
//修改後面的background樣式
android:background="@drawable/bottom_navigation_background"
//修改字的顏色
app:itemTextColor="@color/white"
//修改icon的顏色
app:itemIconTint="@color/white"
接下來我們要把ActionBar的樣式更改成跟我們AccountActivity一樣的顏色!
我們直接去 values→themes 修改colorPrimary的顏色
<item name="colorPrimary">@color/light_pewter_blue</item>
以下是一其他比較常用的theme name對應圖,可以適時新增/修改主題,讓我們節省時間
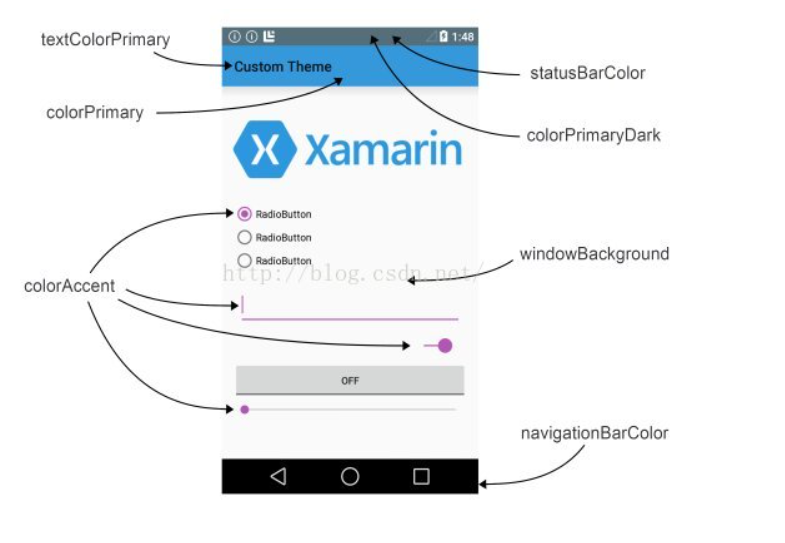
圖片來源(https://blog.csdn.net/liu1164316159/article/details/52163772)
既然上面都有修改statusBar的顏色了,那我們就直接來修改看看吧!
首先在color新增以下顏色
<color name="status_color"> #007979</color>
再來theme指定成上面的顏色
<item name="android:statusBarColor" tools:targetApi="l">@color/status_color</item>
這樣就完成啦!!
我們在註冊的時候,我們是把資料放在Firestore,但是有沒有眼尖的小夥伴發現,我們的User裡面,還有user的image這一欄位!? 那我們要在什麼時候新增呢? 設計理念是覺得,盡量減少user在註冊時所消耗的時間,所以我們會在使用者登入後,另外有一個介面可以讓他更新
dimen
    <dimen name="profile_image_width_height">150dp</dimen>
    <dimen name="profile_image_margin_top">125dp</dimen>
    <dimen name="profile_textSize">16sp</dimen>
    <dimen name="profile_text_margin_top">10dp</dimen>
    <dimen name="button_margin_top_bottom">25dp</dimen>
string
	<string name="toolbar_title_profile">個人頁面</string>
    <string name="edit">修改</string>
    <string name="logout">登出</string>
<?xml version="1.0" encoding="utf-8"?>

<layout xmlns:android="http://schemas.android.com/apk/res/android"
    xmlns:tools="http://schemas.android.com/tools"
    xmlns:app="http://schemas.android.com/apk/res-auto">


    <androidx.constraintlayout.widget.ConstraintLayout

        android:layout_width="match_parent"
        android:layout_height="match_parent"
        tools:context=".ui.fragment.ProfileFragment">


        <FrameLayout
            android:layout_width="match_parent"
            android:layout_height="@dimen/login_banner_height"
            android:background="@color/light_pewter_blue"
            app:layout_constraintTop_toTopOf="parent">

            <androidx.appcompat.widget.Toolbar
                android:id="@+id/toolbar_profile_fragment"
                android:layout_width="match_parent"
                android:layout_height="?attr/actionBarSize">

                <com.example.petsmatchingapp.utils.JFTextView
                    android:layout_width="match_parent"
                    android:layout_height="match_parent"
                    android:textColor="@color/white"
                    android:gravity="center"
                    android:text="@string/toolbar_title_profile"
                    android:textStyle="bold"
                    android:textSize="@dimen/toolbar_textSize">

                </com.example.petsmatchingapp.utils.JFTextView>

            </androidx.appcompat.widget.Toolbar>


        </FrameLayout>

        <FrameLayout
            android:id="@+id/fl_profile_fragment_people_image"
            android:layout_width="@dimen/profile_image_width_height"
            android:layout_height="@dimen/profile_image_width_height"
            android:layout_marginTop="@dimen/profile_image_margin_top"
            app:layout_constraintEnd_toEndOf="parent"
            app:layout_constraintStart_toStartOf="parent"
            app:layout_constraintTop_toTopOf="parent">


            <ImageView
                android:id="@+id/iv_profile_fragment_image"
                android:layout_width="match_parent"
                android:layout_height="match_parent" />

        </FrameLayout>

        <com.example.petsmatchingapp.utils.JFTextView
            android:id="@+id/tv_profile_fragment_name"
            android:layout_width="wrap_content"
            android:layout_height="wrap_content"
            app:layout_constraintTop_toBottomOf="@id/fl_profile_fragment_people_image"
            app:layout_constraintStart_toStartOf="parent"
            app:layout_constraintEnd_toEndOf="parent"
            android:layout_marginTop="20dp"
            android:textStyle="bold"
            android:textSize="16sp"
            tools:text = "王大明"/>

        <com.example.petsmatchingapp.utils.JFTextView
            android:id="@+id/tv_profile_fragment_email"
            android:layout_width="wrap_content"
            android:layout_height="wrap_content"
            app:layout_constraintStart_toStartOf="parent"
            app:layout_constraintEnd_toEndOf="parent"
            android:layout_marginTop="@dimen/profile_text_margin_top"
            android:textSize="@dimen/profile_textSize"
            android:textStyle="bold"
            app:layout_constraintTop_toBottomOf="@id/tv_profile_fragment_name"
            tools:text = "sp9rt77w@gmail.com"/>


        <com.example.petsmatchingapp.utils.JFButton
            android:id="@+id/btn_profile_fragment_go_edit"
            android:layout_width="match_parent"
            android:layout_height="wrap_content"
            app:layout_constraintStart_toStartOf="parent"
            app:layout_constraintEnd_toEndOf="parent"
            app:layout_constraintTop_toBottomOf="@id/tv_profile_fragment_email"
            android:layout_marginTop="@dimen/button_margin_top_bottom"
            android:layout_marginStart="@dimen/tip_margin_start_end"
            android:layout_marginEnd="@dimen/tip_margin_start_end"
            android:background="@drawable/button_background"
            android:foreground="?attr/selectableItemBackground"
            android:textColor="@color/white"
            android:text="@string/edit"/>

        <com.example.petsmatchingapp.utils.JFButton
            android:id="@+id/btn_profile_fragment_signout"
            android:layout_width="match_parent"
            android:layout_height="wrap_content"
            app:layout_constraintStart_toStartOf="parent"
            app:layout_constraintEnd_toEndOf="parent"
            app:layout_constraintTop_toBottomOf="@id/btn_profile_fragment_go_edit"
            android:layout_marginTop="@dimen/button_margin_top_bottom"
            android:layout_marginStart="@dimen/tip_margin_start_end"
            android:layout_marginEnd="@dimen/tip_margin_start_end"
            android:background="@drawable/button_background"
            android:foreground="?attr/selectableItemBackground"
            android:textColor="@color/white"
            android:text="@string/logout"/>


    </androidx.constraintlayout.widget.ConstraintLayout>
</layout>
我們要先去 mobile_navigation.xml
我們希望一開始開啟MatchingActivity的時候出現的是dashboard的Fragment,所以我們要先把把
startDestination 修改成以下
app:startDestination="@+id/navigation_dashboard"
新增剛剛建立好的ProfileFragment,並且把HomeFragment連到ProfileFragment
再過來新增menu,並命名為 home_menu,icon的部分一樣透過新增vector asset,搜尋 person
<?xml version="1.0" encoding="utf-8"?>
<menu xmlns:android="http://schemas.android.com/apk/res/android"
    xmlns:app="http://schemas.android.com/apk/res-auto">

    <item
        android:id="@+id/navigation_profile"
        android:icon="@drawable/ic_baseline_person_24"
        app:showAsAction="always"
        android:title="@string/navigation_profile">
    </item>

</menu>
跑回HomeFragment,一樣先設定databinding,這邊就不贅述了
我們先在onCreateView新增
//指定Fragment願意新增item到選單
setHasOptionsMenu(true)
再來override以下兩個funtion
override fun onCreateOptionsMenu(menu: Menu, inflater: MenuInflater) {
//把剛剛我們創建好的menu,傳進去
inflater.inflate(R.menu.home_menu,menu)
super.onCreateOptionsMenu(menu, inflater)
}
override fun onOptionsItemSelected(item: MenuItem): Boolean {
    when(item.itemId){
			//這邊的id是我們剛剛在home_menu新增的item
      R.id.navigation_profile -> {
				//NavController也要記得宣告喔
        nav.navigate(R.id.action_navigation_home_to_profileFragment)
      }
    }

    return super.onOptionsItemSelected(item)
  }
這樣他就會在在HomeFragment右上角出現剛剛設定的profileIcon,且可以點擊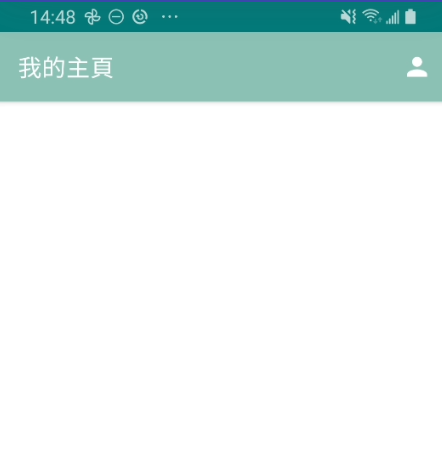
但是!! 我們卻發現! 他點進去後竟然是這副德性
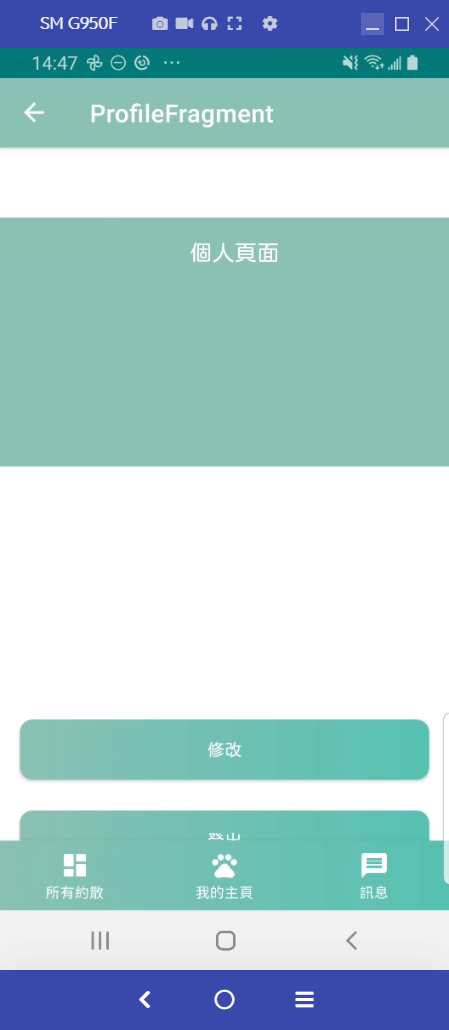
他保留了ActionBar跟BottomNavigation的View,這是因為這兩個都是跟著Activity的,所以我們要把他們隱藏掉!
我們在ProfileFragment新增以下的funtion,並在 onCreateView呼叫它
private fun dismissActivityActionBarAndBottomNavigationView(){
        val activityInstance = this.activity as MatchingActivity
        activityInstance.supportActionBar?.hide()
        activityInstance.findViewById<BottomNavigationView>(R.id.nav_view).visibility = View.GONE

    }
並且到activity_matching.xml的 ConstranLayout裡面把預設的 Padding刪掉
//把這個刪掉
android:paddingTop="?attr/actionBarSize"
binding.toolbarProfileFragment.setNavigationIcon(R.drawable.ic_baseline_arrow_back_24)
        binding.toolbarProfileFragment.setNavigationOnClickListener {
            requireActivity().onBackPressed()
        }
好了!! 接下來是最重要的,我們要把資料從Firestore的資料叫出來,並且存到livedata,好讓我們可以觀察到有變化
好的,那我們首先要回到AccoutViewModel 新增以下兩個funtion
fun getCurrentUID(): String?{
        return FirebaseAuth.getInstance().currentUser?.uid
    }
fun getUserDetail(){
	//先確認我們的getCurrentUID是否為null
    getCurrentUID()?.let {
    FirebaseFirestore.getInstance().collection(Constant.USER)
        .document(it)
        .get()
        .addOnSuccessListener {
//把得到的result轉成User的object並放到livedata,讓我們可以觀察
   _userDetail.postValue(it.toObject(User::class.java))
           }
        .addOnFailureListener {
//這邊我是用Timber,功能類似Log,但是更加簡潔,有興趣可以查關鍵字
                    Timber.d("Error while getUserDetail cause$it")
                }
        }
    }
這時候會發現我們的 addOnSuccessListener裡面會是紅字,沒關係我們來解決它
LiveData,可以讓我們儲存數據,也可以讓我們在UI層觀察變化,有興趣的人可以查關鍵字,這邊就不多說了
//這邊我們設成private,目的是不要讓UI層可以修改我們的數據
private val _userDetail = MutableLiveData<User>()

//這邊就是可以讓UI層觀察到的數據,其數據是跟_userDetail同步的
val userDetail: LiveData<User>
get() = _userDetail
接下來一樣在AccountViewModel新增,讓我們初始化時,就呼叫getUserDetail的funtion
init{
getUserDetail()
}
回到ProfileFragment
一樣要在class下面呼叫 accountViewModel喔
private val accountViewModel: AccountViewModel by sharedViewModel()
accountViewModel.userDetail.observe( viewLifecycleOwner, Observer {

						Constant.loadUserImage(it.image,binding.ivProfileFragmentImage)
            binding.tvProfileFragmentName.setText(it.name)
            binding.tvProfileFragmentEmail.setText(it.email)

        })
因為我們會有使用者的圖片,目前還沒有新增,但是之後會教大家怎麼把圖片存到雲端。所以我們需要使用第三方套件 Glide,讓我們可以load網路上的照片!
首先我們要implementation以下
    //Glide
    implementation "com.github.bumptech.glide:glide:$glide_version"
	//這讓我們可以新增圓角等等...
    implementation 'jp.wasabeef:glide-transformations:3.0.1'
並在 project層級新增版本
ext.glide_version = "4.12.0"
接下來就去 Constant來新增 Glide的funtion
這樣可以讓我們以後在別的Fragment要load圖片時,不用再寫重複的Code
//我們只要兩個參數,一個是你要顯示的圖片url跟你要顯示的ImageView
fun loadUserImage(url: Any, v:ImageView){
		//圓角
        val mRequestOptions = RequestOptions.circleCropTransform()

        Glide.with(v)
			//傳入你要顯示的圖片url
            .load(url)
			//放入圓角
            .apply(mRequestOptions)
			//顧名思義,當今天還沒load到照片時,要先顯示啥照片,這邊大家可以自己抓網路上的圖片
            .placeholder(R.drawable.placeholder)
			//要顯示在哪個ImageView
            .into(v)
    }
我們可以簡單試試看把一些圖片先直接丟進去,成功如下
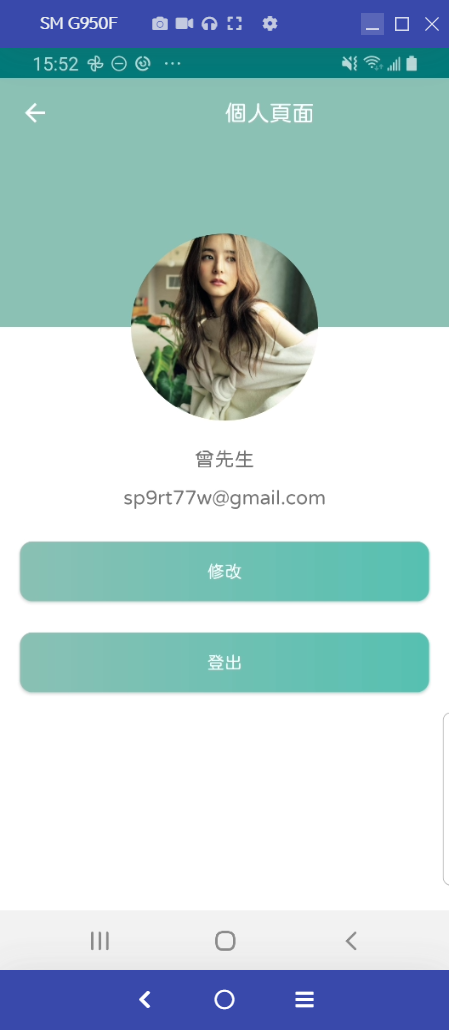
先說,圖片中的不是本人,也不是楊冪(ㄇㄧˋ),知道是誰的夥伴們,可以在留言欄留言,我會隨機按讚!!
最後在新增 logout的功能就結束啦!!
先到AccountViewModel新增以下,簡單明瞭不解釋
fun signOut(){
        FirebaseAuth.getInstance().signOut()
    }
並新增 onClickListener,一樣先繼承 View.OnClickListener
override fun onClick(v: View?) {
        when(v){

            binding.btnProfileFragmentSignout ->{
				//登出
                accountViewModel.signOut()
				//轉到AccountActivity
      startActivity(Intent(requireActivity(),AccountActivity::class.java))
                //關掉當前的Activity
				requireActivity().finish()
            }
        }
    }
並且別忘了在 onCreateView新增
binding.btnProfileFragmentSignout.setOnClickListener(this)
看起來一切都美好,但是... 這邊出現問題啦,當我們左上角的返回鍵後!!
原來是我們剛剛把這兩個都關掉啦!
這邊就新增以下funtion,並在onCreateView呼叫就好!
看起來是有點笨的作法! 有知道其他方法的夥伴們,可以告訴我 plz
private fun showActionBarAndBottomNavigation(){

    if (requireActivity().findViewById<BottomNavigationView>(R.id.nav_view).visibility == View.GONE){
      requireActivity().findViewById<BottomNavigationView>(R.id.nav_view).visibility = View.VISIBLE
    }

    val activityInstance = this.activity as MatchingActivity
    activityInstance.supportActionBar?.show()
  }
大功告成!!
成功如下!!

明天會做新增註冊資料的頁面!! 請大家期待啦 へけっ