本系列文已改編成書「Arduino 自造趣:結合 JavaScript x Vue x Phaser 輕鬆打造個人遊戲機」,本書改用 Vue3 與 TypeScript 全面重構且加上更詳細的說明,
在此感謝 iT 邦幫忙、博碩文化與編輯小 p 的協助,歡迎大家前往購書,鱈魚在此感謝大家 (。・∀・)。
若想 DIY 卻不知道零件去哪裡買的讀者,可以參考此連結 。( •̀ ω •́ )✧
既然已經透過 Serial API 取得 Port 存取權限了,再來我們就要來接收並解析資料了。
若每個需要串列通訊資料的地方都要寫一次讀取相關的程式,會導致程式不好維護,所以我們在此將建立一個模組,負責處理串列通訊資料。
此模組的功能需求為:
建立 port-transceiver.js 模組。
使用觀察者模式,讓物件可以發出事件。
繼承 EventEmitter2,用法說明詳見文檔。
透過 debounce 處理資料接收。
持續有資料接收時不會發送事件,等到超過指定時間後再發出事件。
佇列排程發送資料。
以免不同來源資料在過短時間內同時送出,讓 MCU 解析命令發生錯誤。
透過 Serial API 讀取、發送資料。
src\script\modules\port-transceiver.js
import EventEmitter2 from 'eventemitter2';
import to from 'safe-await';
import { debounce } from 'lodash-es';

export default class extends EventEmitter2.EventEmitter2 {
  port = null;
  reader = null;
  receiveBuffer = [];

  writer = null;
  writeTimer = null;
  cmdsQueue = []; // 命令佇列

  options = {
    /** 命令發送最小間距(ms) */
    writeInterval: 10,

    /** Reader 完成讀取資料之 debounce 時間
     * 由於 Firmata 採樣頻率(Sampling Interval)預設是 19ms 一次
     * 所以只要設定小於 19ms 數值都行,這裡取個整數,預設為 10ms
     *
     * [參考文件 : Firmata Sampling Interval](https://github.com/firmata/protocol/blob/master/protocol.md#sampling-interval)
     */
    readEmitDebounce: 10,
  };
  /** debounce 原理與相關資料可以參考以下連結
   *
   * [Debounce 和 Throttle](https://ithelp.ithome.com.tw/articles/10222749)
   */
  debounce = {
    finishReceive: null,
  };

  constructor(port) {
    super();

    // 檢查是否有 open Method
    if (!this.port?.open) {
      throw new TypeError('無效的 Serial Port 物件');
    }

    this.port = port;

    this.debounce.finishReceive = debounce(() => {
      this.finishReceive();
    }, this.options.readEmitDebounce);

    this.start().catch((err) => {
      // console.error(`[ PortTransceiver start ] err : `, err);
      this.emit('err', err);
    });
  }

  /** 開啟發送佇列並監聽 Port 資料 */
  async start() {
    if (!this?.port?.open) {
      return Promise.reject(new Error('Port 無法開啟'));
    }

    const [err] = await to(this.port.open({ baudRate: 57600 }));
    if (err) {
      return Promise.reject(err);
    }

    this.emit('opened');
    this.startReader();
    this.startWriter();
  }
  /** 關閉 Port */
  stop() {
    this.removeAllListeners();
    clearInterval(this.writeTimer);

    this.reader?.releaseLock?.();
    this.writer?.releaseLock?.();
    this.port?.close?.();
  }

	/** Serial.Reader 開始讀取資料
   *
   * 參考資料:
   * [W3C](https://wicg.github.io/serial/#readable-attribute)
   * [MDN](https://developer.mozilla.org/en-US/docs/Web/API/Web_Serial_API#reading_data_from_a_port)
   */
  async startReader() {
    const port = this.port;

    if (port.readable.locked) {
      return;
    }

    try {
      this.reader = port.readable.getReader();

      for (; ;) {
        const { value, done } = await this.reader.read();
        if (done) {
          break;
        }

        // console.log(`[ startReader ] value : `, value);
        this.receiveBuffer.push(...value);
        this.debounce.finishReceive();
      }
    } catch (err) {
      this.stop();
      this.emit('err', err);
    } finally {
      this.reader?.releaseLock();
    }
  }
  /** 完成接收,emit 已接收資料 */
  finishReceive() {
    this.emit('data', this.receiveBuffer);
  }

	/** 取得 Serial.Writer 並開啟發送佇列
   *
   * 參考資料:
   * [W3C](https://wicg.github.io/serial/#writable-attribute)
   */
  startWriter() {
    this.writeTimer = setInterval(() => {
      if (this.cmdsQueue.length === 0) {
        return;
      }

      this.writer = this.port.writable.getWriter();

      const cmd = this.cmdsQueue.shift();
      this.write(cmd.values);

      // console.log(`write : `, cmd.values);
    }, this.options.writeInterval);
  }
  /** 透過 Serial.Writer 發送資料 */
  async write(data) {
    // console.log(`[ write ] data : `, data);

    await this.writer.write(new Uint8Array(data));
    this.writer.releaseLock();
  }
}
接著在 Vuex 引入 port-transceiver.js 模組,讓使用者選擇 Port 成功後,同時建立 port-transceiver 物件。
src\store\modules\core.store.js
/**
 * 管理 Port 物件、系統主要設定
 */

/**
 * @typedef {import('vuex').Module} Module
 */

import PortTransceiver from '@/script/modules/port-transceiver'

/** @type {Module} */
const self = {
  namespaced: true,
  state: () => ({
    port: null,

    /** @type {PortTransceiver} */
    transceiver: null,
  }),
  mutations: {
    setPort(state, port) {
      state.transceiver?.stop?.();
      state.port = port;

      if (!port) {
        state.transceiver = null;
        return;
      }

      state.transceiver = new PortTransceiver(port);
    },
  },
  actions: {
  },
  modules: {
  },
};

export default self;
在 src\app.vue <script> 引入 Vuex 中的 transceiver 物件,試試看有沒有成功發出資料。
/**
 * @typedef {import('@/script/modules/port-transceiver').default} PortTransceiver
 */

import { mapState } from 'vuex';

import DialogSystemSetting from '@/components/dialog-system-setting.vue';

export default {
  name: 'App',
  components: {
    'dialog-system-setting': DialogSystemSetting,
  },
  data() {
    return {};
  },
  computed: {
    ...mapState({
      /** @type {PortTransceiver} */
      portTransceiver: (state) => state.core.transceiver,
    }),
  },
  watch: {
    /** 偵測 portTransceiver 變化,如果為有效物件,則註冊監聽事件
     * @param {PortTransceiver} transceiver
     */
    portTransceiver(transceiver) {
      if (!transceiver) {
        return;
      }

      transceiver.on('data', (data) => {
        console.log(`[ transceiver on data ] data : `, data);
      });
    },
  },
  created() {},
  mounted() {},
  methods: {},
};
選擇 Port 之後,會建立 portTransceiver 物件,並監聽 data 事件,效果如下:

將註冊 transceiver 事件的程式包裝成一個 Method 為 initTransceiver(),並加入 Notify 訊息,提示目前狀態,讓使用體驗好一點。
這裡以「// ...」省略沒有變動的程式碼,減少干擾。
src\app.vue <script>
/**
 * @typedef {import('@/script/modules/port-transceiver').default} PortTransceiver
 */

import { mapState } from 'vuex';

import DialogSystemSetting from '@/components/dialog-system-setting.vue';

export default {
  name: 'App',
  // ...
  watch: {
    /** 偵測 portTransceiver 變化,如果為有效物件,則進行初始化
     * @param {PortTransceiver} transceiver
     */
    portTransceiver(transceiver) {
      if (!transceiver) {
        return;
      }

      this.initTransceiver();
    },
  },
	// ...
  methods: {
    initTransceiver() {
      /** @type {PortTransceiver} */
      const portTransceiver = this.portTransceiver;

      /** 提示使用者正在等待 Firmata 回應
       * 產生一個可關閉的 Notify,用於後續處理
       * [Notify API](https://v1.quasar.dev/quasar-plugins/notify#programmatically-closing)
       */
      const dismiss = this.$q.notify({
        type: 'ongoing',
        message: '等待 Board 啟動...',
      });

      portTransceiver.on('data', (data) => {
        dismiss();
        console.log(`[ initTransceiver on data ] data : `, data);
      });

      portTransceiver.on('err', (err) => {
				dismiss();

        // 若發生錯誤,則清空選擇 Port
        this.$store.commit('core/setPort', null);

        // 顯示錯誤訊息
        /** @type {string} */
        const msg = err.toString();

        if (msg.includes('Failed to open serial port')) {
          this.$q.notify({
            type: 'negative',
            message: '開啟 Port 失敗,請確認 Port 沒有被占用',
          });
          return;
        }

        this.$q.notify({
          type: 'negative',
          message: `開啟 Port 發生錯誤:${err}`,
        });
      });
    },
  },
};

仔細比對會發現 console.log 印出來的內容與 D04 分析的內容相同,接下來讓我們進入解析資料環節。
建立 Firmata 模組,用於將接收到的數值解析成對應的資料。
首先新增 firmata responce 的資料集,功能需求為:
key:此回應資料的 key。eventName:此資料對應觸發的 event 名稱。matcher():用來判斷回應資料是否符合。getData():將回應資料轉為 Firmata 資料。src\script\firmata\response-define.js
export default [
  // firmwareName: 韌體名稱與版本
  {
    key: 'firmwareName',
    eventName: 'info',
    /**
     * @param {number[]} res
     */
    matcher(res) {
      // 回傳 Boolean 表示是否相符
    },
    /**
     * @param {number[]} values
     */
    getData(values) {
		  // 依照 D04 分析過程設計程式。

      // 取得特徵起點
      const index = values.lastIndexOf(0x79);

      const major = values[index + 1];
      const minor = values[index + 2];

      const nameBytes = values.slice(index + 3, -1);

      /** 在 D04 內容中可以知道 MSB 都是 0
       * 所以去除 0 之後,將剩下的 byte 都轉為字元後合併
       * 最後的結果就會是完整的名稱
       */
      const firmwareName = nameBytes
        .filter((byte) => byte !== 0)
        .map((byte) => String.fromCharCode(byte))
        .join('');

      return {
        ver: `${major}.${minor}`,
        firmwareName
      }
    },
  },
]
所以「matcher() 判斷回應資料是否符合」的部分要怎麼做呢?這裡我們用最簡單直接的辦法,直接將數值矩陣轉為字串後,判斷有沒有含有相符字串。(簡單暴力 ヽ(́◕◞౪◟◕‵)ノ)
大家可以自行實作速度更快的演算法 (ง •̀_•́)ง
建立 src\script\utils\utils.js 集中各類運算功能。
/** 判斷 Array 是否包含另一特徵 Array
 * @param {Number[]} array
 * @param {Number[]} feature
 * @return {Number[]}
 */
export function matchFeature(array, feature) {
  const arrayString = array.join();
  const featureString = feature.join();

  return arrayString.includes(featureString);
}
實作 matcher() 內容
src\script\firmata\response-define.js
import { matchFeature } from '@/script/utils/utils';

export default [
  // firmwareName: 韌體名稱與版本
  {
    key: 'firmwareName',
    eventName: 'info',
    /**
     * @param {number[]} res
     */
    matcher(res) {
			// 回應開頭一定為 F0 79
			const featureBytes = [0xF0, 0x79];
      return matchFeature(res, featureBytes);
    },
    // ...
  },
]
建立 firmata.js 模組並引入 response-define.js。
功能需求:
src\script\firmata\firmata.js
/**
 * @typedef {Object} ResponseParseResult 回應資料解析結果
 * @property {string} key 回應 key
 * @property {string} eventName 事件名稱
 * @property {number[]} oriBytes 原始回應值
 * @property {Object} data 解析完成資料
 */

import responsesDefines from '@/script/firmata/response-define';

export default {
	/** 解析回應資料
   * @param {Number[]} res 接收數值
   */
  parseResponse(res) {
    // 找出符合回應
    const matchResDefines = responsesDefines.filter((define) =>
      define.matcher(res)
    );

    if (matchResDefines.length === 0) {
      return [];
    }

    const results = matchResDefines.map((resDefine) => {
      const data = resDefine.getData(res);
      const { key, eventName } = resDefine;

      /** @type {ResponseParseResult} */
      const result = {
        key,
        eventName,
        oriBytes: res,
        data,
      }
      return result;
    });

    return results;
  },
}
接著在 port-transceiver.js 引入 firmata.js,並修改 finishReceive() Method 內容。
src\script\modules\port-transceiver.js
import EventEmitter2 from 'eventemitter2';
import to from 'safe-await';
import { debounce } from 'lodash-es';

import firmata from '@/script/firmata/firmata';

export default class extends EventEmitter2.EventEmitter2 {
  // ...
   finishReceive() {
   // 解析回應內容
    const results = firmata.parseResponse(this.receiveBuffer);
    if (results.length === 0) {
      this.receiveBuffer.length = 0;
      return;
    }

    // emit 所有解析結果
    results.forEach(({ key, eventName, data }) => {
      // 若 key 為 firmwareName 表示剛啟動,emit ready 事件
      if (key === 'firmwareName') {
        this.emit('ready', data);
      }

      this.emit(eventName, data);
    });

    this.receiveBuffer.length = 0;
  }

  // ...
}
最後回到 app.vue,我們調整一下剛剛 initTransceiver() 內容。
src\app.vue <script>
/**
 * @typedef {import('@/script/modules/port-transceiver').default} PortTransceiver
 */

import { mapState } from 'vuex';

import DialogSystemSetting from '@/components/dialog-system-setting.vue';

export default {
  name: 'App',
  // ...
  methods: {
    initTransceiver() {
      /** @type {PortTransceiver} */
      const portTransceiver = this.portTransceiver;

      /** 提示使用者正在等待 Firmata 回應
       * 產生一個透過程式關閉的 Notify,用於後續處理
       * [Notify API](https://v1.quasar.dev/quasar-plugins/notify#programmatically-closing)
       */
      const dismiss = this.$q.notify({
        type: 'ongoing',
        message: '等待 Board 啟動...',
      });

			// 接收 ready 事件
      portTransceiver.on('ready', (data) => {
        dismiss();

        const ver = data.ver;
        const firmwareName = data.firmwareName;

        this.$q.notify({
          type: 'positive',
          message: `初始化成功,韌體名稱「${firmwareName}」,版本:「${ver}」`,
        });
      });

			// 接收 err 事件
      portTransceiver.on('err', (err) => {
        dismiss();

        // 若發生錯誤,則清空選擇 Port
        this.$store.commit('core/setPort', null);

        // 顯示錯誤訊息
        /** @type {string} */
        const msg = err.toString();

        if (msg.includes('Failed to open serial port')) {
          this.$q.notify({
            type: 'negative',
            message: '開啟 Port 失敗,請確認 Port 沒有被占用',
          });
          return;
        }

        this.$q.notify({
          type: 'negative',
          message: `開啟 Port 發生錯誤:${err}`,
        });
      });
    },
  },
};

至此,我們成功取得 Firmata 回傳之「版本號」與「韌體名稱」了!
接著將 Firmata 取得的資料儲存至 Vuex,讓所有組件都能取得。
建立 src\store\modules\board.store.js
/**
 * 管理 Firmata 版本、Pin 清單等等 MCU 開發版相關資料
 */

/**
 * @typedef {import('vuex').Module} Module
 */

import { merge } from 'lodash-es';

/** @type {Module} */
const self = {
  namespaced: true,
  state: () => ({
    info: {
      ver: null,
      firmwareName: null,
      pins: [],
      analogPinMap: {},
    },

  }),
  mutations: {
    setInfo(state, info) {
      merge(state.info, info);
    },
  },
  actions: {
  },
  modules: {
  },
};

export default self;
並在 Vuex 引入。
import Vue from 'vue';
import Vuex from 'vuex';

Vue.use(Vuex);

import core from './modules/core.store';
import board from './modules/board.store';

export default new Vuex.Store({
  state: {
  },
  mutations: {
  },
  actions: {
  },
  modules: {
    core, board
  },
});
回到 app.vue,在 initTransceiver() 增加 on('info') 事件。
src\app.vue <script>
/**
 * @typedef {import('@/script/modules/port-transceiver').default} PortTransceiver
 */

import { mapState } from 'vuex';

import DialogSystemSetting from '@/components/dialog-system-setting.vue';

export default {
  name: 'App',
  // ...
  methods: {
    initTransceiver() {
      /** @type {PortTransceiver} */
      const portTransceiver = this.portTransceiver;

      // ...

      portTransceiver.on('ready', (data) => {
        // ...
      });

			// 接收 info 事件
      portTransceiver.on('info', (info) => {
	      // 儲存至 Vuex
        this.$store.commit('board/setInfo', info);
      });

      portTransceiver.on('err', (err) => {
				// ...
      });
    },
  },
};
透過 Vue 之 Chrome 外掛,檢查看看有沒有成功存至 Vuex 中。

成功!( ´ ▽ ` )ノ
好不容易取得資料,當然是要顯示出來才行。◝( •ω• )◟
讓我們前往 app.vue,將「版本號」與「韌體名稱」顯示在畫面右下角。
src\app.vue <template lang="pug">
screen
  .info
    | firmwareName - v0.0

  dialog-system-setting
src\app.vue <style lang="sass">
@import '@/styles/quasar.variables.sass'

.screen
  position: absolute
  width: 100%
  height: 100%
  display: flex
  justify-content: center
  align-items: center
  background: linear-gradient(160deg, rgba($teal-1, 0.2), $blue-grey-1)
  color: $grey
  .info
    position: absolute
    right: 0px
    bottom: 0px
    display: flex
    text-align: right
    padding: 14px
    letter-spacing: 1.5px
    font-size: 14px
    color: $grey
效果如下。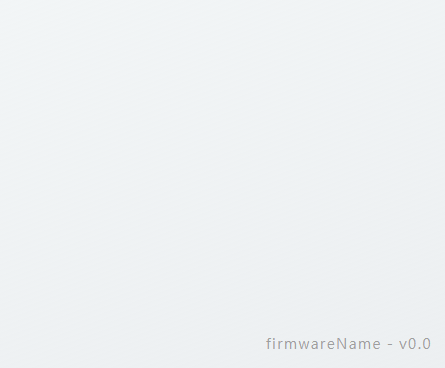
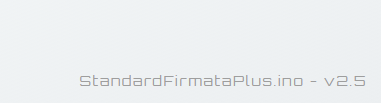
看起來 OK,接著從 Vuex 中取得實際資料,並讓 firmwareName 為空時不顯示。
src\app.vue <template lang="pug">
.screen
  .info(v-if='firmwareName')
    | {{ firmwareName }} - v{{ ver }}

  dialog-system-setting
src\app.vue <script>
/**
 * @typedef {import('@/script/modules/port-transceiver').default} PortTransceiver
 */

import { mapState } from 'vuex';

import DialogSystemSetting from '@/components/dialog-system-setting.vue';

export default {
  name: 'App',
  // ...
	computed: {
    ...mapState({
      /** @type {PortTransceiver} */
      portTransceiver: (state) => state.core.transceiver,

      ver: (state) => state.board.info.ver,
      firmwareName: (state) => state.board.info.firmwareName,
    }),
  },
  // ...
};

最後換個看起來科幻一點的字體,看起來比較厲害。ԅ(´∀` ԅ)
字體從 Google Font 尋找
在 global.sass 新增一個字體用 Class
src\styles\global.sass
@import url('https://fonts.googleapis.com/css2?family=Orbitron:wght@400;500;600;700;800;900&display=swap')

// 引入變數
@import '@/styles/quasar.variables.sass'

.c-row
  display: flex
.c-col
  display: flex
  flex-direction: column

.border-radius-m
  border-radius: $border-radius-m !important
.border-radius-s
  border-radius: $border-radius-s !important

// 滾動條
::-webkit-scrollbar
  width: 3px
  height: 3px
::-webkit-scrollbar-track
  padding: 5px
  border-radius: 7.5px
::-webkit-scrollbar-thumb
  border-radius: 7.5px

.font-orbitron
  font-family: 'Orbitron'
加上替換字體的 Class
src\app.vue <template lang="pug">
.screen
  .info.font-orbitron(v-if='firmwareName')
    | {{ firmwareName }} - v{{ ver }}

  dialog-system-setting
看起來應該有比較酷一點吧... (´・ω・`)
port-transceiver.js 接收 COM Port 資料。以上程式碼已同步至 GitLab,大家可以前往下載:

