本系列文已改編成書「Arduino 自造趣:結合 JavaScript x Vue x Phaser 輕鬆打造個人遊戲機」,本書改用 Vue3 與 TypeScript 全面重構且加上更詳細的說明,
在此感謝 iT 邦幫忙、博碩文化與編輯小 p 的協助,歡迎大家前往購書,鱈魚在此感謝大家 (。・∀・)。
若想 DIY 卻不知道零件去哪裡買的讀者,可以參考此連結 。( •̀ ω •́ )✧
電子助教:「所以標題提到的那些東西好吃嗎?ლ(´∀`ლ)」
鱈魚:「不,都不能吃 (́◉◞౪◟◉‵)」
電子助教:(乾騙我... ლ ( ´•̥̥̥ ω •̥̥̥` ლ ) )
在進入建立視窗組件之前,我們必須先取得必要 MCU 資訊,所以這個章節讓我們繼續取得更多 Firmata 資料吧。
接下來預計還要取得以下資訊:
打開 Firmata Protocol,在「Capability Query」章節可以找到腳位與功能相關說明。
The capability query provides a list of all modes supported by each pin. Each mode is described by 2 bytes where the first byte is the pin mode (such as digital input, digital output, PWM) and the second byte is the resolution (or sometimes the type of pin such as RX or TX for a UART pin). A value of 0x7F is used as a separator to mark the end each pin's list of modes. The number of pins supported is inferred by the message length.
查詢命令為:
0  START_SYSEX              (0xF0)
1  CAPABILITY_QUERY         (0x6B)
2  END_SYSEX                (0xF7)
回應資料為:
0  START_SYSEX              (0xF0)
1  CAPABILITY_RESPONSE      (0x6C)
2  1st supported mode of pin 0
3  1st mode's resolution of pin 0
4  2nd supported mode of pin 0
5  2nd mode's resolution of pin 0
... additional modes/resolutions, followed by `0x7F`,
    to mark the end of the pin's modes. Subsequently, each pin
    follows with its modes/resolutions and `0x7F`,
    until all pins are defined.
N  END_SYSEX                (0xF7)
從以上說明可以得知:
[ 0xF0, 0x6B, 0xF7 ]
0x6C 之後會接續其腳位內容。0x7F 分隔每個腳位內容。這個資料不像版本編號與名稱那樣,開啟 COM 就會自動回傳,需要主動發送查詢命令才行,所以我們在 port-transceiver.js 增加發送命令的功能吧。
需要在 firmata.js 新增一個取得命令資料內容的方法。
新增檔案 cmd-define.js,定義 cmd 名稱與內容。
src\script\firmata\cmd-define.js
export default [
  // queryCapability: 查詢所有腳位與功能
  {
    key: 'queryCapability',
    getValue() {
      return [0xF0, 0x6B, 0xF7];
    },
  },
]
並在 firmata.js 新增 getCmdBytes() Method。
src\script\firmata\firmata.js
/**
 * @typedef {Object} ResponseParseResult 回應資料解析結果
 * @property {string} key 回應 key
 * @property {string} eventName 事件名稱
 * @property {number[]} oriBytes 原始回應值
 * @property {Object} data 解析完成資料
 */

import responsesDefine from '@/script/firmata/response-define';
import cmdsDefinie from '@/script/firmata/cmd-define';

export default {
  // ...

  /** 取得命令資料
   * @param {String} cmdKey
   * @param {Object} params
   * @return {Number[]}
   */
  getCmdBytes(cmdKey, params) {
    const target = cmdsDefinie.find(({ key }) =>
      key === cmdKey
    );
    if (!target) {
      throw new Error(`${cmdKey} 命令不存在`);
    }

    return target.getValue(params);
  },
}
再來調整 port-transceiver.js 內容:
addCmd() Method,finishReceive() 增加 emit 事件 undefined-response,沒有成功解析回應內容時觸發。src\script\modules\port-transceiver.js
/**
 * @typedef {Object} CmdQueueItem 命令項目
 * @property {string} key 命令 key
 * @property {Object} params 命令參數
 * @property {numver[]} values 命令數值
 */

// ...

export default class extends EventEmitter2.EventEmitter2 {
  /** @type {CmdQueueItem[]} */
  cmdsQueue = []; // 命令佇列

  // ...

  /** 完成接收,emit 已接收資料 */
  finishReceive() {
    // 解析回應內容
    const results = firmata.parseResponse(this.receiveBuffer);
    if (results.length === 0) {
      this.emit('undefined-response', this.receiveBuffer);
      this.receiveBuffer.length = 0;
      return;
    }

    // ...
  }

  /** 加入發送命令
   * @param {string} cmdKey
   * @param {Object} params
   */
  addCmd(cmdKey, params = null) {
    const cmdValues = firmata.getCmd(cmdKey, params);

    /** @type {CmdQueueItem} */
    const queueItem = {
      key: cmdKey,
      params,
      values: cmdValues,
    }

    // console.log(`[ addCmd ] queueItem : `, queueItem);

    this.cmdsQueue.push(queueItem);
    return queueItem;
  }
}
最後回到 app.vue,增加以下內容。
portTransceiver.on('ready') 事件中,發送 queryFirmware 命令。portTransceiver.on('undefined-response') 事件,觀察有沒有接收到未定義資料。/**
* @typedef {import('@/script/modules/port-transceiver').default} PortTransceiver
*/
import { mapState } from 'vuex';
import DialogSystemSetting from '@/components/dialog-system-setting.vue';
export default {
name: 'App',
// ...
methods: {
initTransceiver() {
// ...
portTransceiver.on('ready', (data) => {
// ...
portTransceiver.addCmd('queryCapability');
});
portTransceiver.on('undefined-response', (data) => {
console.log(`[ portTransceiver on undefined-response ] data : `, data);
});
// ...
},
},
};
嘗試看看會不會有訊息出現。
成功取得回應!
現在我們來仔細分析看看回應內容,將收到的數值轉成 16 進位來看:
F0 6C 7F 7F 00 01 0B 01 01 01 04 0E 7F 00 01 0B 01 01 01 03 08 04 0E 7F 00 01 0B 01 01 01 04 0E 7F 00 01 0B 01 01 01 03 08 04 0E 7F 00 01 0B 01 01 01 03 08 04 0E 7F 00 01 0B 01 01 01 04 0E 7F 00 01 0B 01 01 01 04 0E 7F 00 01 0B 01 01 01 03 08 04 0E 7F 00 01 0B 01 01 01 03 08 04 0E 7F 00 01 0B 01 01 01 03 08 04 0E 7F 00 01 0B 01 01 01 04 0E 7F 00 01 0B 01 01 01 04 0E 7F 00 01 0B 01 01 01 02 0A 04 0E 7F 00 01 0B 01 01 01 02 0A 04 0E 7F 00 01 0B 01 01 01 02 0A 04 0E 7F 00 01 0B 01 01 01 02 0A 04 0E 7F 00 01 0B 01 01 01 02 0A 04 0E 06 01 7F 00 01 0B 01 01 01 02 0A 04 0E 06 01 7F F7
將資料依照命令特徵與分隔符號(0x7F)換行並加上對應腳位編號,方便分析。
      F0 6C
 0    7F
 1    7F
 2    00 01 0B 01 01 01 04 0E 7F
 3    00 01 0B 01 01 01 03 08 04 0E 7F
 4    00 01 0B 01 01 01 04 0E 7F
 5    00 01 0B 01 01 01 03 08 04 0E 7F
 6    00 01 0B 01 01 01 03 08 04 0E 7F
 7    00 01 0B 01 01 01 04 0E 7F
 8    00 01 0B 01 01 01 04 0E 7F
 9    00 01 0B 01 01 01 03 08 04 0E 7F
10    00 01 0B 01 01 01 03 08 04 0E 7F
11    00 01 0B 01 01 01 03 08 04 0E 7F
12    00 01 0B 01 01 01 04 0E 7F
13    00 01 0B 01 01 01 04 0E 7F
14    00 01 0B 01 01 01 02 0A 04 0E 7F
15    00 01 0B 01 01 01 02 0A 04 0E 7F
16    00 01 0B 01 01 01 02 0A 04 0E 7F
17    00 01 0B 01 01 01 02 0A 04 0E 7F
18    00 01 0B 01 01 01 02 0A 04 0E 06 01 7F
19    00 01 0B 01 01 01 02 0A 04 0E 06 01 7F
20    7F
可以很明確地看出腳位 0、1 不支援使用任何功能,接著再來看腳位功能。
因為 0、1 腳位固定作為 UART 通訊使用,所以不開放使用其他功能。
否則就不能正常通訊了 (́◉◞౪◟◉‵)
由說明可知「腳位模式(Mode)」與「模式解析度(Mode Resolution)」兩兩成對出現,所以把剛才的資料去蕪存菁後分類一下。
 2    (00 01) (0B 01) (01 01) (04 0E) 7F
 3    (00 01) (0B 01) (01 01) (03 08) (04 0E) 7F
 4    (00 01) (0B 01) (01 01) (04 0E) 7F
 5    (00 01) (0B 01) (01 01) (03 08) (04 0E) 7F
 6    (00 01) (0B 01) (01 01) (03 08) (04 0E) 7F
 7    (00 01) (0B 01) (01 01) (04 0E) 7F
 8    (00 01) (0B 01) (01 01) (04 0E) 7F
 9    (00 01) (0B 01) (01 01) (03 08) (04 0E) 7F
10    (00 01) (0B 01) (01 01) (03 08) (04 0E) 7F
11    (00 01) (0B 01) (01 01) (03 08) (04 0E) 7F
12    (00 01) (0B 01) (01 01) (04 0E) 7F
13    (00 01) (0B 01) (01 01) (04 0E) 7F
14    (00 01) (0B 01) (01 01) (02 0A) (04 0E) 7F
15    (00 01) (0B 01) (01 01) (02 0A) (04 0E) 7F
16    (00 01) (0B 01) (01 01) (02 0A) (04 0E) 7F
17    (00 01) (0B 01) (01 01) (02 0A) (04 0E) 7F
18    (00 01) (0B 01) (01 01) (02 0A) (04 0E) (06 01) 7F
19    (00 01) (0B 01) (01 01) (02 0A) (04 0E) (06 01) 7F
看起來清楚多了,接著再比對模式代號表與解析度說明
腳位模式(Mode)
DIGITAL_INPUT      (0x00)
DIGITAL_OUTPUT     (0x01)
ANALOG_INPUT       (0x02)
PWM                (0x03)
SERVO              (0x04)
SHIFT              (0x05)
I2C                (0x06)
ONEWIRE            (0x07)
STEPPER            (0x08)
ENCODER            (0x09)
SERIAL             (0x0A)
INPUT_PULLUP       (0x0B)

// Extended modes
SPI                (0x0C)
SONAR              (0x0D)
TONE               (0x0E)
DHT                (0x0F)
模式解析度(Mode Resolution)
// resolution is 1 (binary)
DIGITAL_INPUT      (0x00)

// resolution is 1 (binary)
DIGITAL_OUTPUT     (0x01)

// analog input resolution in number of bits
ANALOG_INPUT       (0x02)

// pwm resolution in number of bits
PWM                (0x03)

// servo resolution in number of bits
SERVO              (0x04)

// resolution is number number of bits in max number of steps
STEPPER            (0x08)

// resolution is 1 (binary)
INPUT_PULLUP       (0x0B)
我們可以發現所有可用的腳位都支援「數位輸入(DIGITAL_INPUT 0x00)」與「上拉數位輸入(INPUT_PULLUP 0x0B)」!
最後我們透過已知的資訊,反證看看判讀有沒有錯誤。
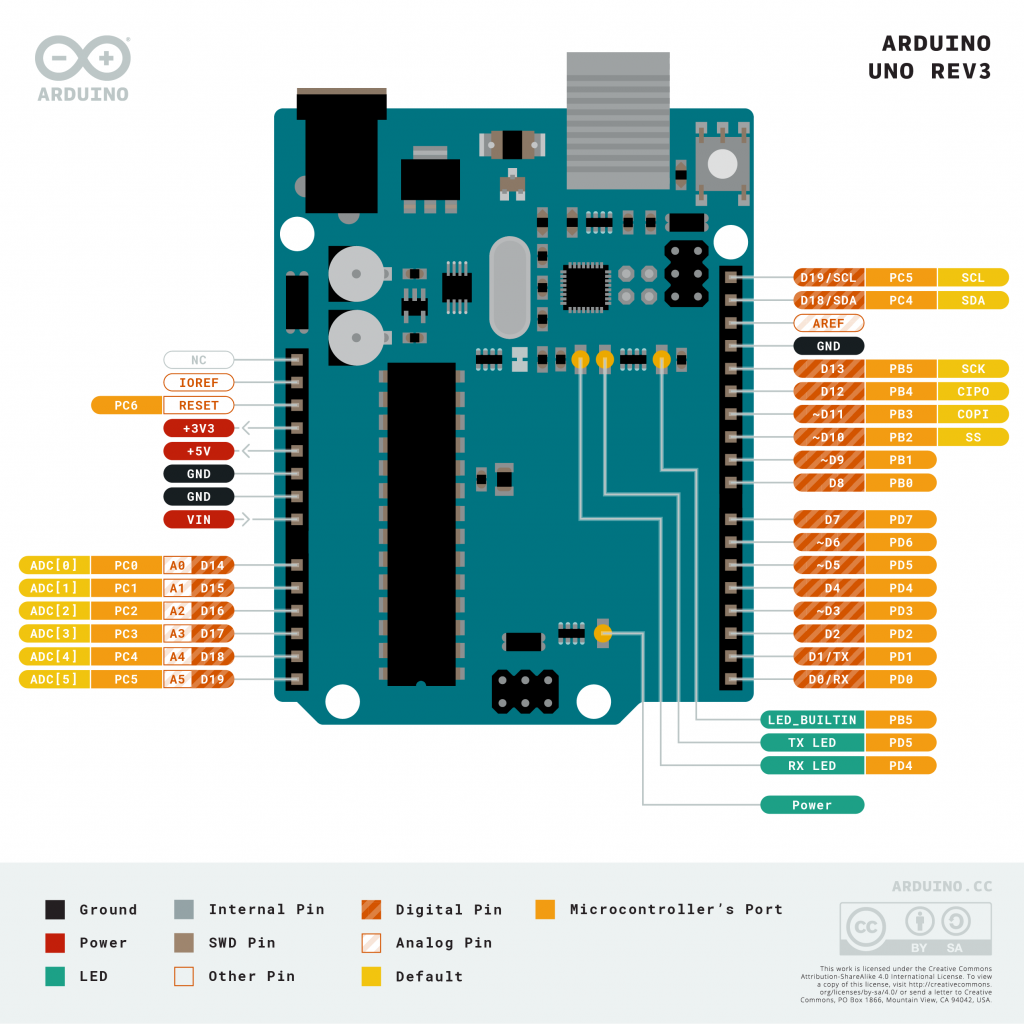
用過 Arduino Uno 的人應該都知道,Uno 比較特別的腳位功能為:
如上圖所示。
回過頭來看看,剛剛的資料是不是相符:
 2    (00 01) (0B 01) (01 01) (04 0E) 7F
 3    (00 01) (0B 01) (01 01) ~(03 08) (04 0E) 7F
 4    (00 01) (0B 01) (01 01) (04 0E) 7F
 5    (00 01) (0B 01) (01 01) ~(03 08) (04 0E) 7F
 6    (00 01) (0B 01) (01 01) ~(03 08) (04 0E) 7F
 7    (00 01) (0B 01) (01 01) (04 0E) 7F
 8    (00 01) (0B 01) (01 01) (04 0E) 7F
 9    (00 01) (0B 01) (01 01) ~(03 08) (04 0E) 7F
10    (00 01) (0B 01) (01 01) ~(03 08) (04 0E) 7F
11    (00 01) (0B 01) (01 01) ~(03 08) (04 0E) 7F
12    (00 01) (0B 01) (01 01) (04 0E) 7F
13    (00 01) (0B 01) (01 01) (04 0E) 7F
14    (00 01) (0B 01) (01 01) *(02 0A) (04 0E) 7F
15    (00 01) (0B 01) (01 01) *(02 0A) (04 0E) 7F
16    (00 01) (0B 01) (01 01) *(02 0A) (04 0E) 7F
17    (00 01) (0B 01) (01 01) *(02 0A) (04 0E) 7F
18    (00 01) (0B 01) (01 01) *(02 0A) (04 0E) (06 01) 7F
19    (00 01) (0B 01) (01 01) *(02 0A) (04 0E) (06 01) 7F
可以看到判讀結果與現有已知的資料一致,太令人感動惹。。・゚・(つд`゚)・゚・
接下來我們來依據資料分析所有腳位功能。
以 Pin 2 為例:
2 (00 01) (0B 01) (01 01) (04 0E)
比對「腳位模式(Mode)」與「模式解析度(Mode Resolution)」後,可以知道 Pin 2 支援的功能有:
0x00),解析度 1 bit(0x01)0x0B),解析度 1 bit(0x01)0x01),解析度 1 bit(0x01)0x04),解析度 14 bit(0x0E)其他腳位以此類推,所以我們成功讀懂腳位功能回應資料了,接下來就是在 response-define.js 增加回應定義,並將剛才的分析過程轉換成 getData() 的解析程式。
由於需要將矩陣進行分割,所以在 utils.js 新增 arraySplit(),可以根據指定元素分割矩陣。(邏輯同 String.split())
src\script\utils\utils.js
// ...

/** 根據指定元素分割矩陣
 * separator 不會包含在矩陣中
 * @param {Array} array
 * @param {*} separator
 */
export function arraySplit(array, separator) {
  const allIndex = indexOfAll(array, separator);

  if (allIndex.length === 0) {
    return [array];
  }

  const initArray = [];

  const part = array.slice(0, allIndex[0]);
  initArray.push(part);

  const result = allIndex.reduce((acc, pos, index) => {
    const start = pos;
    const end = allIndex?.[index + 1] ?? null;

    // end 不存在表示為最後一個
    if (end === null) {
      const part = array.slice(start + 1);
      acc.push(part);
      return acc;
    }

    const part = array.slice(start + 1, end);
    acc.push(part);
    return acc;
  }, initArray);

  return result;
}
接著引用 arraySplit(),完成功能。src\script\firmata\response-define.js
import { arraySplit, matchFeature } from '@/script/utils/utils';

export default [
  // ...

  // capabilitieResponse:
  {
    key: 'capabilitieResponse',
    eventName: 'info',
    /**
     * @param {number[]} res
     */
    matcher(res) {
      const featureBytes = [0xF0, 0x6C];
      return matchFeature(res, featureBytes);
    },
    /**
     * @param {number[]} valuesIn
     */
    getData(valuesIn) {
      const values = valuesIn.filter((byte) => {
        return ![0xF0, 0x6C, 0xF7].includes(byte);
      });

      const pinParts = arraySplit(values, 0x7F);

      const pins = pinParts.map((pinPart, index) => {
        // 每 2 個數值一組
        const modeParts = [];
        for (let i = 0; i < pinPart.length; i += 2) {
          modeParts.push(pinPart.slice(i, i + 2));
        }

        // 第一個數值為模式,第二個數值為解析度
        const capabilities = modeParts.map((modePart) => {
          const [mode, resolution] = modePart;
          return {
            mode, resolution
          }
        });

        return {
          number: index,
          capabilities,
        }
      });

      return {
        pins
      };
    },
  },
]
接著在 board.store.js 中新增變數 pins,儲存 capabilitieResponse 回應資料。
src\store\modules\board.store.js
/**
 * 管理 Firmata 版本、Pin 清單等等 MCU 開發版相關資料
 */

// ...

/** @type {Module} */
const self = {
  namespaced: true,
  state: () => ({
    info: {
      ver: null,
      firmwareName: null,
      pins: [],
    },

  }),
  // ...
};

export default self;
試試看有沒有成功。

成功取得 Arduino Uno 腳位清單與功能!
打開 Firmata Protocol,在「Analog Mapping Query」章節可以找到相關說明。
Analog messages are numbered 0 to 15, which traditionally refer to the Arduino pins labeled A0, A1, A2, etc. However, these pins are actually configured using "normal" pin numbers in the pin mode message, and when those pins are used for non-analog functions. The analog mapping query provides the information about which pins (as used with Firmata's pin mode message) correspond to the analog channels.
查詢命令為:
0  START_SYSEX              (0xF0)
1  analog mapping query     (0x69)
2  END_SYSEX                (0xF7)
回應資料為:
0  START_SYSEX              (0xF0)
1  analog mapping response  (0x6A)
2  analog channel corresponding to pin 0, or 127 if pin 0 does not support analog
3  analog channel corresponding to pin 1, or 127 if pin 1 does not support analog
4  analog channel corresponding to pin 2, or 127 if pin 2 does not support analog
... etc, one byte for each pin
N  END_SYSEX                (0xF7)
從以上說明可以得知:
[ 0xF0, 0x69, 0xF7 ]
0x6A 之後會接續映射資料。一樣先新增命令。
src\script\firmata\cmd-define.js
export default [
  // queryCapability: 查詢所有腳位與功能
  { ... },

  // queryAnalogMapping: 查詢類比腳位映射
  {
    key: 'queryAnalogMapping',
    getValue() {
      return [0xF0, 0x69, 0xF7];
    },
  },
]
接著在 app.vue 之 portTransceiver.on('ready') 增加發送命令。
讓 addCmd('queryCapability') 與上一個 addCmd('queryAnalogMapping') 命令之前延遲一小段時間,讓回應兩個命令的回應不要連在一起。
先在 src\script\utils\utils.js 新增 delay()
// ...

/** 延遲指定毫秒
 * @param {number} millisecond
 */
export function delay(millisecond) {
  return new Promise((resolve) => {
    setTimeout(() => {
      resolve();
    }, millisecond);
  });

}
接著在 src\app.vue 加入命令。
// ...

import { delay } from '@/script/utils/utils';

export default {
  name: 'App',
  // ...
  methods: {
    initTransceiver() {
      // ...

      portTransceiver.once('ready',async (data) => {
        // ...

        portTransceiver.addCmd('queryCapability');
        await delay(100);
        portTransceiver.addCmd('queryAnalogMapping');
      });

      // ...
    },
  },
};

命令發送成功!
接下來將內容轉為 16 進位後分析一下。
F0 6A 7F 7F 7F 7F 7F 7F 7F 7F 7F 7F 7F 7F 7F 7F 00 01 02 03 04 05 F7
依照文檔說明換行並加上對應腳位編號。
      F0 6A
 0    7F
 1    7F
 2    7F
 3    7F
 4    7F
 5    7F
 6    7F
 7    7F
 8    7F
 9    7F
10    7F
11    7F
12    7F
13    7F
14    00
15    01
16    02
17    03
18    04
19    05
      F7
清楚明瞭的表示映射關係為:
其他以此類推。
再來就是實際解析回應資料。
src\script\firmata\response-define.js
import { arraySplit, matchFeature } from '@/script/utils/utils';

export default [
  // ...

  // analogPinMappingResponse:
  {
    key: 'analogPinMappingResponse',
    eventName: 'info',
    /**
     * @param {number[]} res
     */
     matcher(res) {
      const featureBytes = [0xF0, 0x6A];
      return matchFeature(res, featureBytes);
    },
    /**
     * @param {number[]} values
     */
    getData(values) {
      const index = values.findIndex(byte => byte === 0x6A);

      const dataBytes = values.slice(index + 1, -1);

      const analogPinMap = dataBytes.reduce((map, byte, index) => {
        if (byte === 127) {
          return map;
        }

        map[`${index}`] = byte;
        return map;
      }, {});

      return { analogPinMap };
    },
  },
]
並在 Vuex board.store.js 中新增變數 analogPinMap,儲存 analogPinMappingResponse 回應資料。
src\store\modules\board.store.js
/**
 * 管理 Firmata 版本、Pin 清單等等 MCU 開發版相關資料
 */

// ...

/** @type {Module} */
const self = {
  namespaced: true,
  state: () => ({
    info: {
      ver: null,
      firmwareName: null,
      pins: [],
      analogPinMap: {},
    },

  }),
  // ...
};

export default self;
實測看看。

成功取得腳位映射資料 ✧*。٩(ˊᗜˋ*)و✧*。,接下來準備打開第一扇窗!
以上程式碼已同步至 GitLab,大家可以前往下載:

