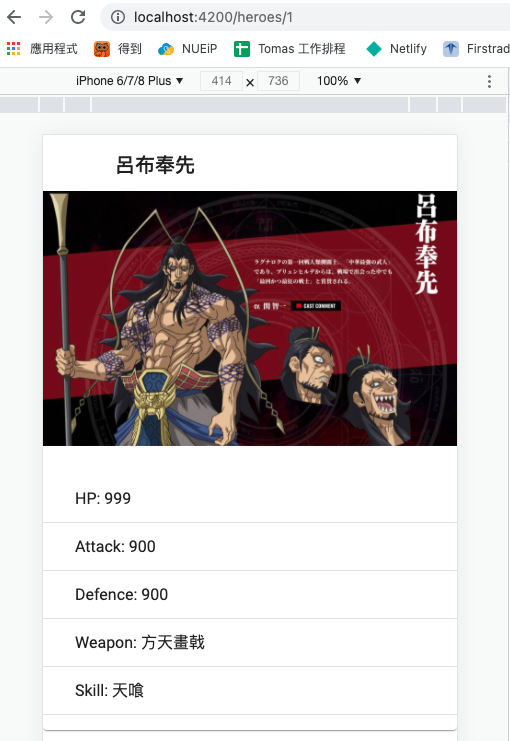
昨天我們完成了英雄細節元件 HeroDetailComponent,並且使用屬性繫結(property binding)的方式來顯示所選取的英雄細節資料。今天,我們將使用另外一個方式來實作瀏覽英雄細節的機制——我們將使用路由導航的方式。此外,我也將過去完成的程式碼放到 Github 上,需要瀏覽程式碼整體的話可以參考,之後的文章中的程式碼僅會服務於說明用途,希望這樣可以讓版面的重點更容易凸顯出來。
現在專案中共使用三個元件:
目前並沒有配置任何路由,唯一做為頁面顯示的是根元件 AppComponent。我們希望完成下列的路由配置:
/heros/:heroId 則導航到 HeroDeatilComponent以下為實作步驟:
ng generate module app-routing --flat --module=app
// --flat 將這個檔案放盡 src/app 中。
// --module=app 讓 AppModule 自動匯入 AppRoutingModule
import { NgModule } from '@angular/core';
import { RouterModule, Routes } from '@angular/router';

import { HeroDetailComponent } from './hero-detail/hero-detail.component';
import { HeroListComponent } from './hero-list/hero-list.component';

const routes: Routes = [
  {
    path: '',
    redirectTo: '/heroes',
    pathMatch: 'full'
  },
  {
    path: 'heroes',
    children: [
      {
        path: '',
        component: HeroListComponent
      },
      {
        path: ':id',
        component: HeroDetailComponent,
      }
    ]
  },
]

@NgModule({
  imports: [
    RouterModule.forRoot(routes)
  ],
  exports: [
    RouterModule
  ]
})
export class AppRoutingModule { }
這個路由配置的規劃是,原本我們將 HeroListComponent(所有英雄的列表)和 HeroDetailComponent(單一英雄資訊)放在同一個畫面上顯示。現在,我們將他們拆分為兩個頁面,'/heroes' 可以瀏覽英雄列表,而'/heroes/:id' 將顯示單個英雄的詳細資訊。為了完成這件事,首先,我們移除原本在 HeroListComponent 使用 HeroDetailComponent 的程式碼:
<-- TODO: 刪除使用 HeroDetailComponent -->
<-- <app-hero-detail [hero]="selectedHero"></app-hero-detail> -->
接著我們要改變原先透過屬性繫結(property binding)將英雄資料傳遞給 HeroDetailComponent 的機制,改為向後端請求特定英雄的資料。
!!先前在建構 mock db 資料時,將 heroes 誤拼為 heros,現已調整 db.json 為正確拼法。
我們先回顧一下,在 AppRoutingModule 是如何配置 HeroDetailComponent 的路由:
  {
    path: 'heroes',
    children: [
      {
        path: '',
        component: HeroListComponent
      },
      {
        path: ':id',
        component: HeroDetailComponent,
      }
    ]
  },
在 'heroes' 下配置了子路由(children):
了解路由配置後,來看看我們是如何導向 '/heroes/{heroId}' 的。打開 HeroListComponent 檔案,將原本的"瀏覽細節"按鈕程式碼改為下面這樣:
    <mat-card-actions>
      <button mat-button [routerLink]="'/heroes/' + hero.id">瀏覽細節</button>
      <button mat-button>SHARE</button>
    </mat-card-actions>
[routerLink] 是 AppRoutingModule 提供的指令(directive),因為我們已在 AppModule 匯入 AppRoutingModule,所以可以使用這個指令。如果沒有匯入的話,這裡的程式碼就會報錯。
我們可以看到,這裡的程式碼告訴 [routerLink],點擊這個按鈕的話,要前往 '/heroes/ + hero.id' 路由,這與剛剛所設定的 HeroDetailComponent 的 Path 是相符的,因此就會切換到該路由去。而 hero.id 就是取自英雄列表的資料當中,因此,接下來的任務就是:
調整後的完整 Hero-detail.component.ts 程式碼如下:
import { HttpClient } from '@angular/common/http';
import { Component, OnInit } from '@angular/core';

import { ActivatedRoute } from '@angular/router';

import { Hero } from '../shared/models/hero.model';

@Component({
  selector: 'app-hero-detail',
  templateUrl: './hero-detail.component.html',
  styleUrls: ['./hero-detail.component.css']
})
export class HeroDetailComponent implements OnInit {

 hero: Hero | null = null;

  constructor(
    private http: HttpClient,
    private route: ActivatedRoute
  ) { }

  ngOnInit(): void {
    const heroId = this.route.snapshot.paramMap.get('id')!;
    this.getHero(heroId);
  }

  private getHero(id: string): void {
    this.http.get<Hero>(`api/heroes/${id}`).subscribe((selectedHero) => {
      this.hero = selectedHero;
    })
  }

}
可以看到在 ngOnInit 生命週期中,從路由取得參數 id 的方式是這樣:
  constructor(
    private http: HttpClient,
    private route: ActivatedRoute
  ) { }

  ngOninit(): void {
      const heroId = this.route.snapshot.paramMap.get('id')!;
      this.getHero(heroId);
  }
在建構式中注入 ActivatedRoute,這讓我們可以取得當前路由的相關資訊。因此,我們使用 snapshot(當前路由的快照)裡的 paramMap提供的方法 get 來取得 id。
取得 id 後,將其作為參數,發送 Http 請求取得特定的英雄資料:
  private getHero(id: string): void {
    this.http.get<Hero>(`api/heroes/${id}`).subscribe((selectedHero) => {
      this.hero = selectedHero;
    })
這樣當我們點擊 "瀏覽細節" 按鈕時,就可以訪問新的英雄細節路由了:

程式碼已放上Github。
