JS 30 是由加拿大的全端工程師 Wes Bos 免費提供的 JavaScript 簡單應用課程,課程主打 No Frameworks、No Compilers、No Libraries、No Boilerplate 在30天的30部教學影片裡,建立30個JavaScript的有趣小東西。
另外,Wes Bos 也很無私地在 Github 上公開了所有 JS 30 課程的程式碼,有興趣的話可以去 fork 或下載。
當滑鼠移入<a>所代表的連結時,快速移動一個白框,產生文字背景為白底的聚光燈效果。

總共分成兩個部分,一個是上方的導覽列(.menu),另一個是放置眾多文字段落和連結的容器(.wrapper)。
<nav>
    <ul class="menu">
        <li><a href="">Home</a></li>
        <li><a href="">Order Status</a></li>
        <li><a href="">Tweets</a></li>
        <li><a href="">Read Our History</a></li>
        <li><a href="">Contact Us</a></li>
    </ul>
</nav>

<div class="wrapper">
    <p>Lorem ipsum dolor sit amet, <a href="">consectetur</a> adipisicing elit. Est <a href="">explicabo</a> unde natus necessitatibus esse obcaecati distinctio, aut itaque, qui vitae!</p>
    <p>Aspernatur sapiente quae sint <a href="">soluta</a> modi, atque praesentium laborum pariatur earum <a href="">quaerat</a> cupiditate consequuntur facilis ullam dignissimos, aperiam quam veniam.</p>
    <p>Cum ipsam quod, incidunt sit ex <a href="">tempore</a> placeat maxime <a href="">corrupti</a> possimus <a href="">veritatis</a> ipsum fugit recusandae est doloremque? Hic, <a href="">quibusdam</a>, nulla.</p>
    <p>Esse quibusdam, ad, ducimus cupiditate <a href="">nulla</a>, quae magni odit <a href="">totam</a> ut consequatur eveniet sunt quam provident sapiente dicta neque quod.</p>
    <p>Aliquam <a href="">dicta</a> sequi culpa fugiat <a href="">consequuntur</a> pariatur optio ad minima, maxime <a href="">odio</a>, distinctio magni impedit tempore enim repellendus <a href="">repudiandae</a> quas!</p>
</div>
在這邊先破梗一下,類似聚光燈的白底效果,其實是靠在文件上新增一個<span>來達成。
這次的 CSS 很重要,需要稍微說明一下。
.highlight 這個 class 選擇器,是要用來加到前面說的那個<span>。
在滑鼠移動到<a>元素裡面的時候,我們會利用 JS 取得<a>元素的寬、高,還有元素離視窗上方(top)、左方的距離(left),讓<span>的寬、高和目前所在的<a>元素一致且因為設定<span>的position: absolute;,所以可以利用取得的top、left,令<span>和<a>貼在一起。
為避免<span>貼到和<a>同一個位置造成覆蓋,我們把z-index設為-1,讓<a>在上層而<span>在下層,最後設定background: white;,此時會發現<span>完全變成<a>的背景了呢~
.highlight {
  transition: all 0.2s;
  border-bottom: 2px solid white;
  position: absolute;
  top: 0;
  background: white;
  left: 0;
  z-index: -1;
  border-radius: 20px;
  display: block;
  box-shadow: 0 0 10px rgba(0,0,0,0.2);
}
宣告常數triggerts用來放置所有取得的<a>元素(NodeList)。
宣告常數highlight用來放置我們建立的<span>元素。
const triggers = document.querySelectorAll('a');
const highlight = document.createElement('span');
把.highlight這個 CSS class 選擇器套用到新建的<span>元素,然後將其加入到body裡面
highlight.classList.add('highlight');
document.body.append(highlight);
我們希望在移入<a>時觸發事件處理函式highlightlink(),所以利用forEach()在每個<a>上註冊mouseenter event listener。
function highlightLink(){}

triggers.forEach(trigger => trigger.addEventListener('mouseenter',highlightLink));
在事件處理函式highlightLink()裡,我們首先要做的就是取得先前提到滑鼠移入的那個<a>標籤的寬、高和它離視窗上方(top)、左方(left)的距離。
function highlightLink(){
      const linkCoords = this.getBoundingClientRect();
      console.log(linkCoords);
}
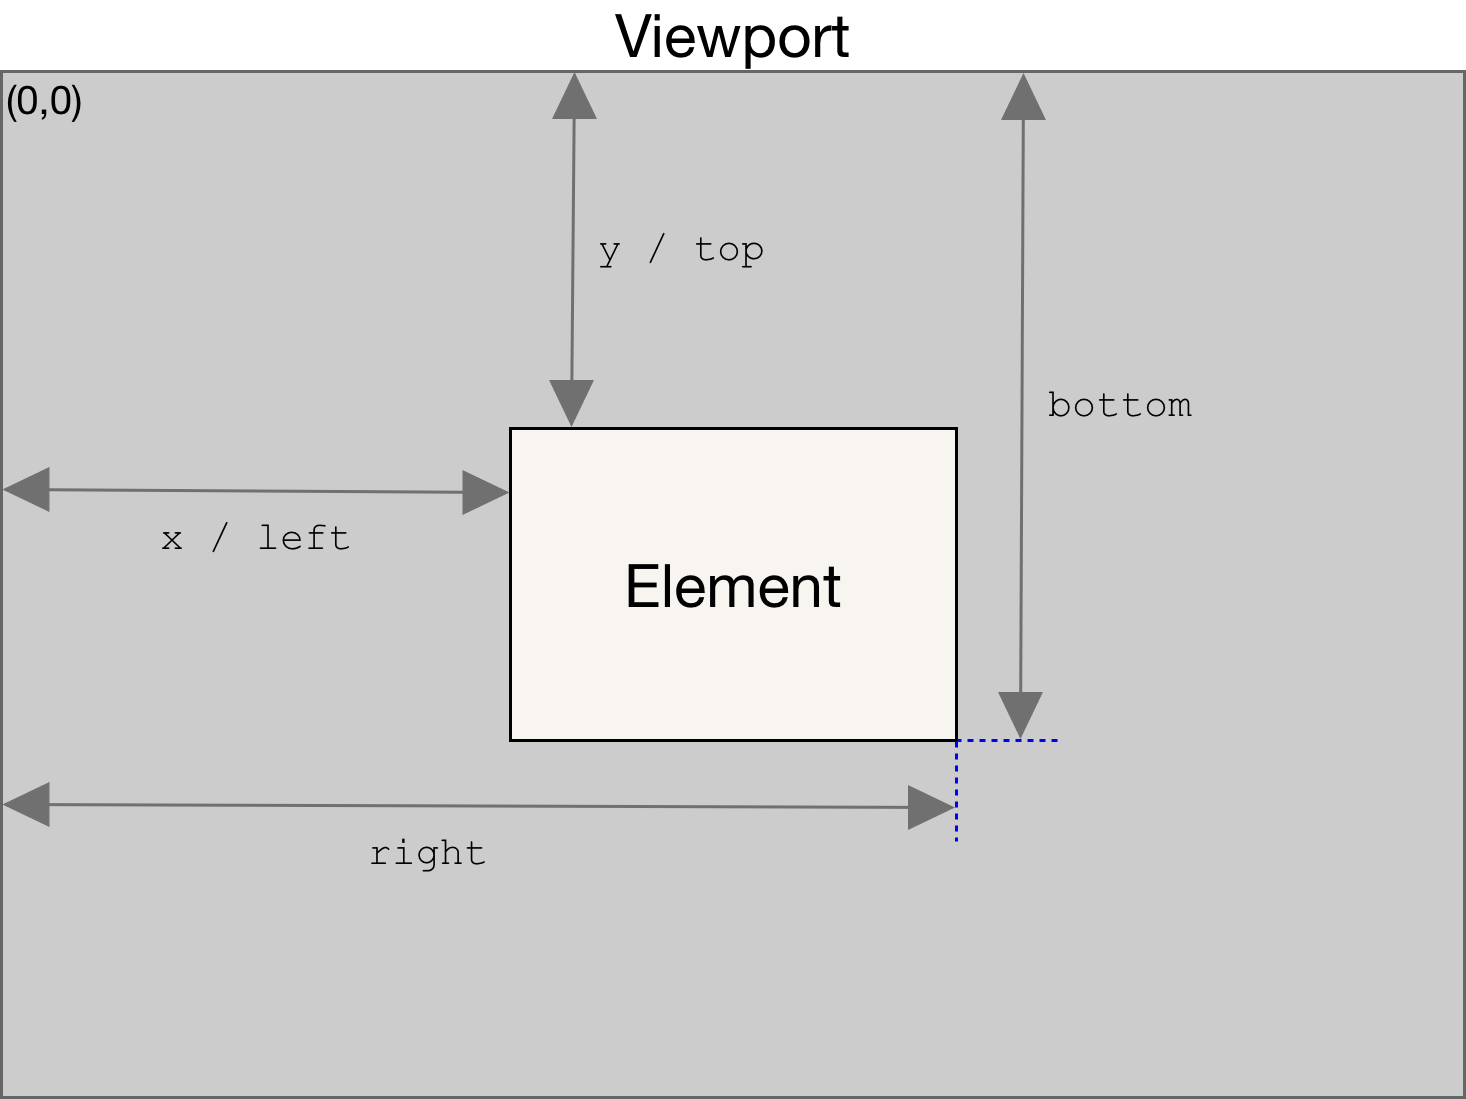
Element.getBoundingClientRect() :
這個方法會回傳一個DOMRect物件,DOMRect本身是一個可以包住該元素的最小方形(包含padding、borderWidth),而從這個物件可以得知呼叫元素的width、height、left、top、bottom等等...。
接下來,我們依序指定<span>元素的寬高和位置,讓它的寬高和位置與滑鼠移入的<a>相同。(一定要記得加上單位喔!)
function highlightLink(){
    /*上略...*/
    highlight.style.width = `${linkCoords.width}px`;
    highlight.style.height = `${linkCoords.height}px`;
    highlight.style.top = `${linkCoords.top}px`;
    highlight.style.left = `${linkCoords.left}px`;
}
嗯,看起來還蠻正常的落在soluta。
(捲軸往下拉) 滑鼠一樣移到soluta,但<span>卻浮在更上面的位置。
會有這樣的問題出現是因為DOMRect始終是以初始視窗的左上角計算元素的top和left,當我們把捲軸往下拉,它的位置沒有加上捲軸的移動量,自然就會出現在較上方的位置。
下面我們對left、top進行修正,分別加上x和y方向的捲軸移動量,這樣就完成了。
function highlightLink(){
    /*上略...*/
    highlight.style.width = `${linkCoords.width}px`;
    highlight.style.height = `${linkCoords.height}px`;
    highlight.style.top = `${linkCoords.top + window.scrollY}px`;
    highlight.style.left = `${linkCoords.left + window.scrollX}px`;
}
當然我們也可以把這些屬性值都寫到一個物件裡,再個別呼叫物件屬性。
function highlightLink(){
    /*上略...*/
    const coords = {
        width: linkCoords.width,
        height: linkCoords.height,
        top: linkCoords.top + window.scrollY,
        left: linkCoords.left + window.scrollX
    }

    highlight.style.width = `${coords.width}px`;
    highlight.style.height = `${coords.height}px`;
    highlight.style.top = `${coords.top}px`;
    highlight.style.left = `${coords.left}px`;

}
Element.getBoundingClientRect()
DOMRect
今天的內容也相對簡單,相信大家都可以輕鬆愉快的學習~