=x= 🌵 COMPANY - About Us 前台頁面後端功能製作。
📌 在 COMPANY 頁面的側邊欄,可以發現是獨立對應 company.html 及 company1.html 頁面,而我們在後台製作時也都把要用到的資料都準備好了,在這裡只要把資料從資料庫撈出來就好,資料區塊分類如果忘記,可以直接參考昨天的拆解。
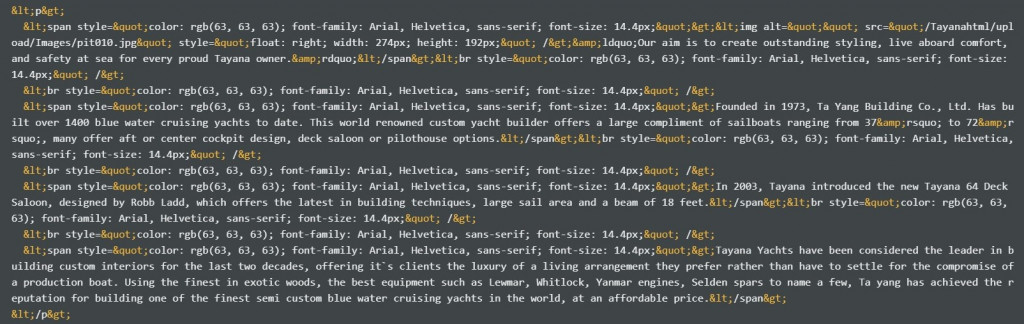
🧠 這個 About Us 頁面的內容在後台是用 WYSIWYG Editor 存下來的內容是 HTML 編碼,然後使用 HtmlEncode() 方法將特殊符號改成 字元實體參照 (character entity reference) 存起來,最後存在資料庫的內容就會變成下面這樣 :
🌵 記得後面要使用時要用HtmlDecode() 轉回 HTML 標籤內容。
👀 特殊符號編碼 : 字元實體(character entities)
<head> 及 <body> 內的內容分別複製到 .aspx檔案中。protected void Page_Load(object sender, EventArgs e)
{
if (!IsPostBack) {
loadContent();
}
}
private void loadContent()
{
//從資料庫取資料
SqlConnection connection = new SqlConnection(WebConfigurationManager.ConnectionStrings["TayanaYachtConnectionString"].ConnectionString);
string sqlCountry = "SELECT TOP 1 aboutUsHtml FROM Company";
SqlCommand command= new SqlCommand(sqlCountry, connection);
connection.Open();
SqlDataReader reader = command.ExecuteReader();
if (reader.Read()) {
//渲染畫面
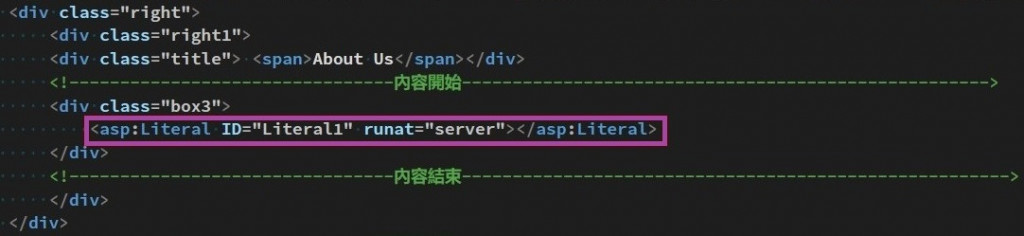
Literal1.Text = HttpUtility.HtmlDecode(reader["aboutUsHtml"].ToString());
}
connection.Close();
}
🌵 記得要使用 HttpUtility.HtmlDecode() 轉成 HTML 標籤內容。
👀 微軟官方資源 : HttpUtility.HtmlEncode 方法
📢 這頁的內容因為有獨立的 WYSIWYG Editor 內容,所以可以完整的練習到,如何一口氣將後台存放的資料送出到前台畫面,參考 Day 10 的文字編輯器後台製作方式,及對應今天的實作內容,可以完整知道 WYSIWYG Editor 的應用方式。