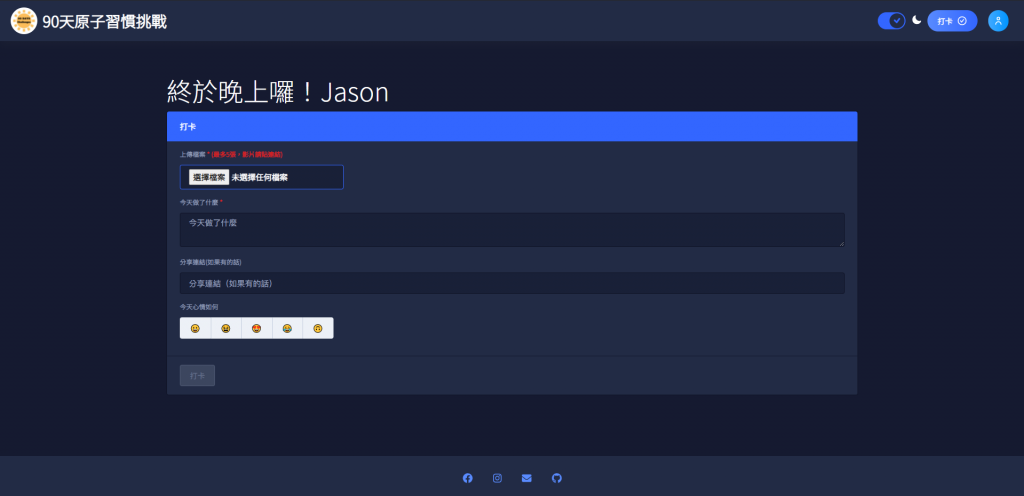
在前幾天接觸新的工具、新的方法,使用不同的套件,現在終於要回到side project 最初的目標- 製作打卡系統

現在要回到前端工程師的老本行之一,刻一個前端頁面,提供使用者可以上傳今日 進步1%努力的證明,順便分享一些話、一些連結與完成的心情。
所以這個頁面要包含以下功能
(必填)
(必填)
另外只有上傳照片和描述今天做了什麼是必填,除此之外,其他都是選填。只有當必填的選項填完之後,打卡的按鈕才會從disable狀態轉為可以點擊的狀態。
以上這個就是需求,那麼就開始吧。
<div class="container">
  <div class="row">
    <div class="col col-12">
      <ng-container [formGroup]="checkinForm">
        <nb-card
          status="primary"
          [nbSpinner]="isLoading"
          nbSpinnerSize="giant"
          nbSpinnerStatus="info"
        >
          <nb-card-header>打卡</nb-card-header>
          <nb-card-body>
            <div class="custom-input-group">
              <label for="checkin-file" class="label"
                >上傳檔案
                <span class="required">* (最多5張,影片請貼連結)</span></label
              >
              <input
                id="checkin-file"
                accept="image/*"
                nbInput
                multiple
                status="primary"
                type="file"
                (change)="onFileChange($event)"
              />
            </div>
            <div class="custom-input-group">
              <label for="checkin-content" class="label"
                >今天做了什麼 <span class="required">*</span></label
              >
              <textarea
                id="checkin-content"
                nbInput
                fullWidth
                placeholder="今天做了什麼"
                formControlName="message"
              ></textarea>
            </div>
            <div class="custom-input-group">
              <label for="checkin-url" class="label"
                >分享連結(如果有的話)</label
              >
              <input
                id="checkin-url"
                formControlName="url"
                type="text"
                nbInput
                fullWidth
                placeholder="分享連結(如果有的話)"
              />
            </div>
            <div class="custom-input-group">
              <label class="label" for="">今天心情如何</label>
              <nb-button-group>
                <button
                  nbButton
                  *ngFor="let emoji of emojiList"
                  (click)="setEmoji(emoji)"
                >
                  {{ emoji }}
                </button>
              </nb-button-group>
            </div>
          </nb-card-body>
          <nb-card-footer>
              <button
                nbButton
                status="primary"
                [disabled]="checkinForm.invalid"
                (click)="checkin()"
              >
                打卡
              </button>
          </nb-card-footer>
        </nb-card>
      </ng-container>
    </div>
  </div>
</div>
基本上的原則就是, 有人造輪子就絕對不自己造輪子 ,能不自己做就不自己做,將安裝的套件淋漓盡致地套用。
排版的部分就使用 bootstrap 的格線系統,像是 container 、 row 、 col 等 class,將版面排好。
而元件的部分,就使用 nebular 所以提供的各式各樣元件,只要是 nb-* 開頭的,都是nebular提供的。像是卡片元件 nb-card 、讀取元件 nbSpinner 、按鈕元件 nbButton、輸入框元件 nbInput
另外表單使用 angular 內建的 reactiveForm 來控制,所以可以看到 formGroup、 formControl等綁定表單元件的屬性,另外在打卡的按鈕,使用diable的條件,當表單內容條件沒有滿足的時候,將會將按鈕disable,不讓使用者點
<button nbButton status="primary" [disabled]="checkinForm.invalid" (click)="checkin()">
    打卡
</button>
樣式基本上套件都寫好了,就只有針對自己需要的地方,做個小小的微調而已
.custom-input-group {
  margin-bottom: 1rem;
}

.label {
  margin-bottom: 0.75rem;
  display: block;
}

.checkin-checkbox {
  margin-left: 10px;
}

.required {
  color: #de1e18;
}
import { Component, OnInit } from '@angular/core';
import { FormBuilder, FormGroup, Validators } from '@angular/forms';
import { NbToastrService } from '@nebular/theme';
import { CheckinService } from '../../../services/checkin.service';
import { emojiList } from '../../../data/emoji';
import { UserService } from '../../../services/user.service';

@Component({
  selector: 'challenge90days-checkin',
  templateUrl: './checkin.component.html',
  styleUrls: ['./checkin.component.scss'],
})
export class CheckinComponent implements OnInit {
  userInfo$ = this.userService.userInfo$;
  emojiList = emojiList;
  checkinForm: FormGroup;
  isLoading = false;
  constructor(
    private fb: FormBuilder,
    private checkinService: CheckinService,
    private toastrService: NbToastrService,
    private userService: UserService,
  ) {}

  ngOnInit(): void {
    this.initForm();
  }

  initForm(): void {
    this.checkinForm = this.fb.group({
      user: [''],
      message: ['', Validators.required],
      url: [''],
      imgFile: [null, Validators.required],
      emoji: [''],
      isCheckinTomorrow: [false],
    });
  }

	// 驗證選擇的檔案
  onFileChange(event): void {
    if (event?.target?.files?.length > 5) {
      this.toastrService.danger('錯誤', '圖片超過5張,請重新選擇');
      const input = document.getElementById('checkin-file') as HTMLInputElement;
      input.value = '';
      return;
    }
    if (event.target.files && event.target.files.length) {
      this.checkinForm.get('imgFile').patchValue( event.target.files);
    }
  }

  checkin(): void {
    this.toastrService.warning('上傳中', '請等待圖片上傳完成,請勿關閉視窗');
    this.isLoading = true;
    this.checkinService.addCheckin(this.checkinForm.value).subscribe((e) => {
      this.toastrService.success('成功', '恭喜,又完成一天囉');
      this.isLoading = false;
      this.resetFrom();
    });
  }

  setEmoji(emoji: string): void {
    this.checkinForm.get('emoji').patchValue(emoji);
  }

  resetFrom() {
    this.initForm();
    const input = document.getElementById('checkin-file') as HTMLInputElement;
    input.value = '';
  }
}
基本上最重要的就是如何建立 響應式的表單
initForm(): void {
    this.checkinForm = this.fb.group({
      user: [''],
      message: ['', Validators.required],
      url: [''],
      imgFile: [null, Validators.required],
      emoji: [''],
    });
  }
建立表單的欄位,並且設定初始值,如果是必填的欄位,加上 Validators.required 讓 reactive form 自動去驗證。建立完表單之後,就可以綁定到頁面上
再來就是頁面送出資料的時候
checkin(): void {
    this.toastrService.warning('上傳中', '請等待圖片上傳完成,請勿關閉視窗');
    this.isLoading = true;
    this.checkinService.addCheckin(this.checkinForm.value).subscribe((e) => {
      this.toastrService.success('成功', '恭喜,又完成一天囉');
      this.isLoading = false;
      this.resetFrom();
    });
  }
因為資料送出去就會變成非同步的動作,所以要顯示loading的畫面,並且給使用者回饋,現在正在做什麼,請稍等一下,讓使用者不會焦慮,不知道是壞掉了還是沒有按到。
接下來將表單的資料送到服務 checkinService,給服務去處理核心的邏輯,這個就留到下一篇再解釋。
當成功送出之後,告訴使用者成功了,並且將表單重置。
好了,這樣就完成頁面的設計囉
