在開始進入複雜的內容之前,我想先帶大家認識幾個會大量出現在每一個測試程式碼裡的核心語法,這些語法如果不了解的話可能就沒辦法看懂之後的測試程式碼,所以我們趕快開始吧!
這些核心語法分別由 Jest 和 Vue Test Utils 所提供的:
test 為測試的最小單位,就是像是變數的宣告一樣,要攥寫每一筆測試時都需要使用 test 宣告。
it 為 test 的別名,所以兩者其實是一樣的。
其中的三個參數分別為:
name 測試名稱。fn 測試內容的函式。timeout (optional) 指定測試中止前等待的時間,單位為毫秒。const number = 2
test('test: is 2', () => {
expect(number).toBe(2)
})
it('it: is 2', () => {
expect(number).toBe(2)
})

攥寫每一筆測試時都會使用 expect(value) 和匹配器 (matcher) 來斷言某個值,expect (value) 的參數 value 會是程式碼產生的值,而匹配器 (matcher) 的任何參數都應該是正確的值,如此一來才能判斷我們的程式碼是否如斷言的一樣。
下面這段測試程式中 toBe 是一個匹配器,而事實上還有許多不同功能的匹配器,不過我們等到日後用到時再向大家介紹。
const number = 2

test('test: is 2', () => {
  expect(number).toBe(2)
})
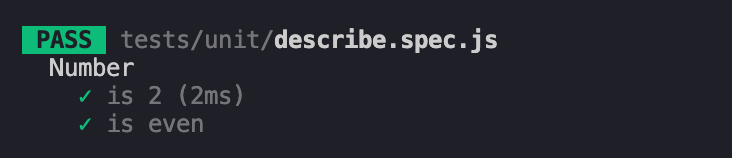
describe 是用來將一至多組有相關的測試組合在一起的區塊。例如,Number 這組測試有兩個測試案例。
const number = 2

describe('Number', () => {
  test('is 2', () => {
    expect(number).toBe(2)
  })

  test('is even', () => {
    expect(number % 2).toBe(0)
  })
})
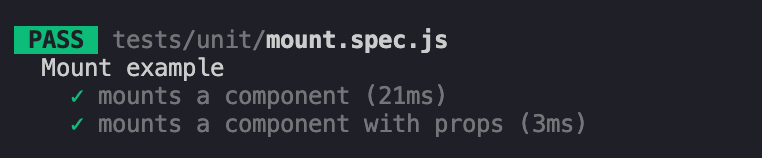
要為我們寫好的元件進行測試,就需要透過 mount() 產生一個已經掛載 (mounted) 和渲染完的元件(Wrapper),並對其進行操作和斷言。
mount 的第一個參數是欲被測試的元件,第二個參數是可以用來定義元件的狀態 (state) 配置,例如 props, data, attrs 等等。
import { mount } from '@vue/test-utils'

const Component = {
  template: '<div>Hello world</div>'
}

const ComponentWithProps = {
  template: '<div>{{ msg }}</div>',
  props: {
    msg: {
      type: String,
      required: true
    }
  }
}

describe('Mount example', () => {
  test('mounts a component', () => {
    const wrapper = mount(Component)

    expect(wrapper.html()).toContain('Hello world')
  })

  test('mounts a component with props', () => {
    const wrapper = mount(ComponentWithProps, {
      props: {
        msg: 'Hello world'
      }
    })

    expect(wrapper.html()).toContain('Hello world')
  })
})
語法說明:
html() - 回傳元件的 HTML。
toContain() - 檢查一個字符串是否是另一個字符串的子字符串,也可檢查一個項目是否在 Array 中。
shallowMount 和 mount 非常相似,差別在於透過 shallowMount 產生的 wrapper 元件,如果它有子元件的話,子元件不會被解析渲染,也不會觸發子元件內的程式碼,而是會用 stub 來替代。
什麼意思呢?我們來看一下下面的範例程式碼。宣告了兩個元件 (Parent 和 Child) 並透過兩種渲染方式來比較一下兩者的差異。
import { mount, shallowMount } from '@vue/test-utils'

const Child = {
  template: "<div>Child component</div>"
}

const Parent = {
  template: "<div><child /></div>",
  components: {
    Child
  }
}

describe('shallowMount example', () => {
  test('test', () => {
    const childShallowWrapper = shallowMount(Child)
    const childMountWrapper = mount(Child)
    console.log(childShallowWrapper.html())
    console.log(childMountWrapper.html())

    const parentShallowWrapper = shallowMount(Parent)
    const parentMountWrapper = mount(Parent)
    console.log(parentShallowWrapper.html())
    console.log(parentMountWrapper.html())
  })
})
執行結果
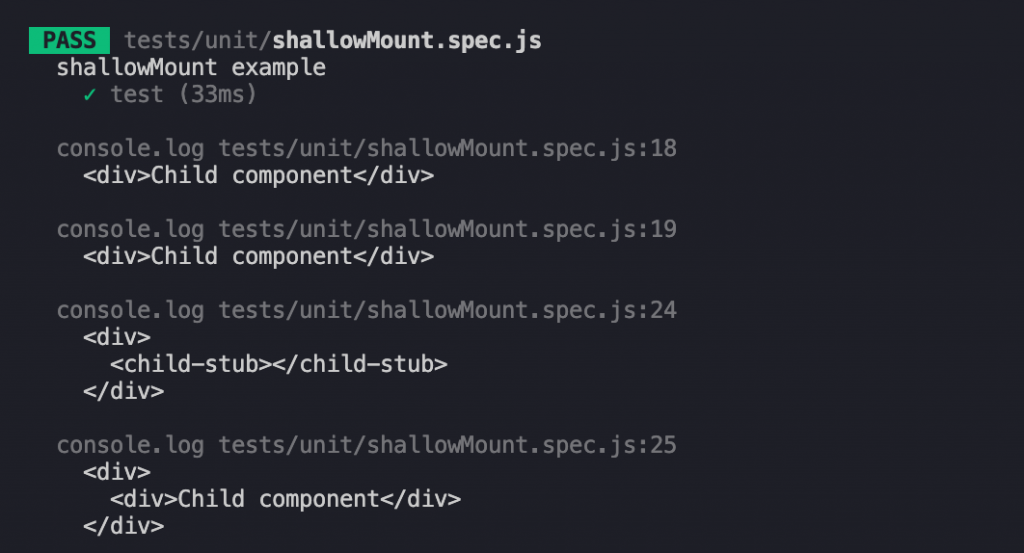
可以發現如果元件內沒有子元件的話,使用 mount 和 shallowMount 是沒有差別的,但如果元件內有子元件的話,使用 shallowMount 的方式的話,其子元件會被 stub 給替換。
而使用 shallowMount 的情況會像是,我們只想關注在父層元件的測試內容,不希望這個測試被子元件所影響,而降低測試的效率,又或者子元件可能也有自己的測試內容,為了避免重複渲染導致的測試時間拉長。
今天的分享就到這邊,如果大家對我分享的內容有興趣歡迎點擊追蹤 & 訂閱系列文章,如果對內容有任何疑問,或是文章內容有錯誤,都非常歡迎留言討論或指教的!
明天要來分享的是 Vue3 單元測試 (Unit Testing) 主題的第三篇 Conditional rendering & Elements visibility ,那我們明天見!