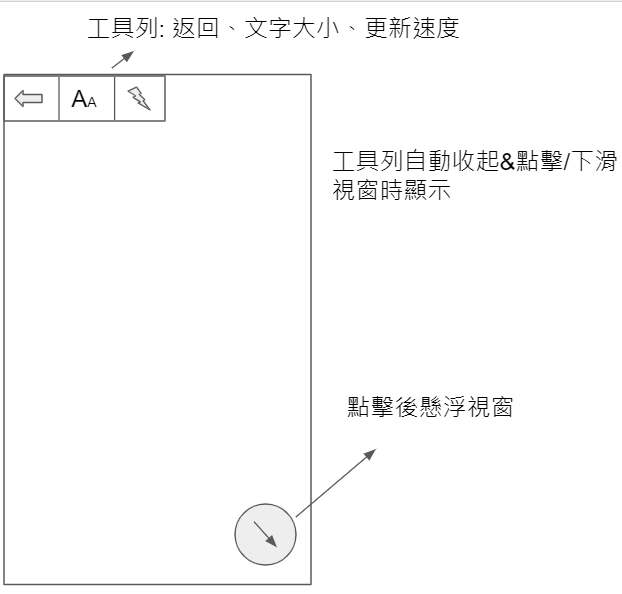
在Day02的時候有先粗略擺放預覽頁的幾個按鈕:
今天沒什麼內容,就把這些按鈕放一放,然後不放修改字型大小的按扭了,這部分之後另外處理。
<?xml version="1.0" encoding="utf-8"?>
<androidx.constraintlayout.widget.ConstraintLayout xmlns:android="http://schemas.android.com/apk/res/android"
    xmlns:app="http://schemas.android.com/apk/res-auto"
    xmlns:tools="http://schemas.android.com/tools"
    android:layout_width="match_parent"
    android:layout_height="match_parent"
    android:background="@color/transparent"
    tools:context=".PreviewFragment">

    <androidx.recyclerview.widget.RecyclerView
        android:id="@+id/recyclerView"
        android:layout_width="0dp"
        android:layout_height="0dp"
        android:background="@color/transparent"
        android:padding="@dimen/one_grid_unit"
        app:layout_constraintBottom_toBottomOf="parent"
        app:layout_constraintEnd_toEndOf="parent"
        app:layout_constraintStart_toStartOf="parent"
        app:layout_constraintTop_toTopOf="parent" />

    <Button
        android:id="@+id/resumeUpdate"
        android:layout_width="wrap_content"
        android:layout_height="wrap_content"
        android:layout_marginBottom="@dimen/one_grid_unit"
        android:text="自動更新"
        android:translationY="200dp"
        app:layout_constraintBottom_toBottomOf="parent"
        app:layout_constraintEnd_toEndOf="parent"
        app:layout_constraintStart_toStartOf="parent" />

    <com.google.android.material.floatingactionbutton.FloatingActionButton
        android:id="@+id/popup"
        android:layout_width="wrap_content"
        android:layout_height="wrap_content"
        android:layout_marginEnd="@dimen/two_grid_unit"
        android:layout_marginBottom="@dimen/two_grid_unit"
        android:backgroundTint="@color/text_normal"
        android:src="@drawable/ic_round_picture_in_picture_alt_24"
        app:borderWidth="0dp"
        app:fabSize="normal"
        app:layout_constraintBottom_toBottomOf="parent"
        app:layout_constraintEnd_toEndOf="parent" />

    <ImageView
        android:id="@+id/back"
        android:layout_width="wrap_content"
        android:layout_height="wrap_content"
        android:layout_marginStart="@dimen/one_grid_unit"
        android:layout_marginTop="@dimen/one_grid_unit"
        android:background="@color/text_normal"
        android:clickable="true"
        android:elevation="@dimen/half_grid_unit"
        android:focusable="true"
        android:foreground="?android:attr/selectableItemBackground"
        android:padding="@dimen/one_grid_unit"
        android:src="@drawable/ic_baseline_arrow_back_24"
        app:layout_constraintStart_toStartOf="parent"
        app:layout_constraintTop_toTopOf="parent" />

    <View
        android:id="@+id/divider"
        android:layout_width="1dp"
        android:layout_height="0dp"
        android:background="@color/text_normal"
        app:layout_constraintBottom_toBottomOf="@id/back"
        app:layout_constraintStart_toEndOf="@id/back"
        app:layout_constraintTop_toTopOf="@id/back" />

    <ImageView
        android:id="@+id/changeUpdateInterval"
        android:layout_width="wrap_content"
        android:layout_height="wrap_content"
        android:layout_marginTop="@dimen/one_grid_unit"
        android:background="@color/text_normal"
        android:clickable="true"
        android:elevation="@dimen/half_grid_unit"
        android:focusable="true"
        android:foreground="?android:attr/selectableItemBackground"
        android:padding="@dimen/one_grid_unit"
        android:src="@drawable/ic_baseline_timer_24"
        app:layout_constraintStart_toEndOf="@id/divider"
        app:layout_constraintTop_toTopOf="parent" />

</androidx.constraintlayout.widget.ConstraintLayout>
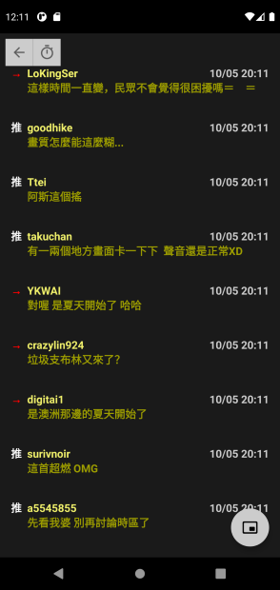
實際畫面
接著新來處理左上兩按鈕的功能,右下角popup按鈕預計會放在明天的內容中。
返回上一頁,基本上就是呼叫Activity的onBackPressed,讓Day16中的OnBackPressedCallback來處理退出頁面。
binding.back.setOnClickListener { requireActivity().onBackPressed() }
這個按鈕是用來修改更新推文的時間間隔,做法上就是跳出一個含有EditText的AlertDialog,並將使用者輸入的數值寫進SharedPreferences中。
class PreviewFragment : Fragment() {
    private lateinit var preferences: SharedPreferences
    private var updateInterval: Long = 2500

    override fun onViewCreated(view: View, savedInstanceState: Bundle?) {
        super.onViewCreated(view, savedInstanceState)
        preferences = requireContext().getSharedPreferences(PREF_NAME, Context.MODE_PRIVATE)
        updateInterval = preferences.getLong(PREF_FIELD_UPDATE_INTERVAL, 2500L)
        // ...
    }
}
updateInterval用來取代Day20中updateHandler.postDelayed的delayMillis。
這部份分兩區塊來看,要建立能讓使用者輸入內容的EditText,首先要創建EditText。
val input = EditText(requireContext())
input.inputType = InputType.TYPE_CLASS_NUMBER or InputType.TYPE_NUMBER_FLAG_DECIMAL
input.setRawInputType(Configuration.KEYBOARD_12KEY)
input.setText(String.format("%.1f", updateInterval / 1000f))

val params = FrameLayout.LayoutParams(
    FrameLayout.LayoutParams.MATCH_PARENT,
    FrameLayout.LayoutParams.MATCH_PARENT
)
params.marginStart = resources.getDimensionPixelSize(R.dimen.two_and_half_grid_unit)
params.marginEnd = resources.getDimensionPixelSize(R.dimen.two_and_half_grid_unit)
input.layoutParams = params

val inputContainer = FrameLayout(requireContext())
inputContainer.addView(input)
這邊為了設Margin,因此多建了一個FrameLayout來放EditText。建立完輸入元件後就是建立AlertDialog並將此元件放入:
AlertDialog.Builder(requireContext())
    .setTitle("推文更新間隔(s):")
    .setView(inputContainer)
    .setPositiveButton(android.R.string.ok) { _, _ ->
        // Load value and write into SharedPreferences.
    }.show()
顯示AlertDialog畫面
即上方程式碼的註解部份:
try {
    val newInterval = (input.text.toString().toFloat() * 1000).toLong()
    if (newInterval != updateInterval && newInterval >= 1500 && newInterval <= 5000) {
        Log.d(mTag, "new updateInterval: $newInterval")
        updateInterval = newInterval
        preferences.edit()
            .putLong(PREF_FIELD_UPDATE_INTERVAL, updateInterval).apply()
    }
} catch (ignore: Exception) {
}
使用try/catch包起來避免EditText內有意外的輸入,接著再另外判斷要不要更改updateInterval和寫入SharedPreferences就好。

