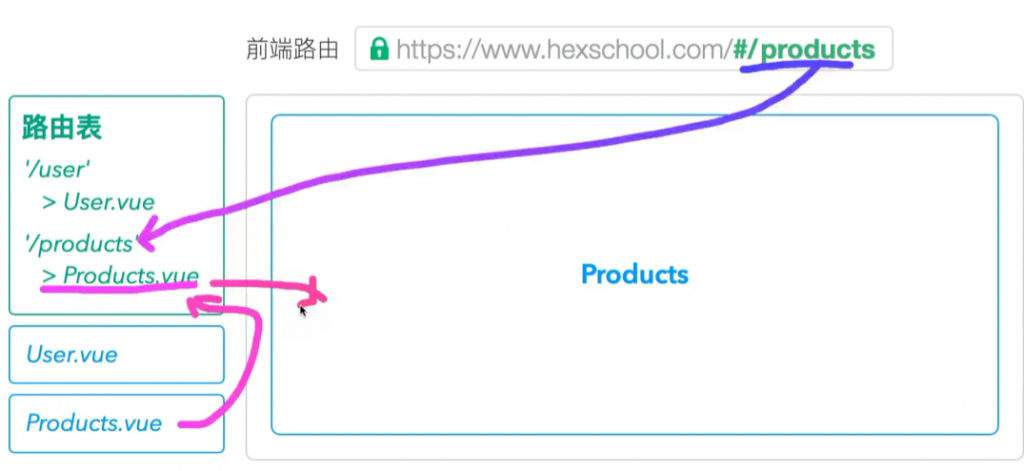
Router負責分配工作
後端路由
全部的頁面傳遞(同大專)
前端路由 #模擬路徑
可部分渲染
1.引入Vue Router
2.定義元件
3.定義路由表
4.加入對應連結(給使用者可以切換頁面)
Vue Router 相關資源
官方文件:https://next.router.vuejs.org/
中文版官方文件:https://next.router.vuejs.org/zh/index.html
注意:Vue 3 搭配的 Router 版本在網址中會有 "next" 的字樣
如:router.vuejs.org 則是 Vue 2 版本的路由
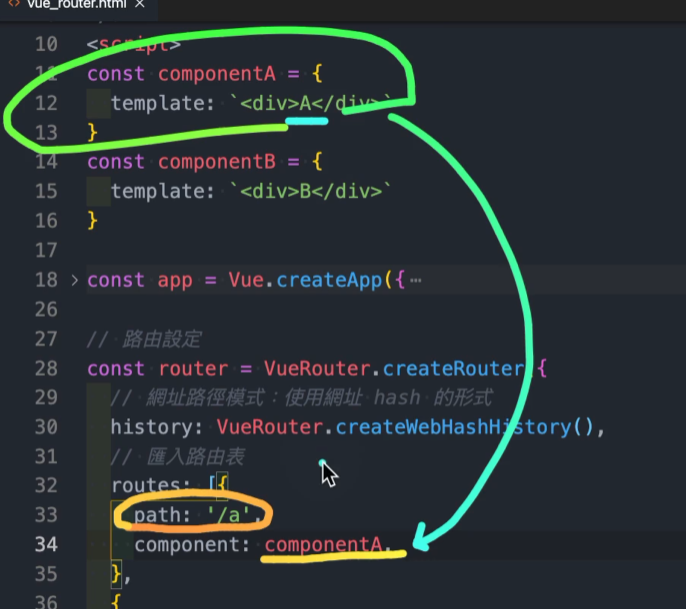
1.引入Vue Router
<script src="https://unpkg.com/vue-router@4.0.5/dist/vue-router.global.js"></script>
            const router = VueRouter.createRouter({
              // 網址路徑模式:使用網址 hash(#/) 的形式
              // http://127.0.0.1:5501/router/vue-router.html#/
              history: VueRouter.createWebHashHistory(),
              // 匯入路由表
              routes: [],
            });
            app.use(router);
            app.mount("#app");
2.定義元件
            const componentA = {
              template: `<div>AAAAAAAAAAAA</div>`,
            };

            const componentB = {
              template: `<div>BBBBBBBBBBBB</div>`,
            };
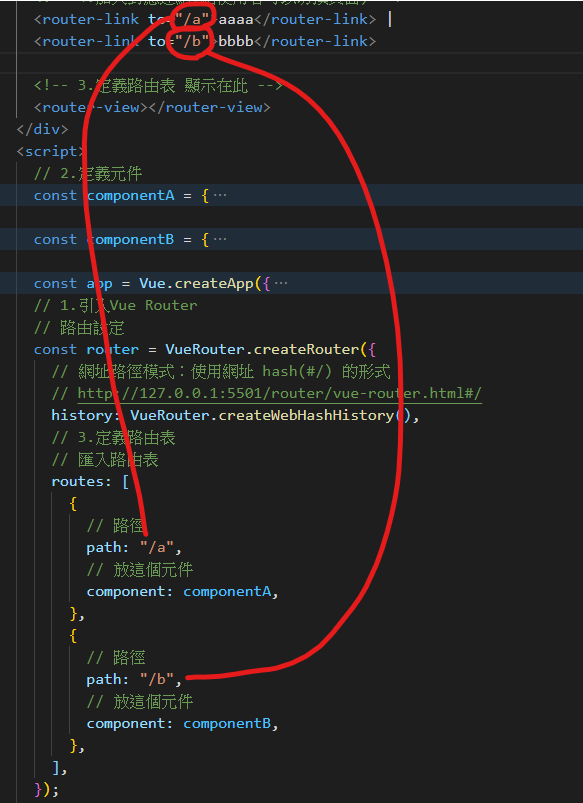
3.定義路由表
             const router = VueRouter.createRouter({
              // 網址路徑模式:使用網址 hash(#/) 的形式
              // http://127.0.0.1:5501/router/vue-router.html#/
              history: VueRouter.createWebHashHistory(),

              // 匯入路由表
              routes: [
                {
                  // 路徑
                  path: "/a",
                  // 放這個元件
                  component: componentA,
                },
                {
                  // 路徑
                  path: "/b",
                  // 放這個元件
                  component: componentB,
                },
              ],
            });
並加入顯示標籤,固定寫法
<router-view></router-view>
4.加入對應連結(給使用者可以切換頁面)
            <router-link to="/a"></router-link>
            <router-link to="/b"></router-link>
(1)建立專案
vue create vue-router(專案名稱)
會多一個問題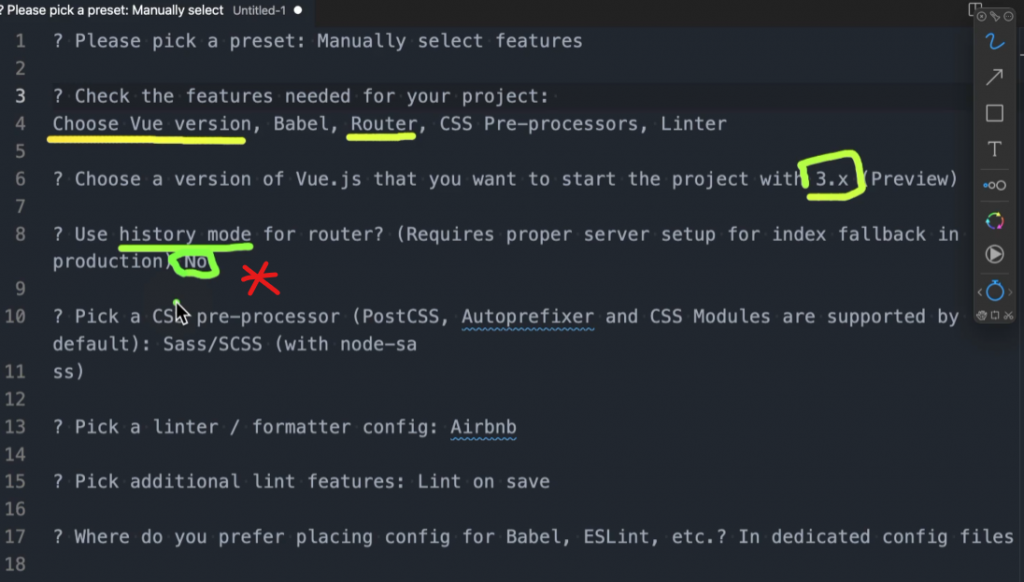
? Please pick a preset: Manually select features
? Check the features needed for your project: Choose Vue version, Babel, Router, CSS Pre-processors, Linter
? Choose a version of Vue.js that you want to start the project with 3.x
? Use history mode for router? (Requires proper server setup for index fallback in production) No
? Pick a CSS pre-processor (PostCSS, Autoprefixer and CSS Modules are supported by default): Sass/SCSS (with node-sass)
? Pick a linter / formatter config: Prettier
? Pick additional lint features: Lint on save
? Where do you prefer placing config for Babel, ESLint, etc.? In dedicated config files
? Save this as a preset for future projects? (y/N) N
**與HTML版本的差異
伺服器執行方式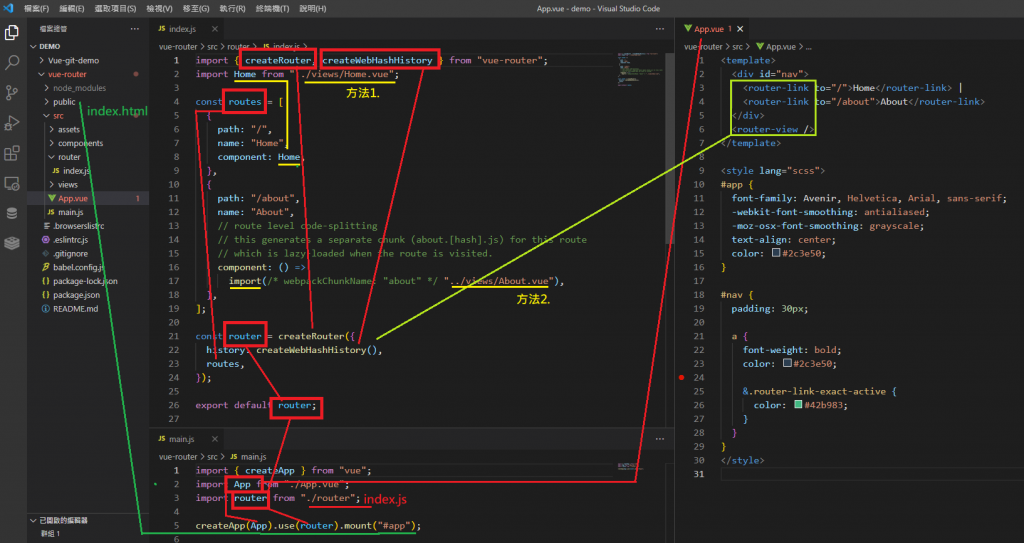
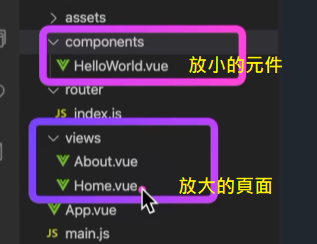
(2)新增頁面元件,放入App.vue
技巧:先製作元件再Router
2-1. 在View下新增頁面元件 NewPage.vue (定義元件)
<template>
    <div>
        我是新增頁面
    </div>
</template>
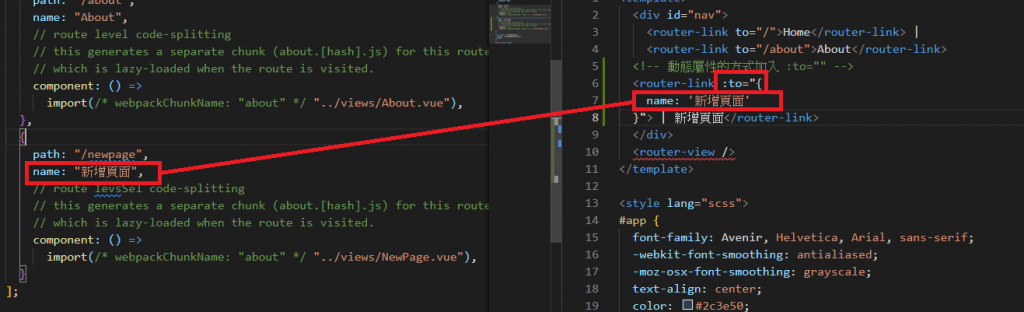
2-2. 把頁面跟Router綁一起 (定義路由表)
Router > index.js
const routes = [
  {
    path: "/newpage",
    name: "新增頁面",
    // route level code-splitting
    // this generates a separate chunk (about.[hash].js) for this route
    // which is lazy-loaded when the route is visited.
    component: () =>
      import(/* webpackChunkName: "about" */ "../views/NewPage.vue"),
  }
];
2-3. 加入對應連結(給使用者可以切換頁面)
App.vue
  <!-- 動態屬性的方式加入 :to="" -->
  <router-link :to="{
    name: '新增頁面'
  }"> | 新增頁面</router-link>
  </div>
  <router-view />
(3)專案放入BS樣式
3-1. public > index.html CDN BS 的 CSS
https://getbootstrap.com/
3-2 App.vue增加BS Navbar樣式
<nav class="navbar navbar-expand-lg navbar-light bg-light">
  <div class="container-fluid">
    <a class="navbar-brand" href="#">Navbar</a>
    <button class="navbar-toggler" type="button" data-bs-toggle="collapse" data-bs-target="#navbarNav" aria-controls="navbarNav" aria-expanded="false" aria-label="Toggle navigation">
      <span class="navbar-toggler-icon"></span>
    </button>
    <div class="collapse navbar-collapse" id="navbarNav">
      <ul class="navbar-nav">
        <li class="nav-item">
          <a class="nav-link active" aria-current="page" href="#">Home</a>
        </li>
        <li class="nav-item">
          <a class="nav-link" href="#">Features</a>
        </li>
        <li class="nav-item">
          <a class="nav-link" href="#">Pricing</a>
        </li>
        <li class="nav-item">
          <a class="nav-link disabled">Disabled</a>
        </li>
      </ul>
    </div>
  </div>
</nav>
3-2 把router-link加到BS Navbar樣式
<router-link class="nav-link" to="/">Home</router-link>
3-3增加 BS container 樣式 到頁面下方
<div class="container">
<router-view></router-view>
</div>

目標:將componentA、componentB放到NewPage.vue下
(1)在View下新增頁面元件 componentA、componentB (定義元件)
<template>
    <div>
        元件AAAAAAAAAAAA
    </div>
</template>

<template>
    <div>
        元件BBBBBBBBBBBB
    </div>
</template>
2-2. 把子項目跟Router綁一起 (定義路由表)
Router > index.js
    path: "/newpage",
    name: "新增頁面",
    // route levsSel code-splitting
    // this generates a separate chunk (about.[hash].js) for this route
    // which is lazy-loaded when the route is visited.
    component: () =>
      import(/* webpackChunkName: "about" */ "../views/NewPage.vue"),
      //放入子項目
      children:[
        // 同上方結構
        // 子路徑無須 /********************************
        {
          path: "a",
        component: () =>
        import( "../views/componentA.vue"),

        },
        {
          path: "b",
        component: () =>
        import( "../views/componentB.vue"),

        },
      ],
指定渲染的位置
view > NewPage.vue
<template>
<div>
    <div>我是新增頁面</div>
      <div class="row">
        <div class="col-4">選單</div>
        <div class="col-8">
            <!-- 渲染 -->
            <router-view></router-view>
        </div>
      </div>
</div>
</template>
2-3. 加入對應連結(給使用者可以切換頁面)
view > NewPage.vue
使用BS樣式
https://getbootstrap.com/docs/4.6/components/list-group/#links-and-buttons
router-link + to="哪裡"
  <router-link to="/newpage/a"
    href="#" class="list-group-item list-group-item-action" aria-current="true">
    元件A
  </router-link>

    <router-link to="/newpage/b"
       href="#" class="list-group-item list-group-item-action" aria-current="true">
    元件B
  </router-link>
Router關係圖
視圖
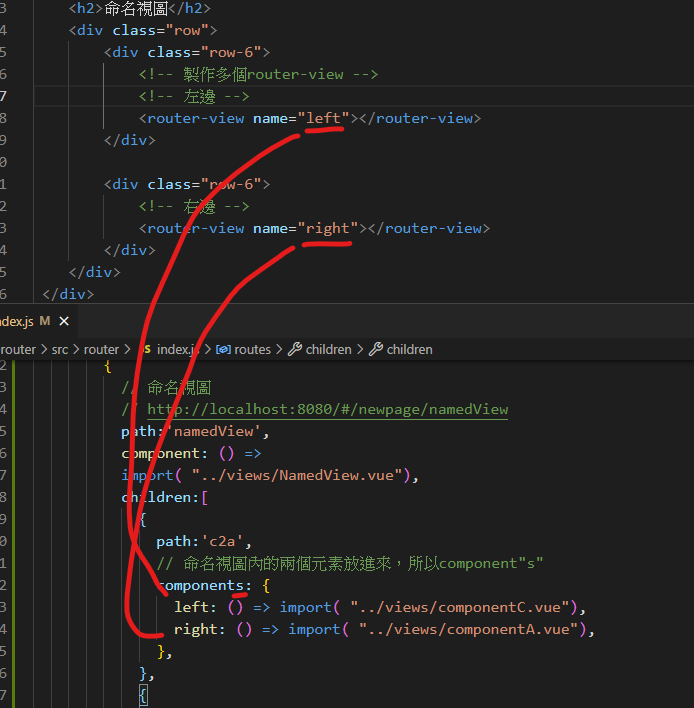
(1)建立包住畫面元件NamedView.vue (定義元件)
內製作多個router-view
view > NamedView.vue
<template>
<div>
    <h2>命名視圖</h2>
    <div class="row">
        <div class="row-6">
            <!-- 左邊 -->
            <router-view name="left"></router-view>
        </div>

        <div class="row-6">
            <!-- 右邊 -->
            <router-view name="right"></router-view>
        </div>
    </div>
 </div>
</template>
(2)與Router綁一起 (定義路由表)
Router > index.js
         {
          // 命名視圖
          // http://localhost:8080/#/newpage/namedView
          path:'namedView',
          component: () =>
          import( "../views/NamedView.vue"),
          children:[
            {
              path:'c2a',
              // 命名視圖內的兩個元素放進來,所以component"s"
              components: {
                left: () => import( "../views/componentC.vue"),
                right: () => import( "../views/componentA.vue"),
              },
            },
            {
              path:'a2b',
              // 命名視圖內的兩個元素放進來,所以component"s"
              components: {
                left: () => import( "../views/componentA.vue"),
                right: () => import( "../views/componentB.vue"),
              },
            },
          ]
        }
(3)加入對應連結(給使用者可以切換頁面)
view > NewPage.vue
      <router-link to="/newpage/namedView"
      href="#" class="list-group-item list-group-item-action" aria-current="true">
               命名視圖
             </router-link>
      <router-link to="/newpage/namedView/c2a"
      href="#" class="list-group-item list-group-item-action" aria-current="true">
               命名視圖c2a
             </router-link>
      <router-link to="/newpage/namedView/a2b"
      href="#" class="list-group-item list-group-item-action" aria-current="true">
               命名視圖a2b
             </router-link>
使用時機:各產品頁面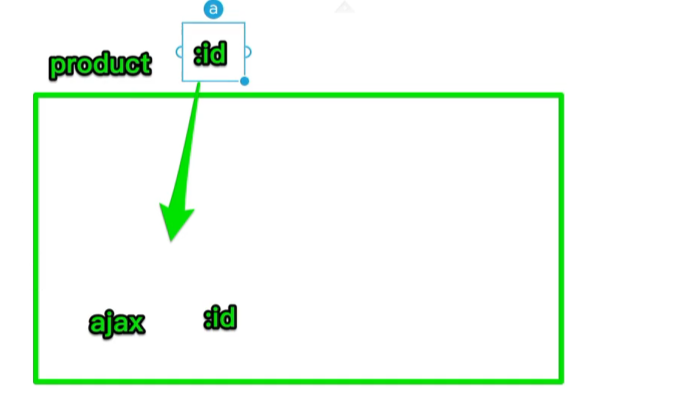
目標:用ajax(axios套件)抓API的值,將該值放入網址列,並顯示相對應資料
(1)安裝axios套件
npm i axios
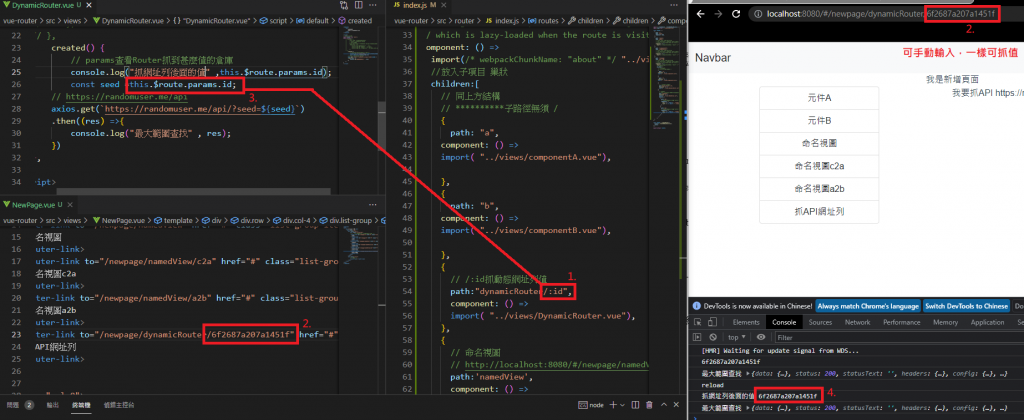
(2)建立畫面元件 DynamicRouter.vue (定義元件)
製作抓API的元件
API:https://randomuser.me/
// 匯入axios套件
  import axios from 'axios';
  export default {
     created() {
         const seed ="6f2687a207a1451f"
         // https://randomuser.me/api
         // 固定網址列
         axios.get(`https://randomuser.me/api/?seed=${seed}`)
         .then((res) =>{
             console.log("最大範圍查找" , res);
             console.log("下一層data" , res.data);
             console.log("抓類似id的值:" , res.data.info.seed);
         })
     },
(2)與Router綁一起 (定義路由表)
Router > index.js
此時想要抓動態網址列
        {
          // /:id抓動態網址列值
          path:"dynamicRouter/:id",
          component: () =>
          import( "../views/DynamicRouter.vue"),
        },
(3)加入對應連結(給使用者可以切換頁面)
view > NewPage.vue
          <router-link to="/newpage/dynamicRouter/6f2687a207a1451f"
          href="#" class="list-group-item list-group-item-action" aria-current="true">
               抓API網址列
             </router-link>
(3)前述(2)是抓固定網址列,將其變更為以下
使用$route可以抓住網址列/:id後的值,並回傳
const seed =this.$route.params.id;
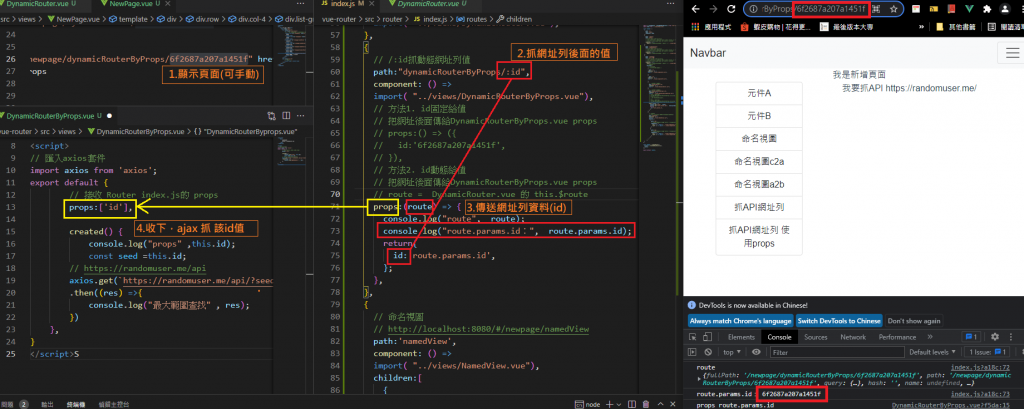
結論:動態id抓取方式
方法1.
Router > index.js
:id
須配合
View > DynamicRouter.vue
this.$route.params.id
所以手動輸入網址列也能抓到值,此處是為了方便直接設定router-link
方法2. 或是直接用props傳id值
路由方法:https://next.router.vuejs.org/zh/api/#router-方法
路由屬性:https://next.router.vuejs.org/zh/api/#routelocationnormalized
Vue執行下,路徑錯誤
(1)404告知製作 及
  {
    path:'/:pathMatch(.*)*',  //全部的母層及子層
    component: () =>
    import( "../views/NotFound.vue"),
  },
(2)重新導向
  {
    path:'/newPage/:pathMatch(.*)*',  //newPage下全部的母層及子層
    redirect:{
      name:'Home'
    }
  },
路由選項:https://next.router.vuejs.org/zh/api/#routeroptions
const router = createRouter({
  history: createWebHashHistory(),
  routes,

  // 路由選項:https://next.router.vuejs.org/zh/api/#routeroptions

  linkActiveClass: 'active', //active BS樣式 易於辨識用

  scrollBehavior(to, from, savedPosition) {
    // `to` 和 `from` 都是路由地址
    // `savedPosition` 滾輪的位置。
    console.log("to", to,"from", from,"savedPosition", savedPosition)
    if (to.fullPath.match('newpage')){
      return{
        top:0,
      }
    }
    return{
    }
  }
 rouoxo
