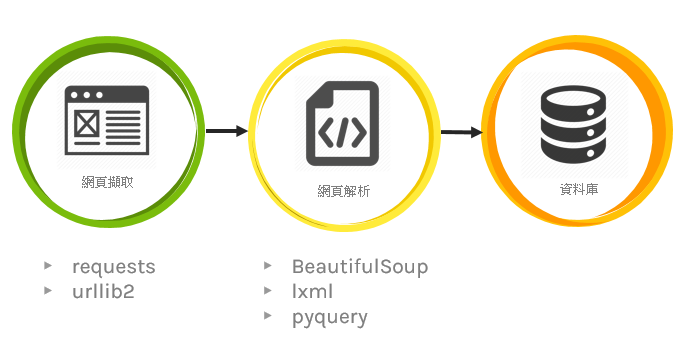
首先要先了解什麼是爬蟲:
網路爬蟲可理解成,可自動蒐集網頁上資訊的程式。本篇會介紹靜態與動態網頁的爬蟲作法,至於兩場的使用場合,理論上來說動態的相對比較不會有問題
本篇爬蟲皆使用python執行,所以執行前請先確認電腦有可執行python程式的環境,可參考以下連結
安裝python請點我
import psycopg2 # pip3 install psycopg2
import urllib.request # pip3 install requests
from bs4 import BeautifulSoup  # pip3 install psycopg2

HOST = "localhost"
PORT = 5432
USER = "liyanxian"
PASSWD = ''
DATABASE = "postgres"
try:
    conn = psycopg2.connect(host=HOST, port=PORT, user=USER,password=PASSWD,
                            database=DATABASE)
    curr = conn.cursor()
    print('開始連接資料庫')
except:
    print('資料庫連接失敗')
    raise

url = "http://www.smeacommercialdistrict.tw/location/street"
# 發一個request去這串網址 並且拿回結果
response = urllib.request.urlopen(url)
data = response.read()
text = data.decode('utf-8-sig')

# 這邊參數很多可以選擇 不過基本上都在做同一件事情 (不過現在一般都推薦lxml 因為效能好)
soup = BeautifulSoup(text, "lxml")  # parse  (要先pip install lxml 不然會噴錯)

html_div = soup.find('div',class_="col-12")  #找到我們需要蒐集資料的外框 (find只會找第一個)

# 去外框裡面找到每一個(find_all)城市名稱
city_name = html_div.find_all(
    'h3', attrs={'class': 'county_title'})

#去外框裡面找到每一個(find_all)表格
table_content = html_div.find_all(
    'table', attrs={'class': 'table table-striped table-bordered table-sm contactus_table'})

# range(len(xxx)) vs enumerate(xxx) 前者不可傳val 後者可傳
for index in range(len(city_name)):
    # 找出表格裡所有的tr (select跟find_all功能其實一樣 只是語法不太一樣)
    table_tbody_tr = table_content[index].select(
        'tbody > tr')
    # 這邊在做資料庫的Insert
    for index2, val2 in enumerate(table_tbody_tr):
        curr.execute("""INSERT IGNORE INTO `bussinessdistrict`
			(`id`, `city`, `businessname`,`regio`, `businessarea`)
			 VALUES (%s,%s,%s,%s,%s)""",
                     (table_tbody_tr[index2].contents[1].contents[0], city_name[index].contents[0], table_tbody_tr[index2].contents[3].contents[0], table_tbody_tr[index2].contents[5].contents[0], table_tbody_tr[index2].contents[7].contents[0]))
        conn.commit()  # 確認送出(必要)
curr.close()
conn.close()
因為在呼叫動態網頁時,無法取得該網頁與呼叫後端的“資料”。此外,也有SPA網頁只有讀到空白html的可能性(例如:中油網站)
在動態爬蟲我們需要chrome的driver來幫我們執行瀏覽器可至以下連結下載
https://chromedriver.chromium.org/downloads
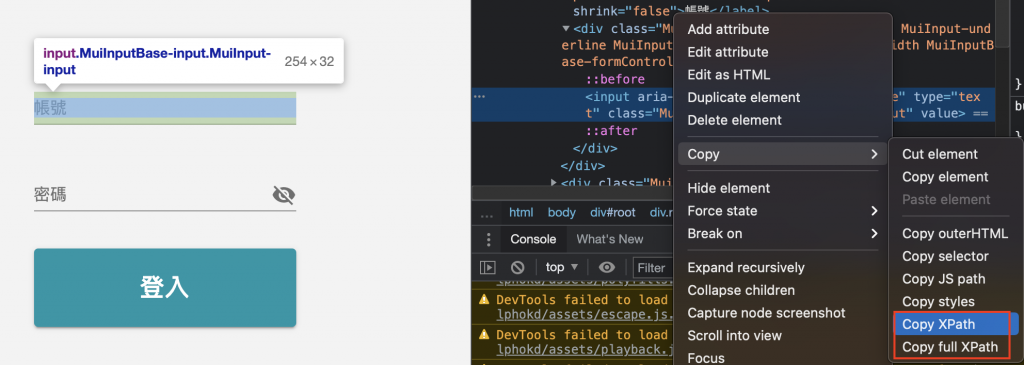
xPath是一種用來尋找XML文件中某個節點(node)位置的查詢語。
實作:以我司的登入系統(NIS)為例
XPath vs. full XPath
"//*[@id="root"]/div[3]/div/form/div[2]/div/input" vs. "/html/body/div/div[3]/div/form/div[2]/div/input"
Step.1:抓取NIS的帳號輸入方塊xpath://*[@id="root"]/div[3]/div/form/div[2]/div/input
Step.2 定位帳號輸入框
Step.3 傳入字串
Step.4:抓取NIS的密碼輸入方塊xpath
Step.5 定位密碼框
Step.6 傳入字串
Step.7:抓取NIS的登入方塊xpath
Step.8 定位登入按鈕
Step.9 點擊登入按鈕
輸入完帳號密碼後 就可以透過button點擊登入按鈕
因諸多考量,不公開底下python語言中的url及帳號密碼
from selenium import webdriver


options = webdriver.ChromeOptions()
options.add_argument('--headless')  # 背景執行設定
driver = webdriver.Chrome(executable_path='./chromedriver' ) # chromedriver的路徑(檔名要記得確認)
# driver = webdriver.Chrome(executable_path='./chromedriver', chrome_options=options)

url = 'jubo_url' # 進入點的網址(換成你想登入的網址)
driver.get(url)
driver.implicitly_wait(10)  # 如果在規定時間內網頁加載完成,則執行下一步,否則一直等到時間終止

# 請使用正確的xpath
account = driver.find_element_by_xpath('/html/body/div/div[3]/div/form/div[2]/div/input')
account.send_keys("xxxxxxxxxxxx") # 輸入帳號

# 請使用正確的xpath
password =  driver.find_element_by_xpath('/html/body/div/div[3]/div/form/div[3]/div/input')
password.send_keys("xxxxxxxxxxxx") #輸入密碼
button = driver.find_element_by_xpath('/html/body/div/div[3]/div/form/button')
button.click()
爬蟲看起來很萬能可以長期抓取想要的資料,但面對常改版或出事的網頁時,爬蟲常會遇到程式"執行有誤"的問題發生,雖可透過發訊息告知使用者,不過收到訊息後大概表示又要修改爬蟲程式,實際上頻繁的改動也是相當耗神。
